
Tutorial
Click on thumbnailed images to enlarge
Open up a new file, any size you want. Write the text, mine looks like this:

Now click the magic wand tool ( ) and click the first letter. Then right-click the letter you just selected > stroke and fill. Make sure your settings are like this:

And click ok. Now you should have one letter with a colored border.
Next you click the border with the magic wand tool (not necessary if it's already selected), then right-click > stroke and fill. Uncheck stroke and check fill. Put your settings like this:
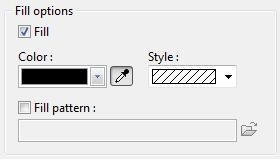
And click ok. Now your first letter should be all done and look something like this:

Now just do it for every letter and voilá, you're done! :---)
Now click the magic wand tool (
) and click the first letter. Then right-click the letter you just selected > stroke and fill. Make sure your settings are like this:And click ok. Now you should have one letter with a colored border.
Next you click the border with the magic wand tool (not necessary if it's already selected), then right-click > stroke and fill. Uncheck stroke and check fill. Put your settings like this:
And click ok. Now your first letter should be all done and look something like this:
Now just do it for every letter and voilá, you're done! :---)
Tutorial Comments
Showing latest 4 of 4 comments

I love this!
By tiarasandglitter on May 7, 2011 8:49 am

you forgot to tell people to invert before they go to the stroke and fill .
By LADiiSOULJA3 on Apr 22, 2009 1:47 am
i love photofiltre
By LADiiSOULJA3 on Apr 14, 2009 3:38 pm

Wow, Photofiltre really sucks compared to Photoshop, I'm glad I switched.
With photoshop, you can do this with just 3 clicks,
Nice tutorial tho.
By creole on Apr 6, 2009 12:57 am
Tutorial Details
| Author |
fiercest
|
| Submitted on | Apr 4, 2009 |
| Page views | 6,302 |
| Favorites | 23 |
| Comments | 4 |
| Reviewer |
A1Bassline
|
| Approved on | Apr 4, 2009 |