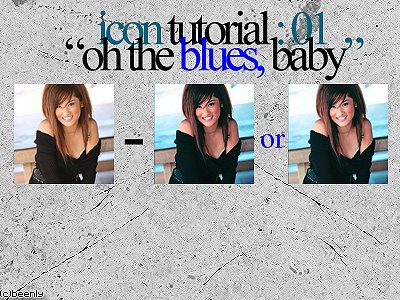
Tutorial
Click on thumbnailed images to enlarge
READ FIRST :
This tutorial was made by me. Redistributing is not allowed.
Not all pictures will have this effect. You are highly advised to mess with the settings to your liking, so you may get the effect you want.
-------------------------------------------
01. Open up your base! ( Sharpen if you want. )

02. Make a new SELECTIVE COLORING layer, and apply these settings.
(Adjust them to your liking if you have to . )


03. You should have something like this.

04. Make a new FILL layer and use the Paint Bucket Tool. Fill the new layer with #04637f and set the layer to OVERLAY. Set the layeropacity to 88%.
(Here's the color if you're too lazy to fill the layer. You can just copy image/paste if you wanted to.)

You should have the first effect!

OPTIONAL:
If you want the second effect of making the icon brighter, just duplicate your final icon and set the duplicated layer to SCREEN. Set the layer opacity to 24%.
You should have the second effect!

---------
Thank you for reading my first tutorial!
Here's a PSD if you're too lazy or you're confused. Be sure to replace my icon with your icon!
This tutorial was made by me. Redistributing is not allowed.
Not all pictures will have this effect. You are highly advised to mess with the settings to your liking, so you may get the effect you want.
-------------------------------------------
01. Open up your base! ( Sharpen if you want. )
02. Make a new SELECTIVE COLORING layer, and apply these settings.
(Adjust them to your liking if you have to . )
03. You should have something like this.
04. Make a new FILL layer and use the Paint Bucket Tool. Fill the new layer with #04637f and set the layer to OVERLAY. Set the layeropacity to 88%.
(Here's the color if you're too lazy to fill the layer. You can just copy image/paste if you wanted to.)
You should have the first effect!
OPTIONAL:
If you want the second effect of making the icon brighter, just duplicate your final icon and set the duplicated layer to SCREEN. Set the layer opacity to 24%.
You should have the second effect!
---------
Thank you for reading my first tutorial!
Here's a PSD if you're too lazy or you're confused. Be sure to replace my icon with your icon!
Tutorial Comments
Showing latest 6 of 6 comments

Sure you can. Just remember to sharpen your picture and then do the coloring.
By creole on May 4, 2010 11:17 am

Can you do this one but with a normal sized picture please?
By Juli13 on Mar 18, 2010 4:09 pm
It didn't work for me =[
By Juli13 on Aug 11, 2009 9:14 pm

Lovely colouring.
By aliiicimo on Apr 14, 2009 3:18 pm

oh, betty nice been ^^
By vietgurl-727 on Apr 10, 2009 8:09 pm

i love blue effect.
i be sure to use this when i do some icons.
By daisyy-yupp on Apr 5, 2009 10:26 pm