Tutorial
Click on thumbnailed images to enlarge
so you like my sign eh?
and you wanna know how to make it?
well i put together this wonderful tutorial just for you!!!
1. Open up the picture you want to use for the sign. if u wanna followalong exactly, that is the pic i used and these
  are the colors[/url]
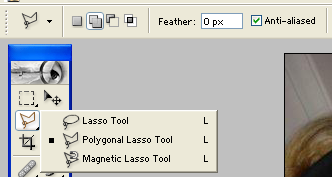
2.use the polygonal lasso tool (right click as show below to use it) at these settings

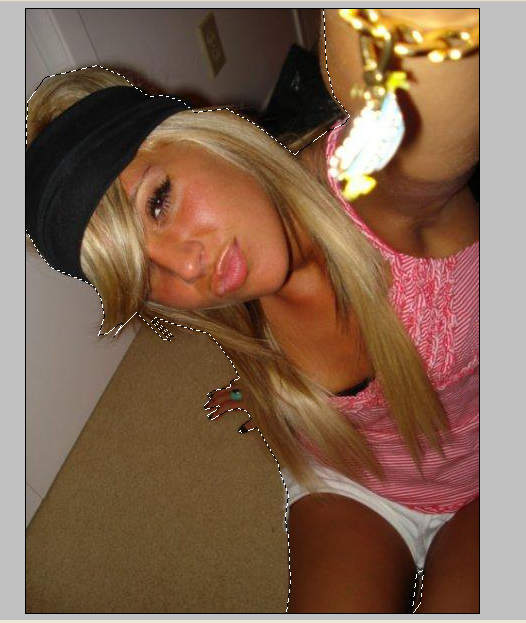
this
4. press Ctrl+C then Ctrl+V on your keyboard to copy and paste them onto a new layer.
5. next, click the background layer then press new layer.
6. Now press Ctrl+Shift+D on your keyboard to reselect the persons shape on the new layer.
7. Go to selection > modify > expand > and expand it however much youwould like for the gradient behind the person.
8. With the area still selected, Right click on the Fill bucket tool to get to the Gradient tool. Then choose the gradient you want from the tool options area of the screen and click and drag across the selected area to make the gradient. it should look like this when you are done

9. Next, with the gradient area still selected, go to your brushes, change the color to white and select a brush then put it randomly on the gradient. I like to use the diamond brushes and i use sevral diffrent ones to make a look like this...

10. If you do not want to do bushes then you can go to Layer > layer style> pattern overlay. and add the pattern to the gradient. while in that dialogbox you may also add stroke and drop shado. drop shadow settings for this layer should be 0,9,6
11. Now after you finish the gradient laer go back and add a stroke to the person by clicking their layer and then going layer> layerstyle> stroke also add a drop shadow of 0,9,6 or 0,12,9
it should now look like this

12. now to do the showtime style. use that poly gonal lasso tool and "DRAW" on your vector like this

you only have to draw on the vector for the part you will see.
13. go to the background layer and add a new layer. then use your brush tool and have a circle brush at about 19/20

and color in the selection alternating colors till it looks like this

14. Go to select> deselct to deselt the vector., then go to Lay>layer style>pattern overlay, and add your patter, stroke and a drop shadow of 0 9 6 within the same dialog box it should look like this

15. now click the background layer and choose one of your colors and color in every 4th one (if you have 4 colors in ur color scheme) then go to layer> layer style>pattern overlay and add your pattern overlay. you may also use brushes if you choose but make sure u erase if any go beyond the space of that vector.it should then look like this

16. repeat step 15 for each color until it is all colored in.then if u like add a gradient overlay to thee persons clothes but make sure you go back to the top layer.
. then you are finished. it should look like this

and you wanna know how to make it?
well i put together this wonderful tutorial just for you!!!
1. Open up the picture you want to use for the sign. if u wanna followalong exactly,
 that is the pic i used and these
  are the colors[/url]
2.use the polygonal lasso tool
 (right click as show below to use it) at these settings
this

4. press Ctrl+C then Ctrl+V on your keyboard to copy and paste them onto a new layer.
5. next, click the background layer then press new layer.

6. Now press Ctrl+Shift+D on your keyboard to reselect the persons shape on the new layer.
7. Go to selection > modify > expand > and expand it however much youwould like for the gradient behind the person.
8. With the area still selected, Right click on the Fill bucket tool to get to the Gradient tool. Then choose the gradient you want from the tool options area of the screen and click and drag across the selected area to make the gradient. it should look like this when you are done

9. Next, with the gradient area still selected, go to your brushes, change the color to white and select a brush then put it randomly on the gradient. I like to use the diamond brushes and i use sevral diffrent ones to make a look like this...

10. If you do not want to do bushes then you can go to Layer > layer style> pattern overlay. and add the pattern to the gradient. while in that dialogbox you may also add stroke and drop shado. drop shadow settings for this layer should be 0,9,6
11. Now after you finish the gradient laer go back and add a stroke to the person by clicking their layer and then going layer> layerstyle> stroke also add a drop shadow of 0,9,6 or 0,12,9
it should now look like this

12. now to do the showtime style. use that poly gonal lasso tool and "DRAW" on your vector like this

you only have to draw on the vector for the part you will see.
13. go to the background layer and add a new layer. then use your brush tool and have a circle brush at about 19/20

and color in the selection alternating colors till it looks like this

14. Go to select> deselct to deselt the vector., then go to Lay>layer style>pattern overlay, and add your patter, stroke and a drop shadow of 0 9 6 within the same dialog box it should look like this

15. now click the background layer and choose one of your colors and color in every 4th one (if you have 4 colors in ur color scheme) then go to layer> layer style>pattern overlay and add your pattern overlay. you may also use brushes if you choose but make sure u erase if any go beyond the space of that vector.it should then look like this

16. repeat step 15 for each color until it is all colored in.then if u like add a gradient overlay to thee persons clothes but make sure you go back to the top layer.
. then you are finished. it should look like this

Tutorial Comments
Showing latest 10 of 56 comments

i already new how to do this.. but this is amazing
By georgejetKins on Jul 21, 2010 3:57 pm
never mind i got it =)
By LADiiSOULJA3 on May 9, 2009 4:21 pm
how the hell do you drag the gradient?
By LADiiSOULJA3 on May 9, 2009 4:16 pm
loveee this :]
By katieee110290 on Apr 10, 2009 11:04 pm
i love this haha!
By younqxquizit on Dec 13, 2008 7:09 pm
how u make the clothes same color??? can u show tat step to me kind i'm still beginnin of PS thnx
By x13abiez on Dec 8, 2008 1:51 am
im goin to try this one. favourite!
By xmari0nettedoIIx on Nov 28, 2008 11:10 pm
nice.
By WhatEvaYo on Nov 19, 2008 3:52 pm
OMG i was lookinq EVERYWHERE for this
thnx sooo much! =)
By cutegurl712 on Nov 6, 2008 6:06 pm
Im needing help with step 12?:OPlease anyone?
By MoonlightxDesigns on Oct 21, 2008 5:38 pm
Tutorial Details
| Author |
PrincessaTessa08
|
| Submitted on | May 21, 2008 |
| Page views | 46,145 |
| Favorites | 258 |
| Comments | 56 |
| Reviewer |
Synesthesia
|
| Approved on | May 22, 2008 |


