Tutorial
Click on thumbnailed images to enlarge
I'll be using these pics:
x, x.
1. Open your Paint Shop Pro. Copy this
image and paste it.
2. Just to lighten up the image, we will use the Smart Photo Fix. Go to Adjust > Smart Photo Fix. Copy my settings:
[screenshot]
When you are done with the Smart Photo Fix, copy the new improved image.
3. Does the image look brighter? Good. Now it is time to get started! Open a new file. Make it 900x900 so we have a lot of room
to work with. Make sure you zoom in 100%! Flood fill your background with #6a165d.
4. Press CTRL+L so we can bring the image onto a new layer. Move your image onto the top left corner. Like this:
[screenshot]
5. Take this brush (from Funeral Monster - dead). We will use it to erase the
edges and give it a better look. Copy the brush and paste to PSP and create it as a brush. Let's label this brush "Texture 1."

6. Go click on the Eraser Tool and find the brush I just supplied you in step #5. Erase the bottom right edge with the rotation of 45.
screenshot]
7. We are going to repeat steps 5-6 but with a different brush and a different spot to erase. Take this brush and erase the bottom
of the image. We are doing these erasings so we can give a texture and grungey look. Let's label this brush "Texture 2."

Like I said, erase the rest of the bottom part of the image with the rotation of 85.
[screenshot]
8. Now we are going to add another image. Let us use this pic.
Copy and paste to PSP. Do step #2 once again to lighten up the image. Copy the improved image. Open your Layers Palette (F8).
Click on the layer named "Background." Then hit CTRL+L so we can add in the copied image to the layout. Move the new image
to the top. Copy how I did it:
[screenshot]
9. Now we are going to erase a part of the image. Try to copy like what I did in the screenshot link below.
With the Eraser Tool, use the Texture 1 brush and erase half of the image like this:
[screenshot]
10. We are still going to use the Eraser Tool. In your list of brushes, pick the rounded brush. Set the size to 120. Erase the rest of
the scraps on the right side like this:
[screenshot]
11. Just to make sure, look on your Layers Palette. The layer called "Raster 2" should be highlighted. Is it? Good.
Now, look
for Texture 2 brush. We are going to erase the bottom of the image. Like this:
[screenshot]
12. Back to the Layers Palette... Click on the "Raster 1" layer so that it is highlighted. Click on the marquee tool. Set feather to 40.
We are going to do a blend between where the two images meet. Drag the marquee where the images meet. When you let go, the spot you
selected should be slightly big. Hit delete about 1-3 times or until you think it is perfect.
[screenshot]
13. We are almost done! Look at your layers palette and click on your "Background" layer so that it is highlighted. We are going to start
decorating... Use the rounded brush in your brush list. Set the Size to 138 and the Hardness to 15. Use the color
#49c406. Click once on the corner where the two images meet like this:
screenshot]
14. Now we will use the pen tool with the same color. So, click on the pen tool. Set your Line Style to +Solid and Width
to 2.00. Go to your Materials Palette. Make sure only the Foreground color is showing and not the Background. If
you see both of the colors, click the X on the [b]Background[/b[ color. Now, you may start to doodle where you put your
rounded brush! This is mine:
[screenshot]
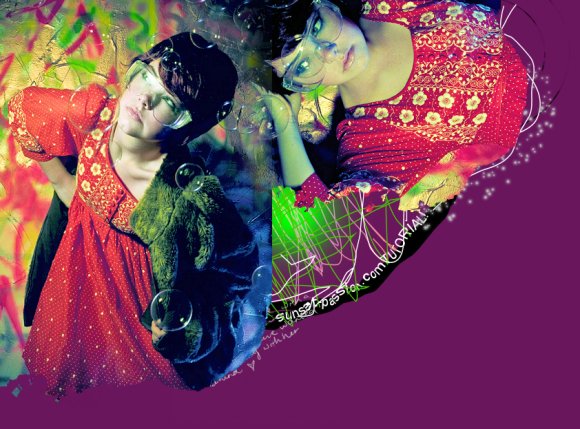
15. You are now free to add as many brushes and oodles of decorations to this layout. I changed mine a bit... Wanna see it?
[screenshot]
You are finished!
Tutorial Comments
Showing latest 10 of 17 comments

this is an amazing tutorial =]]
here's my result: http://i40.tinypic.com/219810z .jpg
I don't get how to add the brushes..
its like a little pain bucket. all u do is pick the color u want and click the bucket in ur tools section and then click on the area u want the color. it fills it for u so u wouldnt have to use the paintbrush
I dont get the part with the flood fill..
this tutorial is a whole lot like one from swimchick.net
did you steal it?
idk where you got those pics from but just cause you used em in this tutorial doesnt mean that i cant use em for a banner graphic right ??
i kinda got frustrated with it.
so i just did this instead. same pics. diff taste?
http://i33.tinypic .com/nbat0h.png
=)
i kinda got frustrated.
so i just did this;
http://i33.tinypic.com/ nbat0h.png
I am trying to do it, but I can't get the brush
Thanks so much for this tutorial!! Here is my result: http://i34.tinypic.com/msiz5f. png
Tutorial Details
| Author |
robinneboo
|
| Submitted on | Jan 2, 2008 |
| Page views | 37,178 |
| Favorites | 52 |
| Comments | 17 |
| Reviewer |
S-Majere
|
| Approved on | Jan 2, 2008 |


