Tutorial
Click on thumbnailed images to enlarge
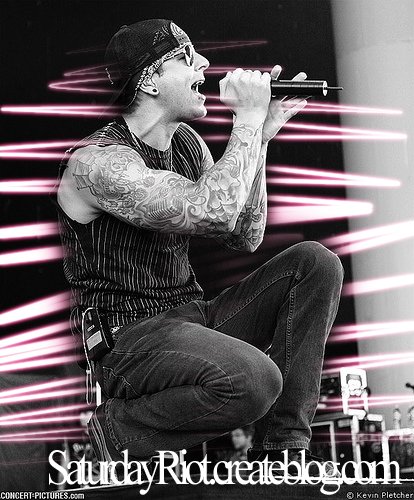
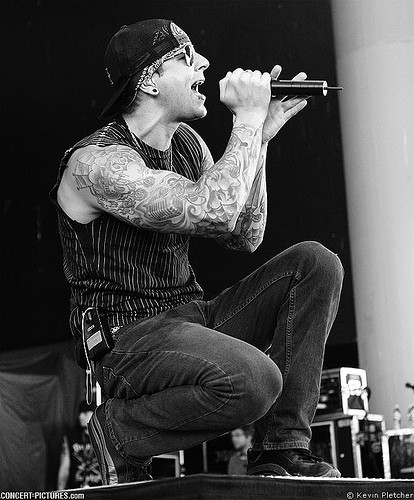
First off, you wanna open up your image or you can use the one I am using of Matt Sanders (other known as M.Shadows) of Avenged Sevenfold.
Once you have your image opened up, click on your pen tool and match your settings to mine below:

Next, make a new layer on your layers palet and begin make swerved lines around Matt's body (or your own in that layer) and it should come out
something like this:
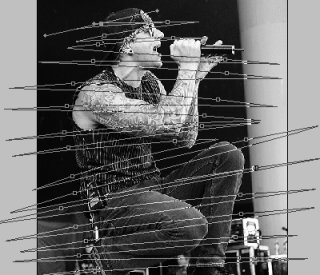
dont worry about getting it exactly right, just as long its in a familiar form then you're okay to go :]
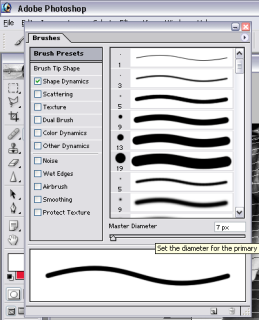
Next, click on your brush tool and click on the top right of your bar and click the "Toggle Brushes Pallet" icon (it should be shaped like a folder) and adjust your settings to mine:
After doing so, close that up and right click on the lines and options should come up, click "Stroke Path". The menu should look like this:

Note: Make sure your foreground color is set to FFFFFF (white)before doing so
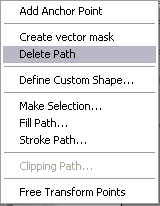
After that, right click again and the same options should come up, this time youre going to select "delete path":
Now your image should look like this so far:
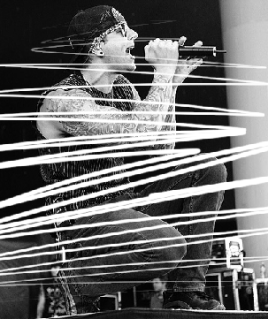
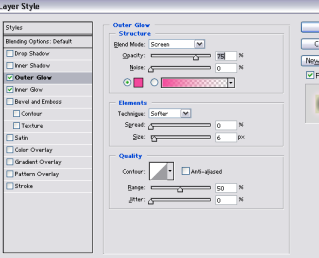
Next we're going to make that line glow! Right click on your new layer that your lines are in and select "blending options" a box should pop up, first press inner glow and leave the settings as they are and then press outer glow and adjust your settings to mine, and choose whatever color your desire from the color pallet I used #E91835
Now close that box and grab your eraser tool and set it to 70 px and erase any lines that are on Matt's body until they are only in the background of him.
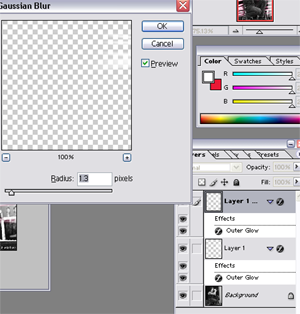
Once you do so, you might want to duplicate the layer, and go to Filter>Blur>Gausian Blur>1.3px[/b] Or to whatever satisfies you:
the glow will stand out more & be more vivid now. It can also point out any areas on the body you missed. If you missed any, go the original line layer and erase them and back to the duplicated layer and erase them.
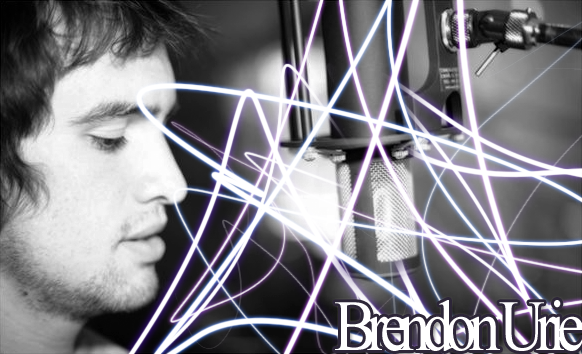
Now youre ready to add some text or any extra things to your image and save it as a .png file. Your outcome should be similar to this :

Congrats, your image is complete. I would love your opinions and to see your results, if any questions feel free to message me or comment here and Ill get back to you soon!
Other results:

Tutorial Comments
Showing latest 10 of 26 comments

thanks so much for this tutorial I actually used photo explosion deluxe for this and since i don't have photoshop but since you did step by and posted screen shots I was able to find everything so thanks

hi, hey wich ps are u using? i have cs4 and i can't do the step 4...and the step 3 doesn't look as yours :/

can you do this on photofiltre?

thanks =)

I've always wondered how this was done, thanks for the tutorial. It was easy to understand and I loved the results. I'm just curious how you got your lines so thick and skinny. I'm not new to the pen tool, but I'm not sure how to do that. Thanks again! (:

Cool :D i didnt use this for my default though :/
I guess thats why it didnt come out as good as youuurs!

i must be super illiterate because i can't draw the lines the way they are on there, point me in that direction or HELP ME? please? :(

what about gimp? :\

LOVEIT

Whaaat about in GIMP ?
PS. Niceee Tutoriaaaal !
Tutorial Details
| Author |
SaturdayRiot
|
| Submitted on | Aug 12, 2009 |
| Page views | 28,802 |
| Favorites | 168 |
| Comments | 26 |
| Reviewer |
Mike
|
| Approved on | Aug 12, 2009 |