Tutorial
Click on thumbnailed images to enlarge
Signature Tutorial
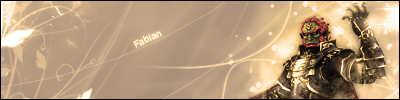
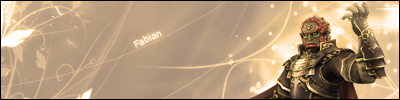
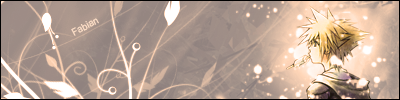
This tutorial will learn you how to create the tfollowing signature.
You will need the following:
- Photoshop
- Brushes
- A render
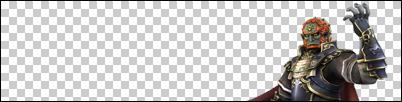
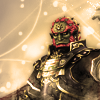
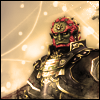
I'm using this render:

Step 1 - Starting up.
Open a new file with a transparant background, size doesn't matter.
I'm using 400x100.
Make sure your colors are reset
You can do this by simply hitting D..
Now click File > Place, and place your render somewhere in the signature.
I prefer putting the render left, right or centered.
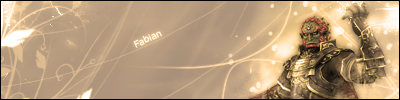
I've placed my render like this:
Now create a new layer and place it below your render.
Fill it with white. Do this by pressing CTRL + Backspace.
Now rightclick the layer and press Blending Options.
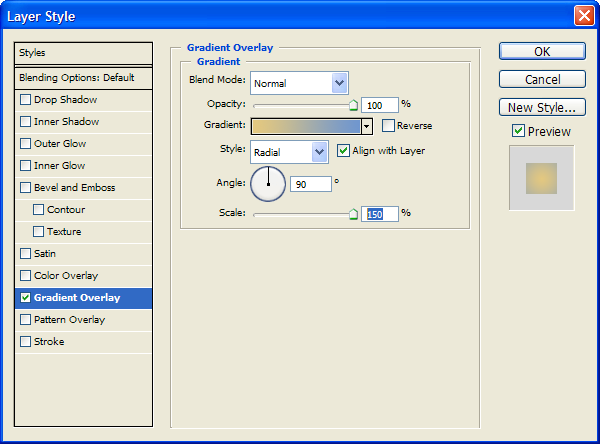
Now go to Gradient Overlay, and make yourself a new gradient, using E4C87F on the left side, and 6F96CF on the right side.
Now use the following settings:
(You can skip this step if your render is centered.)
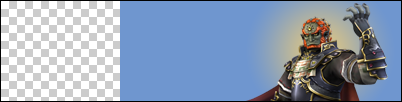
Now push CTRL + T, and place the gradient behind the render.
My signature now looks like this:
On the left side there's a transparant part.
Pretty ugly, right?
Create a new layer and place it below your gradient.
Fill it with 6F96CF.
Now there's no transaparant part anymore.
Now merge layer 1 and 2, so you only have your render and your background.
I'm calling the background "Background" for now.

Step 2 – Effects.
We are gonna add some effects now.
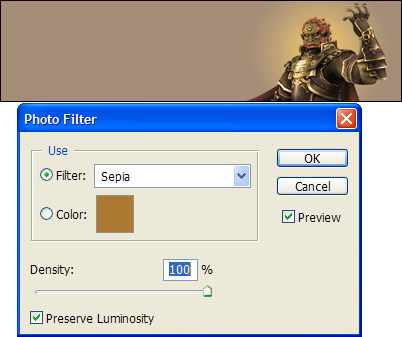
Click at Layer > New Adjustment Layer > Photo Filter…
Now put Filter on Sepia, and put Density on an amount you like.
I'm just using 100% here.
Now create a new layer and place it between the Filter and your Render..
Now take out your Brush Tool and use the following brush:
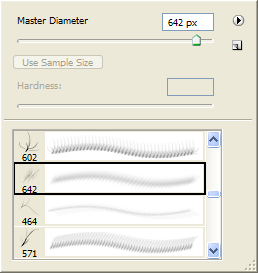
Make sure your primary color is white!
Do this by pressing D, and then pressX.
Now just click once on your signature. Don't drag it!
If your not satisfied with the position of the brush, pressCTRL + ALT + Z and use the Brush again.
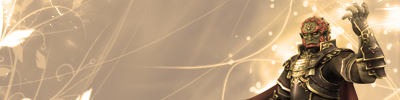
This is my result:

I don't like the lines which override my render, so I erase those.
Step 3 – Filling the emptyness.
The signature is a bit empty, so let's fill it up.
Create a new layer, and place it under your render.
Take out a random white brush, and brush at parts where it's empty.
I'm using a nice flowerbrush for this, and erase some parts I don't like.

I still think it's too empty, so I'll brush somewhat behind the render.

You can do this 'till you drop.
This is my outcome:
Step 4 - Adding text.
This is the easiest part of the tutorial.
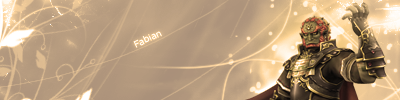
Grab the Text Tool, and type your text anywhere, doesn't matter where.
Now press CTRL, so you can move and rotate your text.
Now put the text on one of the lines.
Don't use any distracting fonts, and use a small size. 9 or something.
I used MS Reference Sans Serif myself, at size 9.
Now just mess around with the Blending Options, untill you got a nice effect.
I used an Outer Glow at 40% Opacity myself.
Step 5 – Border.
Now we're gonna make a border.
Create a new layer and fill it with black. (Press D, then X, then CTRL + Backspace).
Put the layer on Screen.
Now go to Blending Options, and click Stroke.
Put Size at 1 pixel, position on Inside, and color at black.
Now there's a black border around your signature.
Step 6 – Render blending. (Optional)
To make the render fit in the signature, we're gonna blend your render now.
First duplicate (CTRL+J) your render.
Now click on the bottom layer and click Filter > Blur > Gaussian Blur…
A window appears.
Use 3,0.
Now there's some sort of glow around your render!
That makes your render look less like a picture just pasted on the signature.
Sometimes I brush slightly over the render.
Watch the difference:
Without:
With:
Now, to make the colors of your render somewhat nicer, do this:
Duplicate (CTRL + J) your render, and put the blending mode of the top layer on Overlay.
Mostly this looks better, but not allways!
Decide for yourself!
Step 7 - Cutting an icon. (Optional)
You probably want an icon of your signature. This is pretty easy.
First make sure your text and border aren't visible on the signature.
Save this borderless/textless signature somewhere.
Now open a new file, 100x100.
Now click File > Place... and open the borderless/textless signature you just saved.
On the top of the screen, you'll see some settings.
Use these settings:

Now your signature is scaled 1:1.
The only thing you have to do now is move the signature left or right :)
Don't forget to add a border!
If you don't remember how to do this, go back to step 5!
THE END.
Hopefully you've learned something.
Hints and tips are welcome. :)
Sorry for my bad english, I'm dutch.
If you don't understand something, or have any questions, mail me at fabianwashere[at]live.nl
And by the way:
RIP = R.I.P.
Other sigs made like this:
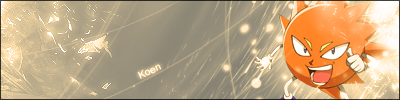


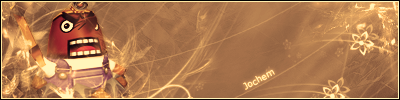

Made by Fabianwashere
Frostbolt.6x.to
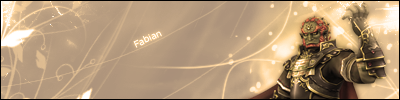
This tutorial will learn you how to create the tfollowing signature.
You will need the following:
- Photoshop
- Brushes
- A render
I'm using this render:
Step 1 - Starting up.
Open a new file with a transparant background, size doesn't matter.
I'm using 400x100.
Make sure your colors are reset
You can do this by simply hitting D..
Now click File > Place, and place your render somewhere in the signature.
I prefer putting the render left, right or centered.
I've placed my render like this:
Now create a new layer and place it below your render.
Fill it with white. Do this by pressing CTRL + Backspace.
Now rightclick the layer and press Blending Options.
Now go to Gradient Overlay, and make yourself a new gradient, using E4C87F on the left side, and 6F96CF on the right side.
Now use the following settings:
(You can skip this step if your render is centered.)
Now push CTRL + T, and place the gradient behind the render.
My signature now looks like this:
On the left side there's a transparant part.
Pretty ugly, right?
Create a new layer and place it below your gradient.
Fill it with 6F96CF.
Now there's no transaparant part anymore.
Now merge layer 1 and 2, so you only have your render and your background.
I'm calling the background "Background" for now.
Step 2 – Effects.
We are gonna add some effects now.
Click at Layer > New Adjustment Layer > Photo Filter…
Now put Filter on Sepia, and put Density on an amount you like.
I'm just using 100% here.
Now create a new layer and place it between the Filter and your Render..
Now take out your Brush Tool and use the following brush:
Make sure your primary color is white!
Do this by pressing D, and then pressX.
Now just click once on your signature. Don't drag it!
If your not satisfied with the position of the brush, pressCTRL + ALT + Z and use the Brush again.
This is my result:
I don't like the lines which override my render, so I erase those.
Step 3 – Filling the emptyness.
The signature is a bit empty, so let's fill it up.
Create a new layer, and place it under your render.
Take out a random white brush, and brush at parts where it's empty.
I'm using a nice flowerbrush for this, and erase some parts I don't like.
I still think it's too empty, so I'll brush somewhat behind the render.
You can do this 'till you drop.
This is my outcome:
Step 4 - Adding text.
This is the easiest part of the tutorial.
Grab the Text Tool, and type your text anywhere, doesn't matter where.
Now press CTRL, so you can move and rotate your text.
Now put the text on one of the lines.
Don't use any distracting fonts, and use a small size. 9 or something.
I used MS Reference Sans Serif myself, at size 9.
Now just mess around with the Blending Options, untill you got a nice effect.
I used an Outer Glow at 40% Opacity myself.
Step 5 – Border.
Now we're gonna make a border.
Create a new layer and fill it with black. (Press D, then X, then CTRL + Backspace).
Put the layer on Screen.
Now go to Blending Options, and click Stroke.
Put Size at 1 pixel, position on Inside, and color at black.
Now there's a black border around your signature.
Step 6 – Render blending. (Optional)
To make the render fit in the signature, we're gonna blend your render now.
First duplicate (CTRL+J) your render.
Now click on the bottom layer and click Filter > Blur > Gaussian Blur…
A window appears.
Use 3,0.
Now there's some sort of glow around your render!
That makes your render look less like a picture just pasted on the signature.
Sometimes I brush slightly over the render.
Watch the difference:
Without:
With:
Now, to make the colors of your render somewhat nicer, do this:
Duplicate (CTRL + J) your render, and put the blending mode of the top layer on Overlay.
Mostly this looks better, but not allways!
Decide for yourself!
Step 7 - Cutting an icon. (Optional)
You probably want an icon of your signature. This is pretty easy.
First make sure your text and border aren't visible on the signature.
Save this borderless/textless signature somewhere.
Now open a new file, 100x100.
Now click File > Place... and open the borderless/textless signature you just saved.
On the top of the screen, you'll see some settings.
Use these settings:
Now your signature is scaled 1:1.
The only thing you have to do now is move the signature left or right :)
Don't forget to add a border!
If you don't remember how to do this, go back to step 5!
THE END.
Hopefully you've learned something.
Hints and tips are welcome. :)
Sorry for my bad english, I'm dutch.
If you don't understand something, or have any questions, mail me at fabianwashere[at]live.nl
And by the way:
RIP = R.I.P.
Other sigs made like this:
Made by Fabianwashere
Frostbolt.6x.to
Tutorial Comments
Showing latest 10 of 18 comments

Nice post.Thank you for taking the time to publish this information very useful!
asics gel shoes
[url=http://www.asicssh oesshopping.com]asics gel shoes[/url]
asics gel shoes
[url=http://www.www.asi csshoesshopping.com asics gel shoes]
By jackettop on Apr 14, 2011 3:57 am

i like the brush you used. where can i get it?
what program did you use?
By MiissYER on Apr 15, 2009 4:43 pm
Amazing :O
By XbreathlessWhispersX on Feb 18, 2009 5:45 pm

Soo kewwl :D
By xUyennie on Jan 30, 2009 8:23 pm

this is some wicked tutorial!
By doodleisLOVE on Jan 19, 2009 7:30 am

i love the elfan lied one (:
By xiiduckies on Dec 31, 2008 2:21 am

ooppss...sorry! i see them now!
By liviia on Dec 7, 2008 5:54 pm
your brushes aren't there
By liviia on Dec 7, 2008 5:53 pm
oops. i didn't see the first part. ];
By Meev on Dec 2, 2008 3:56 pm
where did you get those brushes?
By Meev on Dec 1, 2008 2:43 pm
Tutorial Details
| Author |
Fabianwashere
|
| Submitted on | Sep 28, 2008 |
| Page views | 24,316 |
| Favorites | 110 |
| Comments | 18 |
| Reviewer |
Blaqheartedstar
|
| Approved on | Sep 29, 2008 |