Tutorial
Click on thumbnailed images to enlarge
Note: Don't be confused by the different hues of the pictures shown. Some are saved as I work, others are saved from my print screen key, which changes the hues slightly.
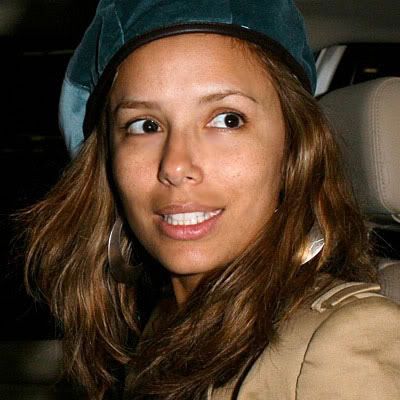
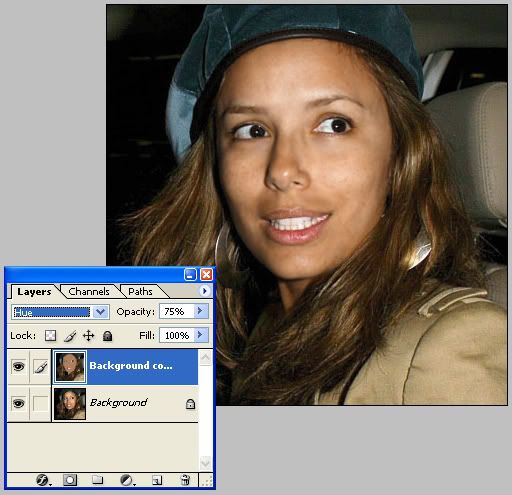
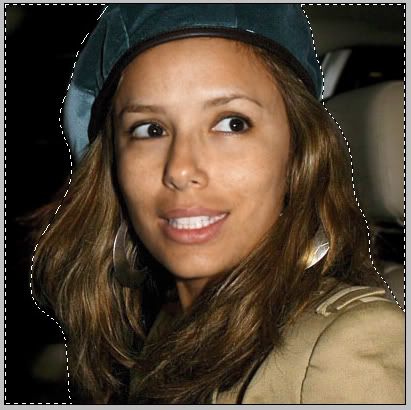
Here is an image of Eva Longoria that I'm going to be using:

1. Duplicate the original picture. LAYER > DUPLICATE LAYER...
2. Using the SMUDGE TOOL (R), with the strength set to something under 40%. I used 20%. Then smudge away any pimples or rough spots... or even a small section of distorted eyebrow or lip.
Then change the layer opacity to anywhere from 50% to 99%, depending on how much smudging you had to do and how natural you want it to look. Since mine still looks alot like the original, I only changed it to 90%.
Merge your layers by going to LAYER > FLATTEN IMAGE.
3. Now, using the LASSO TOOL (L), select the skin on your person (including their neck, arms, etc. for a more uniform look). Deselect the eyes, lips, eyebrows (depending on how thick or big they are), fingernails, and the nostrils if you want. Feather your selection based on how large the image is and how accurate your selection is. (Do this by right clicking your selection and selecting "Feather..." or pressing CTRL+ALT+D.) I think mine was 5 or 10 px.

4. Slightly blur the skin. FILTER > BLUR > GAUSSIAN BLUR...
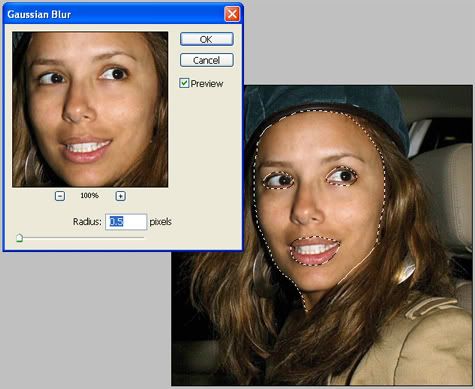
If you have a smaller image, just a little is fine. For larger res pictures, more is okay. Just don't overdo it, otherwise it will not look natural.
5. While keeping your selection active, duplicate the layer. Then average the skin color by going to FILTER > BLUR > AVERAGE.
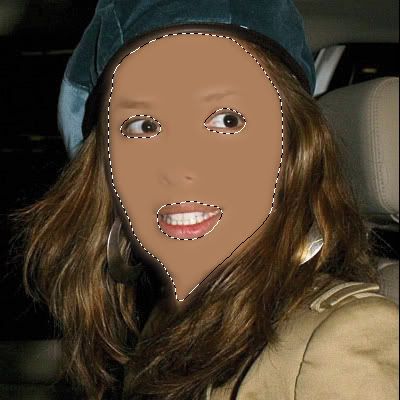
6. Change the layer type to HUE.This will even out the skin tone if there's alot of redness and such, but will also make the face look bland if you like red cheeks, etc. So play around with the opacity.
Now flatten the image. LAYER > FLATTEN IMAGE
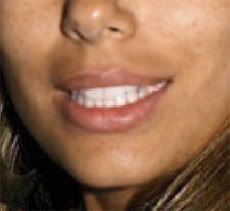
7. If you want, you can do the same thing to the lips. Select them, feather, duplicate layer, average the color, change layer settings to HUE, and merge.
8. Then I did some extra touchups.
I made a selection of the darker part of her nose, feathered it, and lightened it a little bit by increasing the Brightness. (IMAGE > ADJUSTMENTS > BRIGHTNESS/CONTRAST...)
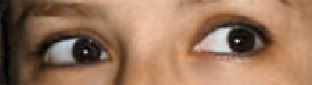
Then I got rid of the redness in her left eyes by using the SMUDGE TOOL (R).

If your person has red patches on their skin, you can change the color balance (away from red) rather than the brightness. (IMAGE > ADJUSTMENTS > COLOR BALANCE...)
If needed you can also whiten your person's eyes and/or teeth by:
Duplicating your original image. On your duplicated layer, selecting the whites of the eye and/or teeth using the Lasso Tool, feather your selection. Increase the brightness and decrease the contrast a little bit until you like the way it looks. If the teeth are yellow or the eyes are red, you can also use a cooling photo filter on your selection. IMAGE > ADJUSTMENTS > PHOTO FILTER... Pick one of the two cooling filters that look best and then you will have to change the density percentage to 15% or less so that your person still looks normal. If the outer parts of the eye or the lips seemed to have been affected, very carefully erase them away so that the original picture shows through. Now only the eyes and/or teeth have been fixed. Flatten the image.
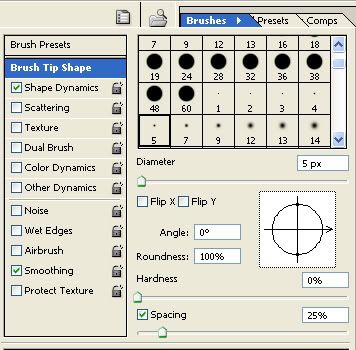
9. I'm now going to add eyeliner. Create a new layer by going to LAYER > NEW > LAYER... or SHIFT+CTRL+N on your keyboard. Make sure the foreground color is black (or some other dark color of your choice) and then select a small brush. Change the opacity depending on how dark you want the eyeliner to be. 100% will probably be way too strong.
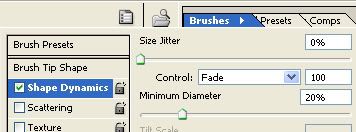
For the "Brush Tip Shape" make sure the "Spacing" section is checked. Make sure the "Shape Dynamics" is checked and the "Control" section is set to "Fade".
Now while in your new layer, line her eyes from outter corner to inner corner. You will probably need to use a smaller sized brush for the bottom rim of her eye and therefore, redo all the above seetings.
Now Gaussian Blur this layer so that the eyeliner is softer. If you still think the color is too strong, you can reduce the Opacity percentage on this layer. Now flatten image.
10. In order to focus the picture more on Eva, we will select what's around her (aka the background) and feather it. Mine was around 20 px. Because this is a dark picture, I made the background darker by decreasing the Brightness a little bit and then I did a small Gaussian Blur as well (1 px).
11. Some last overall changes...
I increased the Contrast a little bit on the picture.
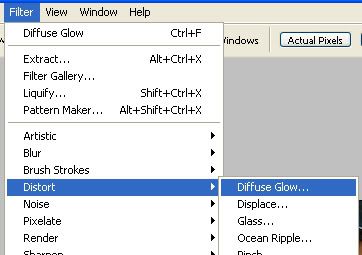
Then (making sure the background color is set to white) I applied a Diffuse Glow to soften her face. To do this go to FILTER > DISTORT > DIFFUSE GLOW...
My settings were...
Graininess: 0
Glow Amount: 1
Clear Amount: 15
You can mess around with those to get what you like.
I then applied a Photo Filter to the whole image (IMAGE > ADJUSTMENTS > PHOTO FILTER...) I chose a toned warming filter.
THE END
Original:
Final Product:
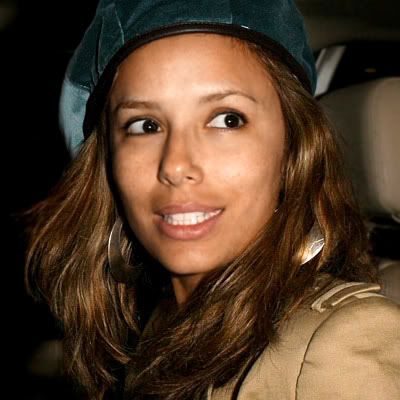
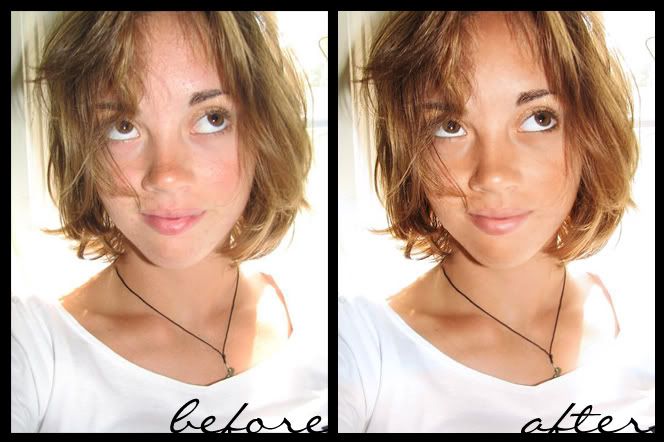
The difference might not appear very drastic in my example but can choose how you apply different settings.
Here's another example of a picture I touched up:
Here is an image of Eva Longoria that I'm going to be using:
1. Duplicate the original picture. LAYER > DUPLICATE LAYER...
2. Using the SMUDGE TOOL (R), with the strength set to something under 40%. I used 20%. Then smudge away any pimples or rough spots... or even a small section of distorted eyebrow or lip.
Then change the layer opacity to anywhere from 50% to 99%, depending on how much smudging you had to do and how natural you want it to look. Since mine still looks alot like the original, I only changed it to 90%.
Merge your layers by going to LAYER > FLATTEN IMAGE.
3. Now, using the LASSO TOOL (L), select the skin on your person (including their neck, arms, etc. for a more uniform look). Deselect the eyes, lips, eyebrows (depending on how thick or big they are), fingernails, and the nostrils if you want. Feather your selection based on how large the image is and how accurate your selection is. (Do this by right clicking your selection and selecting "Feather..." or pressing CTRL+ALT+D.) I think mine was 5 or 10 px.
4. Slightly blur the skin. FILTER > BLUR > GAUSSIAN BLUR...
If you have a smaller image, just a little is fine. For larger res pictures, more is okay. Just don't overdo it, otherwise it will not look natural.
5. While keeping your selection active, duplicate the layer. Then average the skin color by going to FILTER > BLUR > AVERAGE.
6. Change the layer type to HUE.This will even out the skin tone if there's alot of redness and such, but will also make the face look bland if you like red cheeks, etc. So play around with the opacity.
Now flatten the image. LAYER > FLATTEN IMAGE
7. If you want, you can do the same thing to the lips. Select them, feather, duplicate layer, average the color, change layer settings to HUE, and merge.
8. Then I did some extra touchups.
I made a selection of the darker part of her nose, feathered it, and lightened it a little bit by increasing the Brightness. (IMAGE > ADJUSTMENTS > BRIGHTNESS/CONTRAST...)
Then I got rid of the redness in her left eyes by using the SMUDGE TOOL (R).
If your person has red patches on their skin, you can change the color balance (away from red) rather than the brightness. (IMAGE > ADJUSTMENTS > COLOR BALANCE...)
If needed you can also whiten your person's eyes and/or teeth by:
Duplicating your original image. On your duplicated layer, selecting the whites of the eye and/or teeth using the Lasso Tool, feather your selection. Increase the brightness and decrease the contrast a little bit until you like the way it looks. If the teeth are yellow or the eyes are red, you can also use a cooling photo filter on your selection. IMAGE > ADJUSTMENTS > PHOTO FILTER... Pick one of the two cooling filters that look best and then you will have to change the density percentage to 15% or less so that your person still looks normal. If the outer parts of the eye or the lips seemed to have been affected, very carefully erase them away so that the original picture shows through. Now only the eyes and/or teeth have been fixed. Flatten the image.
9. I'm now going to add eyeliner. Create a new layer by going to LAYER > NEW > LAYER... or SHIFT+CTRL+N on your keyboard. Make sure the foreground color is black (or some other dark color of your choice) and then select a small brush. Change the opacity depending on how dark you want the eyeliner to be. 100% will probably be way too strong.
For the "Brush Tip Shape" make sure the "Spacing" section is checked. Make sure the "Shape Dynamics" is checked and the "Control" section is set to "Fade".
Now while in your new layer, line her eyes from outter corner to inner corner. You will probably need to use a smaller sized brush for the bottom rim of her eye and therefore, redo all the above seetings.
Now Gaussian Blur this layer so that the eyeliner is softer. If you still think the color is too strong, you can reduce the Opacity percentage on this layer. Now flatten image.
10. In order to focus the picture more on Eva, we will select what's around her (aka the background) and feather it. Mine was around 20 px. Because this is a dark picture, I made the background darker by decreasing the Brightness a little bit and then I did a small Gaussian Blur as well (1 px).
11. Some last overall changes...
I increased the Contrast a little bit on the picture.
Then (making sure the background color is set to white) I applied a Diffuse Glow to soften her face. To do this go to FILTER > DISTORT > DIFFUSE GLOW...
My settings were...
Graininess: 0
Glow Amount: 1
Clear Amount: 15
You can mess around with those to get what you like.
I then applied a Photo Filter to the whole image (IMAGE > ADJUSTMENTS > PHOTO FILTER...) I chose a toned warming filter.
THE END
Original:
Final Product:
The difference might not appear very drastic in my example but can choose how you apply different settings.
Here's another example of a picture I touched up:
Tutorial Comments
Showing latest 4 of 4 comments

i don't have a the average option under blur, anywhere else i could find it?
By kimber87 on Nov 20, 2007 2:47 pm

mmm, i don't usually use that extensive of a technique, but will be sure to try it! nice job!
By cheerbee07 on Jul 12, 2007 1:27 am
Whoaaaa + 2. Nice Skin Texture
By ShaBen on Jul 2, 2007 3:07 pm

Whoaaaaa, very cool. In that second picture she looks her usual self (well, usual self on camera).
By kayceeisms on Nov 14, 2006 7:24 pm
Tutorial Details
| Author |
o8simplicity
|
| Submitted on | Nov 12, 2006 |
| Page views | 62,303 |
| Favorites | 94 |
| Comments | 4 |