Tutorial
Click on thumbnailed images to enlarge
**NOTE**
I did this tutorial in Photoshop CS3 Extended which is why some of you may have problems. However, that does't mean this tutorial won't work in other versions of Photoshop. Just try it out.
Want to learn how to apply scanlines on your graphics? Well now you can by following my tutorial. I will be using the original divas... The Spice Girls! :D Here's the before:

Here's the after:

Let's get started!
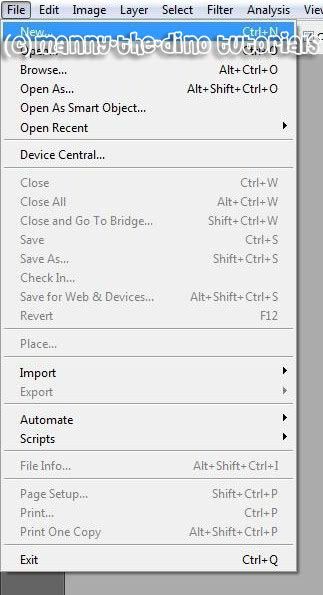
001.First, go File>New.
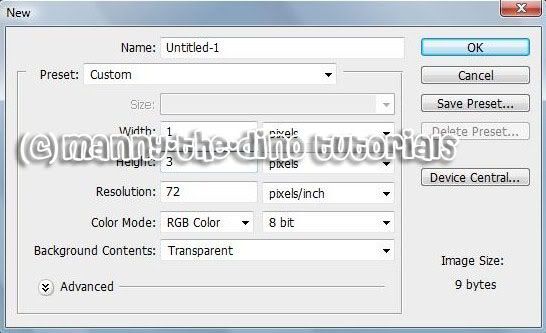
002.Make a new document sizing in 1x3 pixels & that has tansparent background contents.
003.Now select your Pencil Tool (B).

004.Before doing this step, make sure you foreground & background colors are at their default. Press D to do so. Okay once you've done that, zoom in all the way & make a dot in the center of your document.

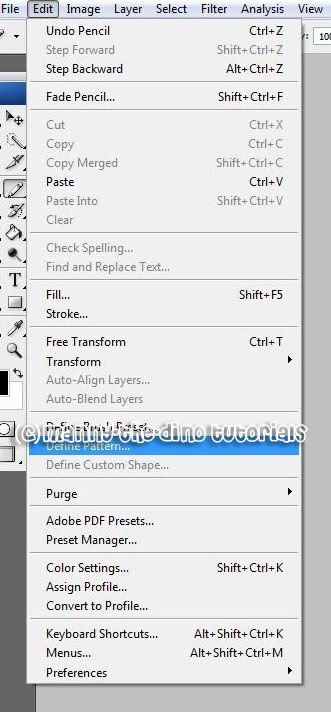
005.Go Edit>Define Pattern.
006.Name your pattern "Scanlines".

007.Now open up the picture you want to apply the effect on.

008.Do a ctrl+j.

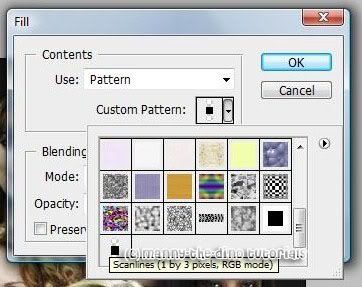
009.Now go Edit>Fill.
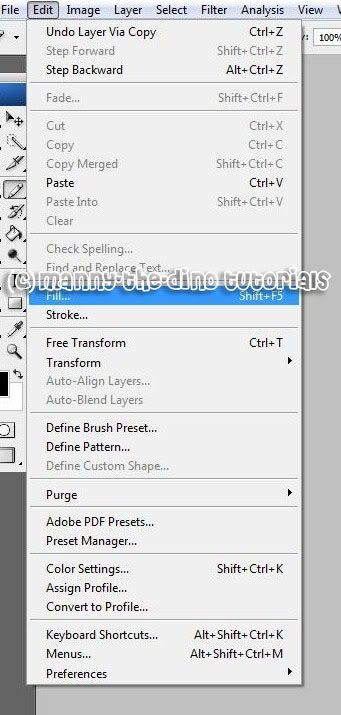
010.In the "Use" section, select "Pattern" & in the "Custom Pattern" section, go all the way down & select your "Scanlines" pattern.
011.Change the opacity to somewhere between 30%-50% on the top layer for your picture.
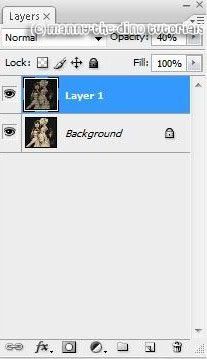
012.And there you have it... your scanlined picture! :D

If you got lost or have any questions, comment the tutotial & I'll get back to you as soon as I can. :D
I did this tutorial in Photoshop CS3 Extended which is why some of you may have problems. However, that does't mean this tutorial won't work in other versions of Photoshop. Just try it out.
Want to learn how to apply scanlines on your graphics? Well now you can by following my tutorial. I will be using the original divas... The Spice Girls! :D Here's the before:

Here's the after:

Let's get started!
001.First, go File>New.

002.Make a new document sizing in 1x3 pixels & that has tansparent background contents.

003.Now select your Pencil Tool (B).

004.Before doing this step, make sure you foreground & background colors are at their default. Press D to do so. Okay once you've done that, zoom in all the way & make a dot in the center of your document.

005.Go Edit>Define Pattern.

006.Name your pattern "Scanlines".

007.Now open up the picture you want to apply the effect on.

008.Do a ctrl+j.

009.Now go Edit>Fill.

010.In the "Use" section, select "Pattern" & in the "Custom Pattern" section, go all the way down & select your "Scanlines" pattern.

011.Change the opacity to somewhere between 30%-50% on the top layer for your picture.

012.And there you have it... your scanlined picture! :D

If you got lost or have any questions, comment the tutotial & I'll get back to you as soon as I can. :D
Tutorial Comments
Showing latest 10 of 12 comments

:):D thanks!
By XbreathlessWhispersX on Mar 30, 2009 12:10 pm
oww! great.but ryt now
there are patterns already.
By -retired- on Dec 28, 2008 12:07 pm
i dont see a pencil tool in cs3 extended ?
By BabygirlSoMajorPromo on Jun 28, 2008 2:23 pm
Thanks. I use PS7 and this was very helpful. You're amazing.
By naythan82 on Jun 21, 2008 9:34 pm
Nice tutorial!
By pinki3ros3 on Mar 25, 2008 9:15 pm
thnx it helped alot!
By GlamorousMiMi16 on Mar 2, 2008 8:31 pm
didn't work for me... help? all i see are 4 tiny dots across my picture.
By turnupthevolume on Dec 22, 2007 9:26 pm
oh psh nvm i feel stupid.
By munkyfacgrl on Dec 22, 2007 12:05 am
it says i can't define pattern because it is empty. for step 5 ;( help!
By munkyfacgrl on Dec 22, 2007 12:05 am
looks pretty cute x]
gives a different look to the picture.
i'ma try this soon :)
By munkyfacgrl on Dec 20, 2007 11:12 pm
Tutorial Details
| Author |
manny-the-dino
|
| Submitted on | Dec 18, 2007 |
| Page views | 15,784 |
| Favorites | 69 |
| Comments | 12 |
| Reviewer |
S-Majere
|
| Approved on | Dec 18, 2007 |


