
Tutorial
Click on thumbnailed images to enlarge
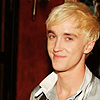
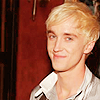
How to turn this: 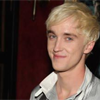 to this:
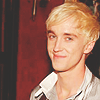
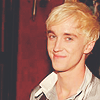
1. We'll start off by opening an image. I used one of the amazing Tom Felton. Crop it to your liking. I think this coloring works best with high-quality bright to semi-bright photos. To avoid confusion, try using the same image that I'm using.
2. Sharpen and Duplicate your base. Now set the first copy ("Layer 1 copy" or "Background copy") to Screen at 30% opacity. Duplicate the base again, and bring the 2nd Copy to the top. Set the 2nd copy to Softlight at 40% opacity. This basically brightens up your picture.
>> 
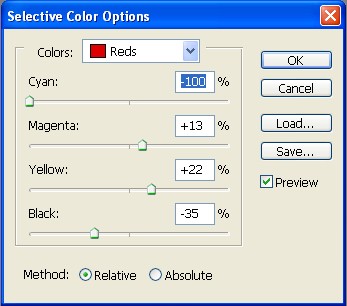
3. Go to Layers >> Adjustment Layers >> Selective Coloring. The Selective Coloring window will pop up. Follow my settings:
Colors: Red
Colors: Yellow
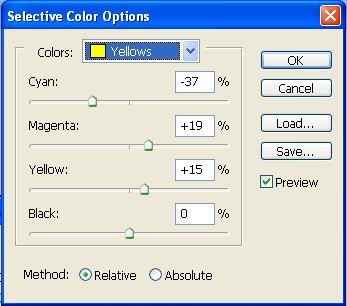
We added a red tone to the picture.
 >>
>> 
4. Go to Layers >> Adjustment Layers >> Color Balance. The Color Balance window will pop up. Follow my setting:
Midtones: +22 0 -27
Shadows: +14 0 0
Highlights: -28 0 0
Added some orange to the warm up the picture.
 >>
>> 
5. Go to Layer >> New Fill Layer >> Solid Color. Choose #f5b3b3 and set to Soft Light at 80%.
We added a pink tint.
>> 
6. Go to Layer >> New Fill Layer >> Solid Color. Choose #363636 and set to Lighten at 85%.
It doesn't look like much, but we matte'd the icon with a gray tone.
>> 
7. Finally, go to Layer >> New Fill Layer >> Solid Color. Choose #0b2c8d and set to Exclusion at 10%.
Your Final Icon:
Other Results using different pictures:

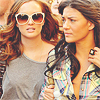

*Note: As you can see from the other results above, the coloring may vary depending on the brightness of your photo. : )
More Sweet Tutorials?
to this:1. We'll start off by opening an image. I used one of the amazing Tom Felton. Crop it to your liking. I think this coloring works best with high-quality bright to semi-bright photos. To avoid confusion, try using the same image that I'm using.
2. Sharpen and Duplicate your base. Now set the first copy ("Layer 1 copy" or "Background copy") to Screen at 30% opacity. Duplicate the base again, and bring the 2nd Copy to the top. Set the 2nd copy to Softlight at 40% opacity. This basically brightens up your picture.
>> 3. Go to Layers >> Adjustment Layers >> Selective Coloring. The Selective Coloring window will pop up. Follow my settings:
Colors: Red
Colors: Yellow
We added a red tone to the picture.
>> 4. Go to Layers >> Adjustment Layers >> Color Balance. The Color Balance window will pop up. Follow my setting:
Midtones: +22 0 -27
Shadows: +14 0 0
Highlights: -28 0 0
Added some orange to the warm up the picture.
>> 5. Go to Layer >> New Fill Layer >> Solid Color. Choose #f5b3b3 and set to Soft Light at 80%.
We added a pink tint.
>> 6. Go to Layer >> New Fill Layer >> Solid Color. Choose #363636 and set to Lighten at 85%.
It doesn't look like much, but we matte'd the icon with a gray tone.
>> 7. Finally, go to Layer >> New Fill Layer >> Solid Color. Choose #0b2c8d and set to Exclusion at 10%.
Your Final Icon:
Other Results using different pictures:
*Note: As you can see from the other results above, the coloring may vary depending on the brightness of your photo. : )
More Sweet Tutorials?
Tutorial Comments
Showing latest 5 of 5 comments

yay! tom!!
fuckyeahtomfelton.tumbl r.com
By lkajsfklajskds on Dec 5, 2009 4:30 am

TOM IS SO GORG.
love this.
By futura on Aug 24, 2009 5:28 am

i love this coloring. it reminds me of sunny d,
yes, the drink.
By creole on Aug 22, 2009 4:49 pm

LOVE the coloring!
its freakin' amazing. :D
By daisyy-yupp on Aug 12, 2009 1:47 am

Woww, gorgeous colouring.
By aliiicimo on Aug 11, 2009 10:48 am
Tutorial Details
| Author |
broken-doll
|
| Submitted on | Aug 11, 2009 |
| Page views | 13,267 |
| Favorites | 29 |
| Comments | 5 |
| Reviewer |
manny-the-dino
|
| Approved on | Aug 11, 2009 |