
Tutorial
Click on thumbnailed images to enlarge
Before and after picture :

1. Open up your desired image, for I have used a picture of Mario cupcakes.
2. Create a new layer. Select the Paint Bucket Tool from the tool bar, or just push K.
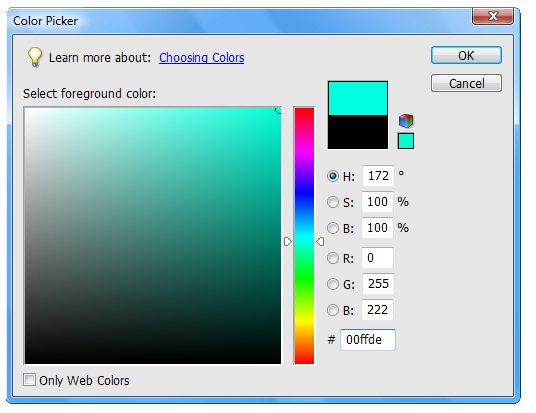
3. Change your foreground color to these settings;

4. Click on the new layer, and change the blending mode of the layer to, Saturation, and make the opacity 60%. You'll end up with this as your result;

5. Now change your foreground color to these settings;
6. Make a new layer. Select the Paint Bucket Tool (or press K) again, and fill the layer.
7. Change the blending mode of the layer to Soft Light.
Results :

Another picture I used this on was:

1. Open up your desired image, for I have used a picture of Mario cupcakes.
2. Create a new layer. Select the Paint Bucket Tool from the tool bar, or just push K.
3. Change your foreground color to these settings;
4. Click on the new layer, and change the blending mode of the layer to, Saturation, and make the opacity 60%. You'll end up with this as your result;
5. Now change your foreground color to these settings;
6. Make a new layer. Select the Paint Bucket Tool (or press K) again, and fill the layer.
7. Change the blending mode of the layer to Soft Light.
Results :
Another picture I used this on was:
Tutorial Comments
Showing latest 10 of 10 comments

amazing
By forgetit on Jun 12, 2009 6:55 pm

really brings out the green
By CHOWDERR on Apr 20, 2009 12:29 am

vI agree.
By impurities on Mar 30, 2009 10:33 pm

Yeah, great on objects - not on people. Well, I guess it depends on the picture.
By Dominiloka on Mar 26, 2009 6:30 pm

It would look better if you just adjusted brightness and contrast.
By Maccabee on Mar 26, 2009 12:15 am

great on objects.
not so great on people.
but still love this.
By emileeexhale on Mar 8, 2009 9:25 pm

this is a pretty cool coloring kinda thing.
but those cupcakes are AWESOME
By peypey2011 on Mar 6, 2009 6:10 pm

Interesting coloring.
By creole on Feb 28, 2009 9:45 pm

@so-sarcastic.
You're right ]:.
There are some people that make avi's out of pictures of treats and sturf. I was just experimenting.
By Emmeh on Feb 23, 2009 11:56 pm

I don't think this looks very good on a person,
but on objects and treats, it seems to. :]
By so-sarcastic on Feb 22, 2009 10:54 pm
Tutorial Details
| Author |
Emmeh
|
| Submitted on | Feb 21, 2009 |
| Page views | 9,855 |
| Favorites | 42 |
| Comments | 10 |
| Reviewer |
manny-the-dino
|
| Approved on | Feb 21, 2009 |