Tutorial
Click on thumbnailed images to enlarge
1. Make a 100x100 image and open it up
2. Paste this pic of Norah onto it and flatten:
3. Now duplicate the layer and then desaturate that new layer. Set the new mode to VALUE and flatten
4. Now zoom in and cut out the part of norah! It should look pretty like this:
5. Now make sure its transparent k? Now make another 100x100 image and paste in this pattern: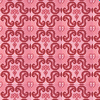
6. Now Merge it down. Then add this to your image with a white rectangle above the little thing:
7. YAY YOU'RE DONE! Now add any info you want to in the box. enjoy!
Tutorial Comments
Showing latest 6 of 6 comments

Im glad!
By hollywoodawaits on Jul 23, 2009 11:03 pm

i love this tutorial. it helped me soo much
By MacabreMadi on May 28, 2009 2:36 am
Yeah. srry. Thanks for the confrimation for me. I used GIMP in it and my computer was kinda dead
By hollywoodawaits on Dec 6, 2008 11:19 pm

its not a button, its a layer effect(term?)
1.click on your layer and at the top of the box, it should say NORMAL.
change that to DESATURATE :)
By mattxmusicx on Nov 21, 2008 4:28 pm

Yeah can anyone help wheres the desaturate button ? I use PSP8
By babyroxxi on Oct 28, 2008 12:40 am

i can't find the desaturate button in PSP, help!
By Candice-Marie on Oct 11, 2008 12:01 am
Tutorial Details
| Author |
hollywoodawaits
|
| Submitted on | Oct 4, 2008 |
| Page views | 9,828 |
| Favorites | 9 |
| Comments | 6 |
| Reviewer |
Blaqheartedstar
|
| Approved on | Oct 6, 2008 |