Tutorial
Click on thumbnailed images to enlarge
**NOTE**
I did this tutorial in Photoshop CS3 Extended which is why some of you may have problems. However, that does't mean this tutorial won't work in other versions of Photoshop. Just try it out.
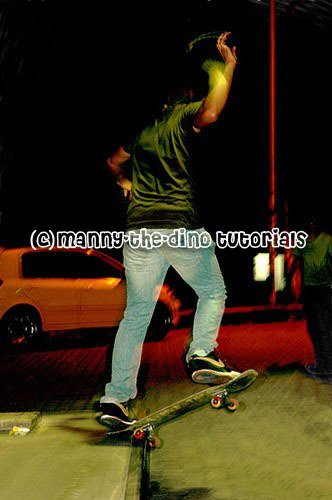
Have a titled photo that just gets on your nerves? Want to straighten it? Well now you can. It's another one of my tutorials to the rescue! :) I'll be using a picture of some skater guy I found online. Here's the before:

Here's the after:

Let's start!
001.First, open up your picture.

002.Do a ctrl+r to get your rulers to show up.

003.Click on the left side ruler, & drag it on to your image. After letting go, you should have a blue line on your image.

004.Now select your image. You can do that by doing a ctrl+a.

005.Now rotate you image. (Do a ctrl+t). After, do a ctrl+d to deselect your image.

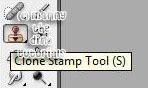
006.Notice how the corners of the image are white. Well we can fix that. Select your Clone Stamp Tool (S).
007.If you don't know how to use the clone stamp, click here to learn. Once you are done, you image should look like this which means you are done! ")
If you got lost or have any questions, comment the tutorial & I'll get back to you as soon as I can. :D
I did this tutorial in Photoshop CS3 Extended which is why some of you may have problems. However, that does't mean this tutorial won't work in other versions of Photoshop. Just try it out.
Have a titled photo that just gets on your nerves? Want to straighten it? Well now you can. It's another one of my tutorials to the rescue! :) I'll be using a picture of some skater guy I found online. Here's the before:
Here's the after:
Let's start!
001.First, open up your picture.
002.Do a ctrl+r to get your rulers to show up.
003.Click on the left side ruler, & drag it on to your image. After letting go, you should have a blue line on your image.
004.Now select your image. You can do that by doing a ctrl+a.
005.Now rotate you image. (Do a ctrl+t). After, do a ctrl+d to deselect your image.
006.Notice how the corners of the image are white. Well we can fix that. Select your Clone Stamp Tool (S).
007.If you don't know how to use the clone stamp, click here to learn. Once you are done, you image should look like this which means you are done! ")
If you got lost or have any questions, comment the tutorial & I'll get back to you as soon as I can. :D
Tutorial Comments
Showing latest 1 of 1 comments

Tutorial Details
| Author |
manny-the-dino
|
| Submitted on | Dec 21, 2007 |
| Page views | 14,657 |
| Favorites | 62 |
| Comments | 1 |
| Reviewer |
S-Majere
|
| Approved on | Dec 21, 2007 |