Tutorial
Click on thumbnailed images to enlarge
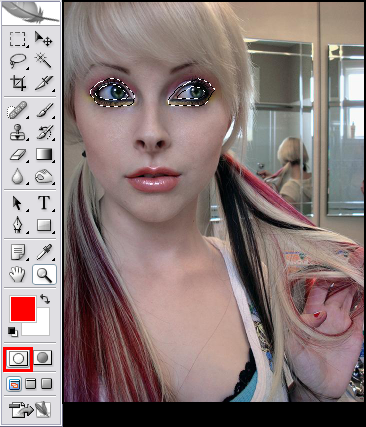
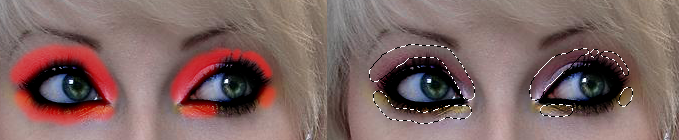
1. Select "Edit in Quick Mask Mode" from the tools bar on the left-side. Or just type "Q" to get in that mode.
Then select the brush tool with the appropriate size that will be able to cover the eyeliner, and this will select the area you want to edit.
2. Once you have selected the are you want to edit, go back to "Edit in Standard Mode" or type "Q". And you should have the area selected like this:
3. Go to Image > Adjustments > Curves, or Ctrl+M,
and make sure the channel is RGB, then click anywhere on the line to make a point, and then make the input 120, output 80. Make another point by clicking somewhere else on the line, and make the input 175 and the output 170. Or if the eyeliner needs to be darker or lighter go ahead and just mess around to get the perfect effect for you photo.
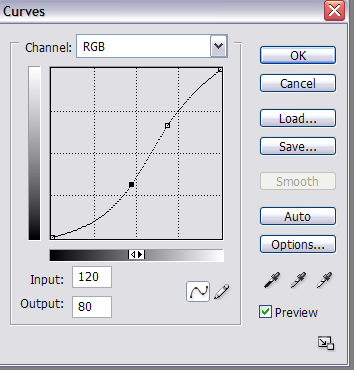
4. Once you've gotten the desired effect, click "Ok" and you should already see a difference in your picture.

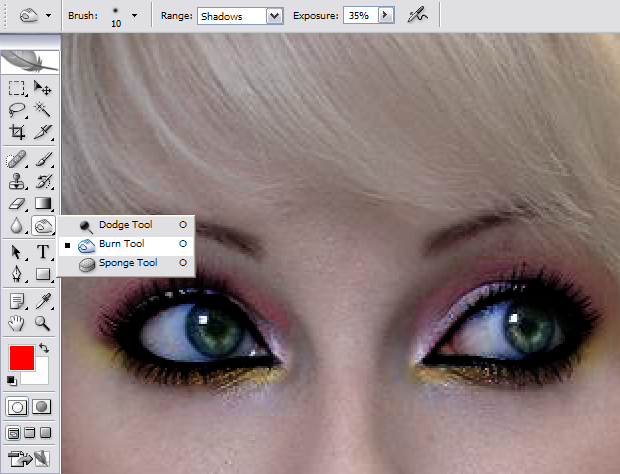
5. Zoom in 200% or 300%, depending on how big or small your picture is. (If it's smaller, zoom in more. If bigger, zoom in less.) Zoom in until you can easily work with the eyes, and make-up. Select the burn tool, and make sure you have the range set to "shadows" and if you want the eyeliner to be really dark try Exposure: 50% or more, and if you want a more natural looking dark, try Exposure:35% or whatever suits your picture. Select a brush size that covers only the eyeliner! If you go over the eyeliner once and you think it's not dark enough then go over it again, and if it's too dark just undo, and lower the exposure.
6. Now we're going to edit the make up. Just like the first steps for editing the eyeliner, go into "Edit in Quick Mask mode" or type "Q" and select all the make up on the eye, then switch back to "Edit in Standard Mode" or type "Q".
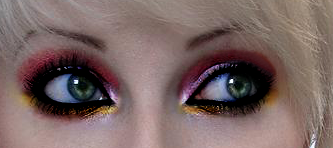
7. Go to Image > Adjustments > Curves, or Ctrl+M, and again make sure you're on Channel:RGB and play around with how dark you want it or how light. This is what I did to the make-up.
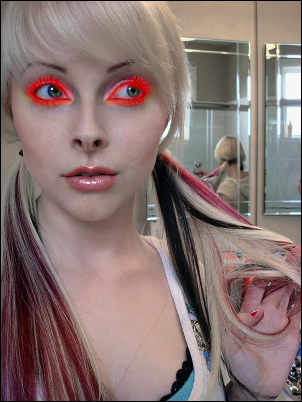
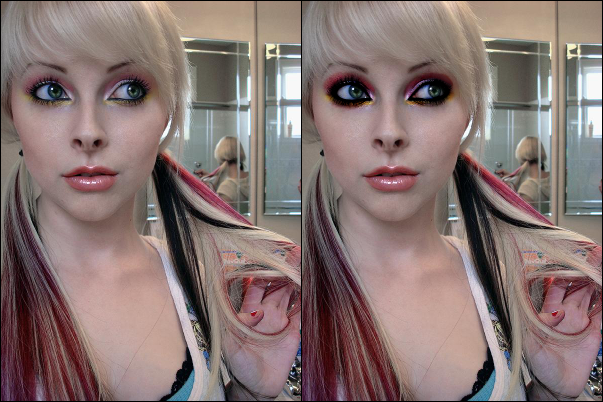
Before and After shot:
Hope this was easy to understand! :)
Then select the brush tool with the appropriate size that will be able to cover the eyeliner, and this will select the area you want to edit.
2. Once you have selected the are you want to edit, go back to "Edit in Standard Mode" or type "Q". And you should have the area selected like this:
3. Go to Image > Adjustments > Curves, or Ctrl+M,
and make sure the channel is RGB, then click anywhere on the line to make a point, and then make the input 120, output 80. Make another point by clicking somewhere else on the line, and make the input 175 and the output 170. Or if the eyeliner needs to be darker or lighter go ahead and just mess around to get the perfect effect for you photo.
4. Once you've gotten the desired effect, click "Ok" and you should already see a difference in your picture.
5. Zoom in 200% or 300%, depending on how big or small your picture is. (If it's smaller, zoom in more. If bigger, zoom in less.) Zoom in until you can easily work with the eyes, and make-up. Select the burn tool, and make sure you have the range set to "shadows" and if you want the eyeliner to be really dark try Exposure: 50% or more, and if you want a more natural looking dark, try Exposure:35% or whatever suits your picture. Select a brush size that covers only the eyeliner! If you go over the eyeliner once and you think it's not dark enough then go over it again, and if it's too dark just undo, and lower the exposure.
6. Now we're going to edit the make up. Just like the first steps for editing the eyeliner, go into "Edit in Quick Mask mode" or type "Q" and select all the make up on the eye, then switch back to "Edit in Standard Mode" or type "Q".
7. Go to Image > Adjustments > Curves, or Ctrl+M, and again make sure you're on Channel:RGB and play around with how dark you want it or how light. This is what I did to the make-up.
Before and After shot:
Hope this was easy to understand! :)
Tutorial Comments
Showing latest 10 of 19 comments

Love this! Gonna try it out right now ;D
By WizardMadds on Jul 23, 2009 12:07 am

if you could only touch up her whole face...
By kwaka on Apr 4, 2009 2:52 pm
Awesome tutorial but when i go back to standard editing instead of the brush strokes being selected the whole picture is selected
By abbigailchasey on Jan 7, 2009 3:05 am

wow. nice..
By turnupthevolume on Jan 2, 2009 7:29 pm

thnx.
this is kool
By cheyluvHK on Dec 29, 2008 3:30 am

waw! thanks for this!
By xmari0nettedoIIx on Nov 28, 2008 10:34 am
i dont use much of this things for my random pictures but seriously effin nice tutorial:D
By princeALLY on Nov 18, 2008 5:27 pm
This is great =D
By michellizzzle on Nov 17, 2008 11:40 pm

Flamboyant ;)
By fatmonsterx on Oct 30, 2008 7:41 pm

wow, i love it!
[>___
By katyaeliz on Oct 23, 2008 11:58 pm
Tutorial Details
| Author |
danielaaax
|
| Submitted on | Oct 4, 2008 |
| Page views | 38,170 |
| Favorites | 210 |
| Comments | 19 |
| Reviewer |
Blaqheartedstar
|
| Approved on | Oct 6, 2008 |