Tutorial
Click on thumbnailed images to enlarge
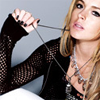
Step 1: Start out with you base image 100X100 (or whatever your desired size is).
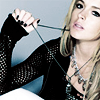
Step 2: Duplicate the base image.
Step 3: Set the duplicated layer to Softlight 100% (Optional: You may choose to sharpen your base or not to. It's really about preference).

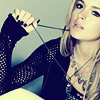
Step 4: Go to Layer>>New Adj. Layer>>Hue/Saturation and change the Saturation to -31.

Step 5: Go to Layer>>New Adj. Layer>>Selective Coloring and input these seetings:
Red: -31/-36/-51/-35
Yellow: -100/-100/-100/-100
Cyan: 44/30/-44/26
Neutrals: 29/0/0/0
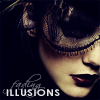
Step 6: Fill a new (and empty) layer with #080440 and set it to Exclusion 100%.
Step 7: Duplicate the Base image and bring it to the top of all the layers.
Step 8: Set this layer to Softlight 100%.

Step 9: Add any text or brushes to the icon to make it your own!
~~~~~~~~~~~~~
Some examples of different icons that used this coloring:
Light Bases:

Medium Bases:

Dark Bases:
Step 2: Duplicate the base image.
Step 3: Set the duplicated layer to Softlight 100% (Optional: You may choose to sharpen your base or not to. It's really about preference).
Step 4: Go to Layer>>New Adj. Layer>>Hue/Saturation and change the Saturation to -31.
Step 5: Go to Layer>>New Adj. Layer>>Selective Coloring and input these seetings:
Red: -31/-36/-51/-35
Yellow: -100/-100/-100/-100
Cyan: 44/30/-44/26
Neutrals: 29/0/0/0
Step 6: Fill a new (and empty) layer with #080440 and set it to Exclusion 100%.
Step 7: Duplicate the Base image and bring it to the top of all the layers.
Step 8: Set this layer to Softlight 100%.
Step 9: Add any text or brushes to the icon to make it your own!
~~~~~~~~~~~~~
Some examples of different icons that used this coloring:
Light Bases:
Medium Bases:
Dark Bases:
Tutorial Comments
Showing latest 10 of 10 comments

shia labeouf :]
By egduf8 on Dec 31, 2008 3:18 am

One of the best tutorials ever. I love using this to make avatars and icons. It's such an awesome effect and it's so simple to do! Bravo!
By trancer97 on Jul 21, 2008 2:51 pm

omg...I totally adore this...I like it to make avatars =D So this one is very helpful!
By Cupcake-S on Jul 9, 2008 1:14 pm

good tutorial =]
By N4th4li3L on Jul 7, 2008 4:03 pm

This is so neat,
Thanks for sharing. :D
By SmileBig on Jun 22, 2008 1:43 pm

Cuuute :D Good tutorial!
By IzzyGrace on Jun 15, 2008 5:46 pm

i love this
thank ya bunches :)
By brunette925 on Jun 13, 2008 1:33 pm

beautiful. thanks for the tut. :D
By jaenie on Jun 12, 2008 10:22 pm

it really makes the skin look nice in the finished project! fabulous!
By digitalivory on Jun 12, 2008 9:47 pm

Wow, that's neat. [: I'd use this tutorial, but I don't have the program.
By robinneboo on Jun 10, 2008 10:38 pm
Tutorial Details
| Author |
vogueXdirge
|
| Submitted on | Jun 10, 2008 |
| Page views | 17,073 |
| Favorites | 102 |
| Comments | 10 |
| Reviewer |
manny-the-dino
|
| Approved on | Jun 10, 2008 |