Tutorial
Click on thumbnailed images to enlarge
So id figure i do something like this in PS CS3 Ext. Version, since the one thats already here is done in PS, and its kinda hard.
1. Open your image in PS
2. Press the letter D so that you have the default colors(black & white) as your foreground an background colors, you can either make a new layer and select the Rectangular Marquee tool and with the foreground color set to white press Alt + Backspace to fill those selected pixels with white, then lower the opacity to like 10% - 20% in the layers palette, or select the Rectangular Shape tool
  and click and drag to make a rectangular as you like, position it as you desire then lower the opacity as i already mentioned
3. Now change your foreground color by pressing the letter X to black and select the Line tool , it shares a spot in the toolbox with the Rectangular Shape tool, and make a line the same width as your white rectangle, and lower the opacity to like 30%, and position it on top of your white rectangle
4. Now make sure you have that line layer selected, press the letter V to select the move tool , now in the image window, press and hold Alt + Shift to make a copy of that line and constrain your movement vertically, click and drag downwards and position it below the white rectangle
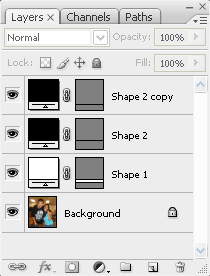
you should have this in your layers palette now
and that should do it, add text and whatever you want
(c) The Photoshop Group
1. Open your image in PS
2. Press the letter D so that you have the default colors(black & white) as your foreground an background colors, you can either make a new layer and select the Rectangular Marquee tool
and with the foreground color set to white press Alt + Backspace to fill those selected pixels with white, then lower the opacity to like 10% - 20% in the layers palette, or select the Rectangular Shape tool and click and drag to make a rectangular as you like, position it as you desire then lower the opacity as i already mentioned3. Now change your foreground color by pressing the letter X to black and select the Line tool
, it shares a spot in the toolbox with the Rectangular Shape tool, and make a line the same width as your white rectangle, and lower the opacity to like 30%, and position it on top of your white rectangle4. Now make sure you have that line layer selected, press the letter V to select the move tool
, now in the image window, press and hold Alt + Shift to make a copy of that line and constrain your movement vertically, click and drag downwards and position it below the white rectangleyou should have this in your layers palette now
and that should do it, add text and whatever you want
(c) The Photoshop Group
Tutorial Comments
Showing latest 5 of 5 comments

wTh...........
i'm already lost on step 1 =x
HELLPP!!
By choualee12 on Dec 5, 2008 2:22 am
I dont understand... =(
By Rin58 on Aug 15, 2008 10:27 pm

whoot, awesome [=
By xfelony on Mar 31, 2008 1:21 am
THANKS MAN...
By caslonc on Mar 5, 2008 11:31 pm

thanks breh!
By oneroot on Feb 25, 2008 7:20 pm
Tutorial Details
| Author |
elrene06
|
| Submitted on | Feb 20, 2008 |
| Page views | 19,704 |
| Favorites | 100 |
| Comments | 5 |
| Reviewer |
MissHygienic
|
| Approved on | Feb 20, 2008 |