Tutorial
Click on thumbnailed images to enlarge
**NOTE**
I did this tutorial in Photoshop CS3 Extended which is why some of you may have problems. However, that doesn't mean this tutorial won't work in other versions of Photoshop. Just try it out.
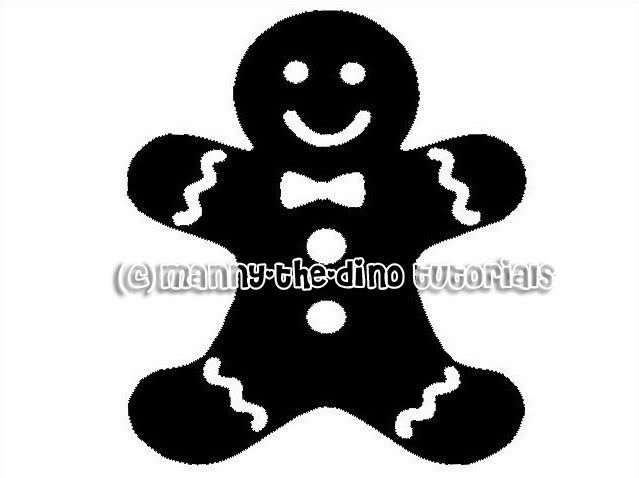
Have your custom shape done but want to learn something else about it? Well I will show you how to change the color of you custom shape & make "collections" with it. Here's the before:
Here's the after:

Let's start!
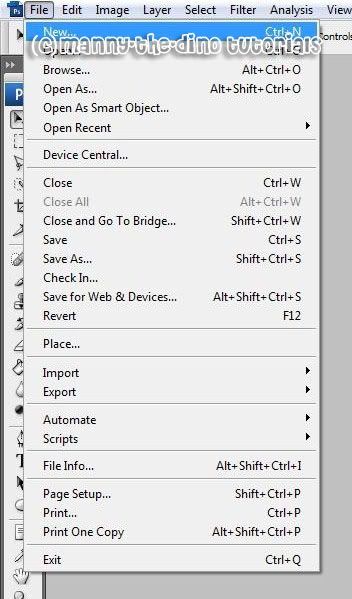
001.First go File>New.
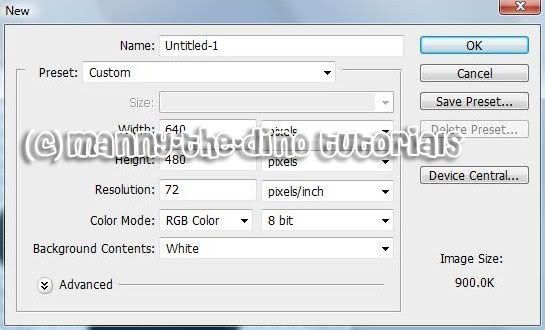
002.Make your new document 640x480.
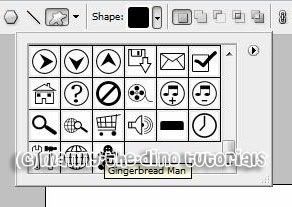
003.Select your Custom Shape Tool (U).

004.Select your new shape. In my case, I would select my "Gingerbread Man" shape.
005.Drag your shape out onto your document.

006.Go over to the layers' palette, double-click on your color (which should be black) & pick a color. The color I chose was #9d6b40.

007.Now do a ctrl+t, resize & rotate your shape.

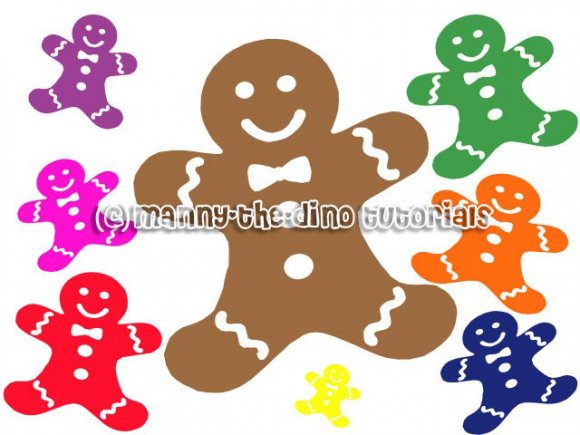
008.Just keep going & going. Add some more gingerbread men in different colors & sizes. Have fun with it. You should end up with something like my finished product below.
If you got lost or have any questions, comment the tutotial & I'll get back to you as soon as I can. :D
I did this tutorial in Photoshop CS3 Extended which is why some of you may have problems. However, that doesn't mean this tutorial won't work in other versions of Photoshop. Just try it out.
Have your custom shape done but want to learn something else about it? Well I will show you how to change the color of you custom shape & make "collections" with it. Here's the before:
Here's the after:
Let's start!
001.First go File>New.
002.Make your new document 640x480.
003.Select your Custom Shape Tool (U).
004.Select your new shape. In my case, I would select my "Gingerbread Man" shape.
005.Drag your shape out onto your document.
006.Go over to the layers' palette, double-click on your color (which should be black) & pick a color. The color I chose was #9d6b40.
007.Now do a ctrl+t, resize & rotate your shape.
008.Just keep going & going. Add some more gingerbread men in different colors & sizes. Have fun with it. You should end up with something like my finished product below.
If you got lost or have any questions, comment the tutotial & I'll get back to you as soon as I can. :D
Tutorial Comments
No comments yet. Be the first one to comment!
Tutorial Details
| Author |
manny-the-dino
|
| Submitted on | Jan 27, 2008 |
| Page views | 10,185 |
| Favorites | 19 |
| Comments | 0 |
| Reviewer |
S-Majere
|
| Approved on | Jan 29, 2008 |