Tutorial
Click on thumbnailed images to enlarge
This Tutorial was created by Erin @ [url=http://www.foreverangel.info/]Forever Angel/url].
Step Uno (1)- Open/Create your image. You may create your image in another program and then open it in GIMP or just create the image in GIMP. I'm using this image (you may save it to follow along):

Step Dos (2)- Click Filters>Web>Image Map...

Step Tres (3)- Click one of the 3 tracing tools on the left side of the popup box and then draw the box around your text like so:
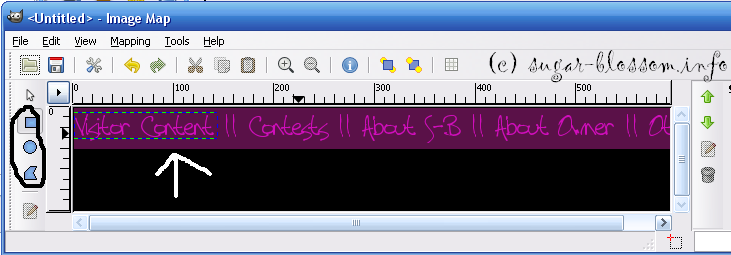
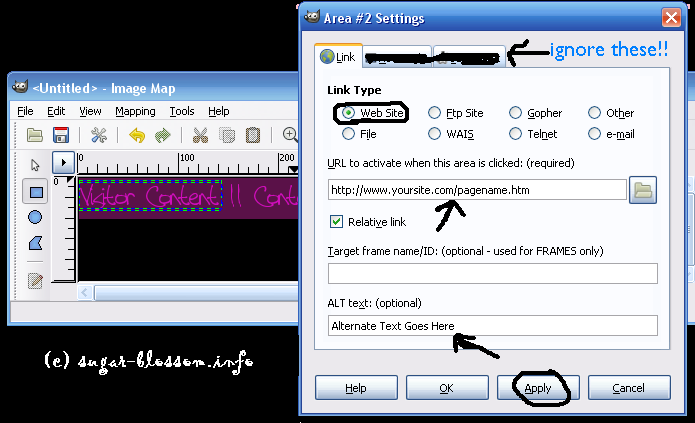
Step Cuatro (4)- Create the link by making sure it is set to website, then typing in the url to where you want that specific map to be linked to then if you want to add some alternate text. Click Apply. Repeat as many times as needed.
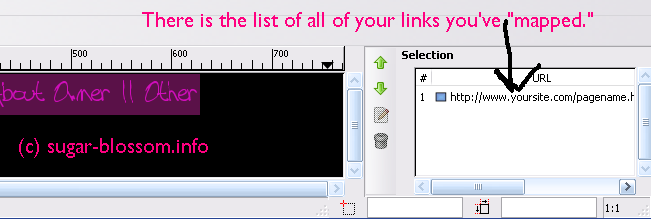
Step Cinco (5)- Your links will show up in the box next to where you are image mapping.
Step Seis (6)- Save the image map as youfilenamehere.html YOU MUST SAVE IT AS .html FOR THIS TO WORK!!!! Save your image as well. It doesn't matter what the ending is when you save it.
[img]http://i68.photobucket.com/albums/i31/dumb5567/create%20blog%20stuff/saveimgmap.png[img]
Step Seite (7)- Open up the .html file and open the file where you are going to place the image map. The .html file should look like this:
< img src="PUT THE DIRECT LINK CODE FOR THE IMAGE THAT WILL BE IMAGE MAPPED HERE! :-)" width="630" height="41" border="0" usemap="#map" />
DO NOT USE THIS CODE AS YOUR OWN!!! :-|
< map name="map">
< area shape="rect" coords="0,4,141,32" href="URL HERE" />
< area shape="rect" coords="173,6,257,33" href="URL HERE" />
< area shape="rect" coords="283,4,389,31" href="URL HERE" />
< area shape="rect" coords="421,6,541,31" href="URL HERE" />
< area shape="rect" coords="573,4,626,28" href="URL HERE" />
< /map >
Step Ocho (8)- Upload the IMAGE to photobucket, tinypic, imageshack, or a place like that. If you use FTP you may upload it there.
Step Nueve (9)- Go to the first (1st) line and find the img source tag and change the file name that's in there (should say something like image.gif) to the direct link of the image. Make sure that this direct link is right because the image source tag is CASE sensitive. http://www.whatever.com/yourfilenameforyourimage.gif
Step Dies (10)- Copy & Paste the html in the .html file into where you want the image map to show up.
Step Once (11)- Save the file where you want the image map to show up NOT THE .html FILE.
VIOLA!! You have a perfect image map! :-)
Step Uno (1)- Open/Create your image. You may create your image in another program and then open it in GIMP or just create the image in GIMP. I'm using this image (you may save it to follow along):
Step Dos (2)- Click Filters>Web>Image Map...
Step Tres (3)- Click one of the 3 tracing tools on the left side of the popup box and then draw the box around your text like so:
Step Cuatro (4)- Create the link by making sure it is set to website, then typing in the url to where you want that specific map to be linked to then if you want to add some alternate text. Click Apply. Repeat as many times as needed.
Step Cinco (5)- Your links will show up in the box next to where you are image mapping.
Step Seis (6)- Save the image map as youfilenamehere.html YOU MUST SAVE IT AS .html FOR THIS TO WORK!!!! Save your image as well. It doesn't matter what the ending is when you save it.
[img]http://i68.photobucket.com/albums/i31/dumb5567/create%20blog%20stuff/saveimgmap.png[img]
Step Seite (7)- Open up the .html file and open the file where you are going to place the image map. The .html file should look like this:
< img src="PUT THE DIRECT LINK CODE FOR THE IMAGE THAT WILL BE IMAGE MAPPED HERE! :-)" width="630" height="41" border="0" usemap="#map" />
DO NOT USE THIS CODE AS YOUR OWN!!! :-|
< map name="map">
< area shape="rect" coords="0,4,141,32" href="URL HERE" />
< area shape="rect" coords="173,6,257,33" href="URL HERE" />
< area shape="rect" coords="283,4,389,31" href="URL HERE" />
< area shape="rect" coords="421,6,541,31" href="URL HERE" />
< area shape="rect" coords="573,4,626,28" href="URL HERE" />
< /map >
Step Ocho (8)- Upload the IMAGE to photobucket, tinypic, imageshack, or a place like that. If you use FTP you may upload it there.
Step Nueve (9)- Go to the first (1st) line and find the img source tag and change the file name that's in there (should say something like image.gif) to the direct link of the image. Make sure that this direct link is right because the image source tag is CASE sensitive. http://www.whatever.com/yourfilenameforyourimage.gif
Step Dies (10)- Copy & Paste the html in the .html file into where you want the image map to show up.
Step Once (11)- Save the file where you want the image map to show up NOT THE .html FILE.
VIOLA!! You have a perfect image map! :-)
Tutorial Comments
Showing latest 3 of 3 comments

Thanks! But it doesn't work in myspace band layouts ;(
By drumminsully on Feb 25, 2010 5:36 pm

Thanks! :-)
By theerinkal on Mar 5, 2009 10:34 pm

Thank you so much :)
I have Photoshop CS3 extended.
but I never understood gimp.
so this is extrememly helpful :)
By korkybabyy on Mar 5, 2009 8:29 pm
Tutorial Details
| Author |
theerinkal
|
| Submitted on | Mar 4, 2009 |
| Page views | 9,280 |
| Favorites | 12 |
| Comments | 3 |
| Reviewer |
manny-the-dino
|
| Approved on | Mar 4, 2009 |