Tutorial
Click on thumbnailed images to enlarge
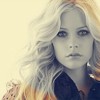
I'm using this photograph of Taylor Swift from Photobucket:

FIRST: Crop the section of the photo you are going to use. 100 px by 100 px. Also do any colour correction you want.

My crop looks like this:

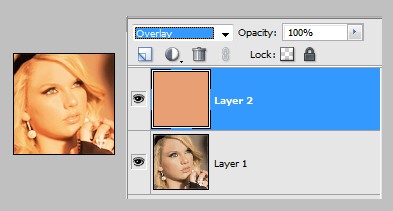
SECOND: Create a new layer and fill with e79f74. Set to Overlay.
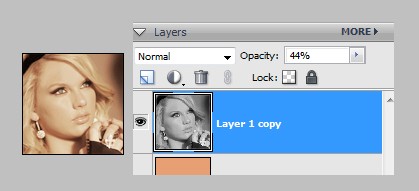
THIRD: Duplicate your base layer. Convert to Black and White (Ctrl+Shft+U) and set to Normal, 44%.
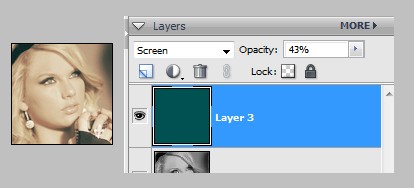
FORTH: Create another new layer at Screen, 43%. Fill with 005151.
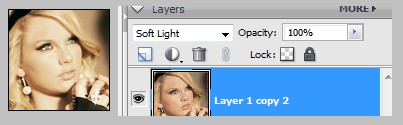
FIFTH: Duplicate your base again. Set to Soft Light.
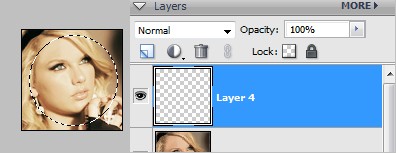
SIXTH: Make a circle w/ the selection tool on a new layer.
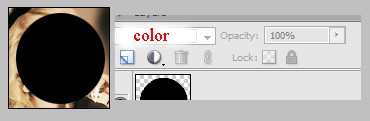
SEVENTH: Select your fill bucket tool and color the circle w/ black. Then deselect (Ctrl+D). (There's a mistake in the photo. The red font should just be Normal. We haven't done anything with the style yet.)
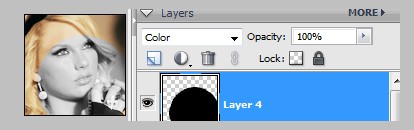
EIGHTH: Change the layer style to Color. Now move the circle wherever you want.
NINTH: Now we'll blur the circle. Filter > Blur > Gaussian Blur... Settings: 2.5 pixels.
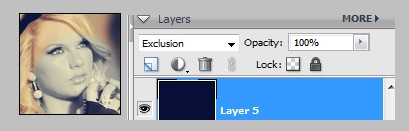
TENTH: Create one more new layer. Fill with 080f38 and set to Exclusion.
OPTIONAL: Duplicate your base again and drag to top. Set to Soft Light.
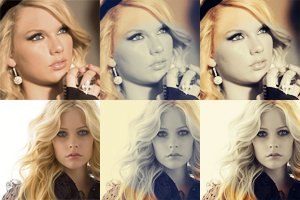
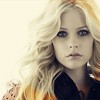
RESULTS:
TEN STEPS:

OPTIONAL STEP:

Enjoy! :D
Stealing is wrong.
FIRST: Crop the section of the photo you are going to use. 100 px by 100 px. Also do any colour correction you want.
My crop looks like this:
SECOND: Create a new layer and fill with e79f74. Set to Overlay.
THIRD: Duplicate your base layer. Convert to Black and White (Ctrl+Shft+U) and set to Normal, 44%.
FORTH: Create another new layer at Screen, 43%. Fill with 005151.
FIFTH: Duplicate your base again. Set to Soft Light.
SIXTH: Make a circle w/ the selection tool on a new layer.
SEVENTH: Select your fill bucket tool and color the circle w/ black. Then deselect (Ctrl+D). (There's a mistake in the photo. The red font should just be Normal. We haven't done anything with the style yet.)
EIGHTH: Change the layer style to Color. Now move the circle wherever you want.
NINTH: Now we'll blur the circle. Filter > Blur > Gaussian Blur... Settings: 2.5 pixels.
TENTH: Create one more new layer. Fill with 080f38 and set to Exclusion.
OPTIONAL: Duplicate your base again and drag to top. Set to Soft Light.
RESULTS:
TEN STEPS:
OPTIONAL STEP:
Enjoy! :D
Stealing is wrong.
Tutorial Comments
Showing latest 7 of 7 comments

great tutorial! kudos x
By imano on Jan 7, 2009 5:15 pm

swweeet!
By diputs on Dec 1, 2008 8:32 am

Great tut [:
By iSbl on Dec 1, 2008 6:13 am

informative ;)
By xmari0nettedoIIx on Nov 28, 2008 4:15 am

Ooh, really nice effect.
I'll be sure to try it. :D
By so-sarcastic on Nov 26, 2008 2:26 am

pretty cool. :D
By futura on Nov 24, 2008 10:06 pm

wow. This is gorgeous! I love the warm effect it gives.
By vogueXdirge on Nov 24, 2008 9:31 pm
Tutorial Details
| Author |
digitalivory
|
| Submitted on | Nov 24, 2008 |
| Page views | 13,262 |
| Favorites | 93 |
| Comments | 7 |
| Reviewer |
manny-the-dino
|
| Approved on | Nov 24, 2008 |