Tutorial
Click on thumbnailed images to enlarge
Alright kiddies. Once again it's another installment of the Banneresque series of coloring tutorials! Yay! Yes, I can just sense your enthusiasm.
Anyways, I shall quit with my banter and go on with the tutoring!
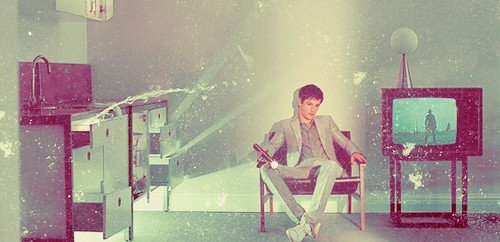
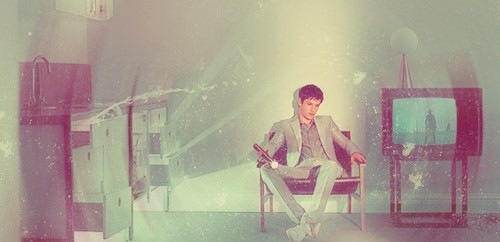
Step Uno: Grab your base
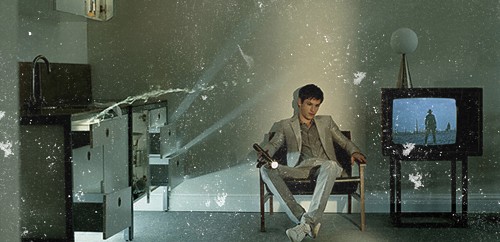
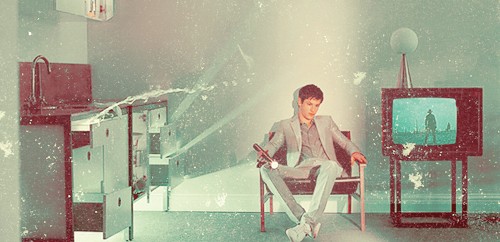
For this lovely tutorial, I am using a picture of the even lovlier Gaspard Ulliel, who was seriously born to play Edward and some people just can't see that, but ANYWAYS.
Seriously. This man is smokin.
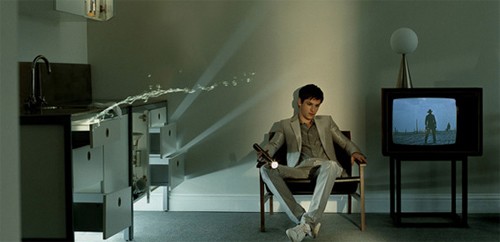
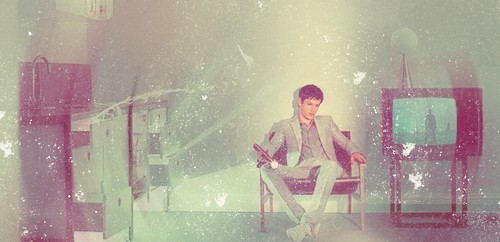
Step Two: Minor Tweeks (OPTIONAL)
When I was creating this graphic, as I kept doing my coloring layers, I noticed some slight pixelated so I blured a couple of areas.
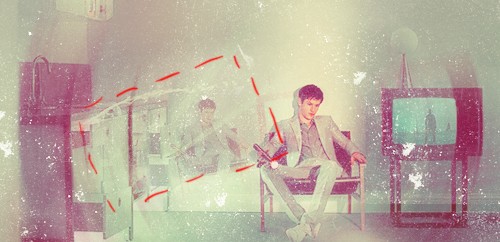
Blurred Areas:
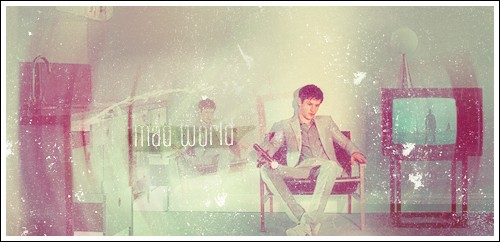
FINAL:

Step Three: TEXTurize ME
Take this lovely texture:
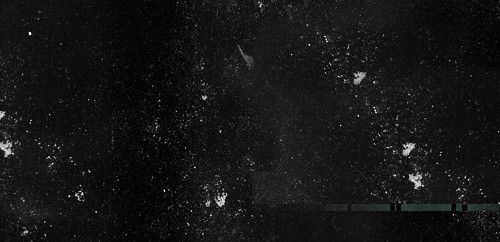
and set that to SCREEN giving you the result of
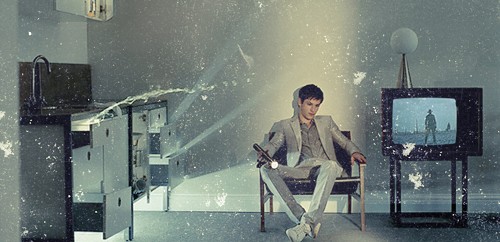
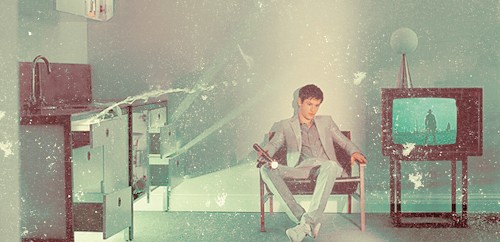
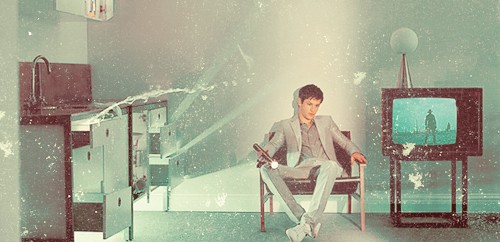
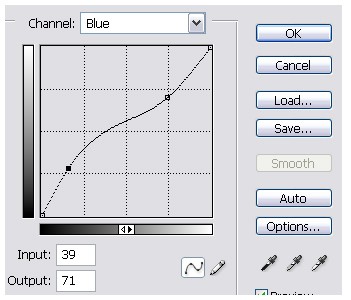
Step Four: CURVEy
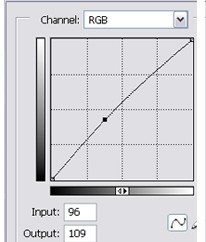
Now, we're going to add some coloring. WHOOT! So, go to LAYER >> New Adjustment Layer>> Curves and input these settings:
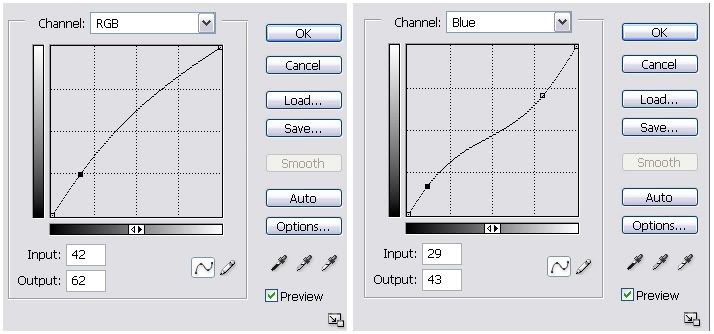
click for larger picture
to give you the result of
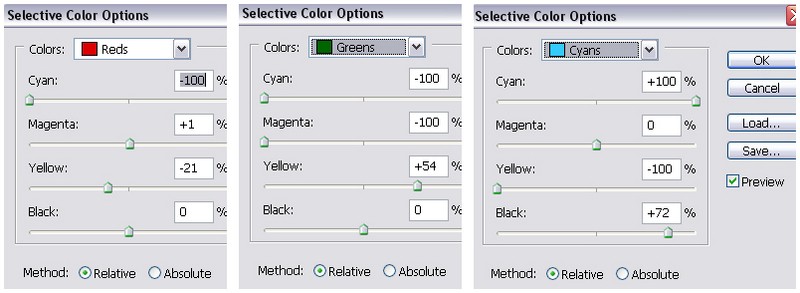
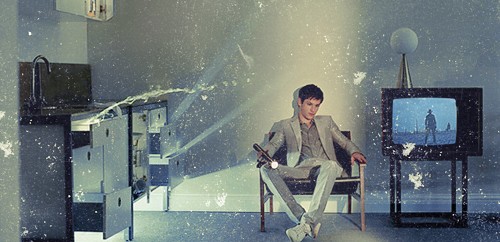
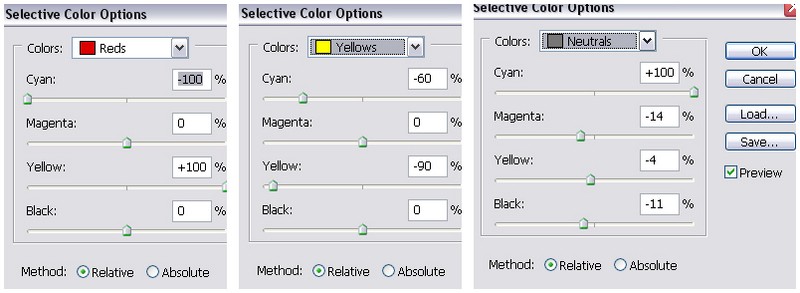
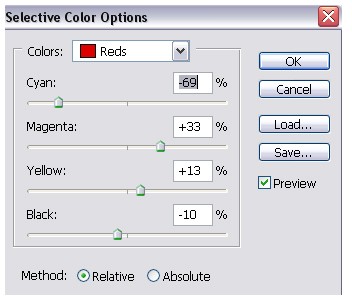
Step Five: Colourrr
Go to Layer>>New Adjustment Layer>>Selective Color and input these lovely settings:
to give you the result of
 ''
''
Step Six: Yellerrr
Make a new layer (Layer>>New Layer), fill it with the color: D3C205 and set it to Soft Light @ 100% Opacity, which yes, makes a slightly ugly yellow hue to everything but really, it looks better in the end.

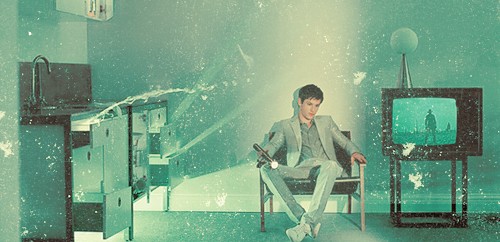
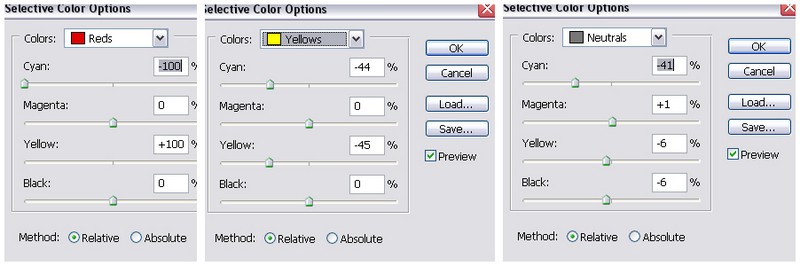
Step Seven: Mas Color
Create a new selective color adjustment layer, and input these settings:
which gives the resultsss of
Step Eight:Mooore Color
New selective color adjustment layer, again, i'm starting to sense a pattern..., with these settings
which gives these results
Step Nine: Layered
Duplicate your base, way down at the bottom, drag it on up your layers pallete, and set that to Soft Light @ 40% Opacity. So far:
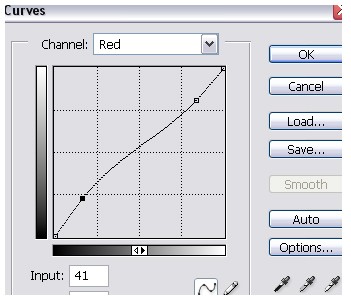
Step Ten: Curvalicioso
Layer>> New Adjustment Layer>> Curves, with these settings:
to give the result of
Step Eleven: Bloody Red
New Selective color, with the settings of
to give
Seriously, have I bored you yet? Take this time to go get a coke or something...
*Hums elevator music*
BACK!
Step Twelve: Curavliciosaaaa
New Curve layer, with the settings of:
to give

Step Thirteen: Orraanggee
New color layer, fill it with FDEEE0 and set it to Darken @ 100%, to give you

Step Fourteen: Violeta
New color layer, fill it with FFF0F5, and set it to ColorBlurn @ 100%, to give you

Step Fifteen: Mas
Once again, new curve layer, with these settings:
to give the result of
Step Sixteen: Balancenco
Layer >> New Adjustment Layer >> Color Balance, with these settings
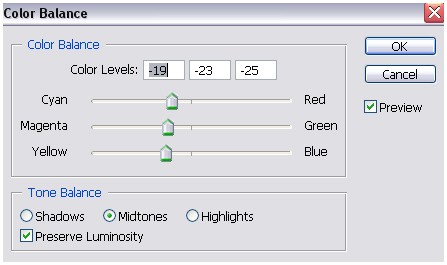
to give this

Step Seventeen: Radical duddeeee
NOW! Here's the fun part. Create a new layer. Hit cntrl+alt+shift+e on your keyboard. This merges everything that you've done onto that one layer. Now go to Filter >> Blur >> Radial Blur and look at this:
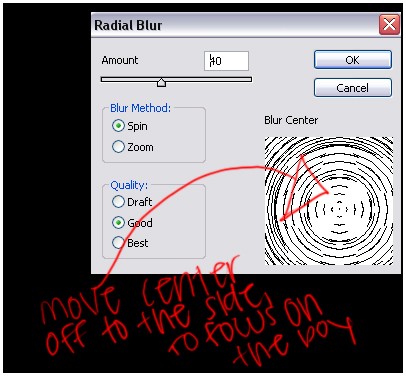
What you have to do is drag the center a little off to the right, because Edward, i'm sorry Gaspard, is off to the right a bit. It doesn't quite have to be exact, just..near him.
When I did this, I got this:
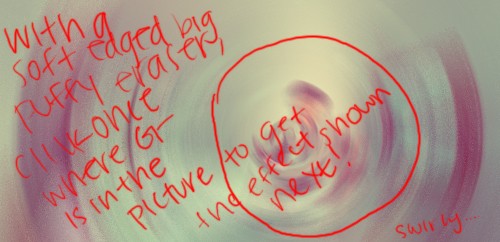
Now all you have to do is take a fairly large soft edged eraser, and just click once in the center, where he is. Once yuo've done the erasing, set the layer to Soft Light @40% Opacity
Step Eighteen: Texxtturization Meh
Remember that texture from step three? Yes. Duplicate it, drag it to the top, and hit it to Screen.

to give
I don't know why I did it twice. It seems stupid, now that I think about it.
Step Nineteen: Seein' Double
Create a new layer. Hit cntrl+alt+shift+e. Resize it, cntrl+t, make it smaller and move it off to the left side of his head. Using a large soft edged eraser, set it to soft light.
To get..this. It's quite lovely.
Step Twenty: Bow chicka wah wah
Now. Duplicate that last layer. And then, we're going to blur it again. I honestly don't have any pictures to this describe it, and to only say, move the blur center off to the left side. Yeah. Once you have the blur, just erase some that'll spread, and set the blur layer to soft light, and lower the opacity a bit.
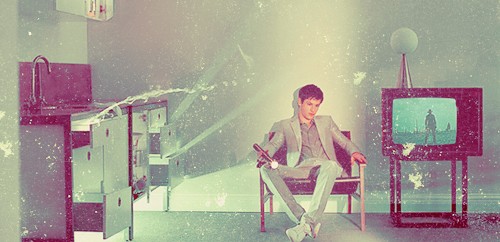
And then, you're done! Just add some text, border, whatever!
It's soo purrrty!!
Anyways, I shall quit with my banter and go on with the tutoring!
Step Uno: Grab your base
For this lovely tutorial, I am using a picture of the even lovlier Gaspard Ulliel, who was seriously born to play Edward and some people just can't see that, but ANYWAYS.
Seriously. This man is smokin.
Step Two: Minor Tweeks (OPTIONAL)
When I was creating this graphic, as I kept doing my coloring layers, I noticed some slight pixelated so I blured a couple of areas.
Blurred Areas:
FINAL:
Step Three: TEXTurize ME
Take this lovely texture:
and set that to SCREEN giving you the result of
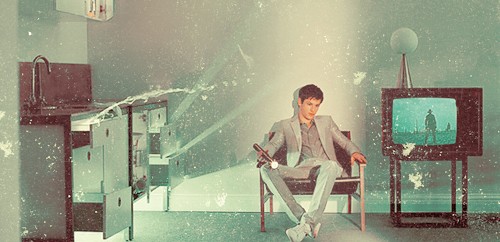
Step Four: CURVEy
Now, we're going to add some coloring. WHOOT! So, go to LAYER >> New Adjustment Layer>> Curves and input these settings:
click for larger picture
to give you the result of
Step Five: Colourrr
Go to Layer>>New Adjustment Layer>>Selective Color and input these lovely settings:
to give you the result of
''Step Six: Yellerrr
Make a new layer (Layer>>New Layer), fill it with the color: D3C205 and set it to Soft Light @ 100% Opacity, which yes, makes a slightly ugly yellow hue to everything but really, it looks better in the end.
Step Seven: Mas Color
Create a new selective color adjustment layer, and input these settings:
which gives the resultsss of
Step Eight:Mooore Color
New selective color adjustment layer, again, i'm starting to sense a pattern..., with these settings
which gives these results
Step Nine: Layered
Duplicate your base, way down at the bottom, drag it on up your layers pallete, and set that to Soft Light @ 40% Opacity. So far:
Step Ten: Curvalicioso
Layer>> New Adjustment Layer>> Curves, with these settings:
to give the result of
Step Eleven: Bloody Red
New Selective color, with the settings of
to give
Seriously, have I bored you yet? Take this time to go get a coke or something...
*Hums elevator music*
BACK!
Step Twelve: Curavliciosaaaa
New Curve layer, with the settings of:
to give
Step Thirteen: Orraanggee
New color layer, fill it with FDEEE0 and set it to Darken @ 100%, to give you
Step Fourteen: Violeta
New color layer, fill it with FFF0F5, and set it to ColorBlurn @ 100%, to give you
Step Fifteen: Mas
Once again, new curve layer, with these settings:
to give the result of
Step Sixteen: Balancenco
Layer >> New Adjustment Layer >> Color Balance, with these settings
to give this
Step Seventeen: Radical duddeeee
NOW! Here's the fun part. Create a new layer. Hit cntrl+alt+shift+e on your keyboard. This merges everything that you've done onto that one layer. Now go to Filter >> Blur >> Radial Blur and look at this:
What you have to do is drag the center a little off to the right, because Edward, i'm sorry Gaspard, is off to the right a bit. It doesn't quite have to be exact, just..near him.
When I did this, I got this:
Now all you have to do is take a fairly large soft edged eraser, and just click once in the center, where he is. Once yuo've done the erasing, set the layer to Soft Light @40% Opacity
Step Eighteen: Texxtturization Meh
Remember that texture from step three? Yes. Duplicate it, drag it to the top, and hit it to Screen.
to give
I don't know why I did it twice. It seems stupid, now that I think about it.
Step Nineteen: Seein' Double
Create a new layer. Hit cntrl+alt+shift+e. Resize it, cntrl+t, make it smaller and move it off to the left side of his head. Using a large soft edged eraser, set it to soft light.
To get..this. It's quite lovely.
Step Twenty: Bow chicka wah wah
Now. Duplicate that last layer. And then, we're going to blur it again. I honestly don't have any pictures to this describe it, and to only say, move the blur center off to the left side. Yeah. Once you have the blur, just erase some that'll spread, and set the blur layer to soft light, and lower the opacity a bit.
And then, you're done! Just add some text, border, whatever!
It's soo purrrty!!
Tutorial Comments
Showing latest 10 of 21 comments

Where did you get the splatter texture? I'd like a bigger one to use for a bigger picture :P
By chod3994 on Oct 29, 2010 3:05 pm

These are so awesome. I really like it. Thanks!
By PaigeTurner on Jul 12, 2009 3:57 am
Ah Gaspard. Oh. Awesome tut btw.
By XxDanceToThisBeatxX on Jan 31, 2009 2:05 am

I soooo much agree with you on the edawrd deal
seriously
By sunniede82 on Jan 7, 2009 1:06 am

this is amazing!!! Love part 2!!!!
By Wancapulet on Nov 28, 2008 1:01 pm

wow amazing :D
By goth-nina on Oct 10, 2008 3:38 pm

that is awesome..I should try sometime..hehe^^
By nolee on Sep 7, 2008 4:41 pm

how do you add the texture?
By pnaigirl13 on Jun 3, 2008 10:55 pm

very cool. =]
By shmuggy on Apr 23, 2008 9:04 am
I love this :)
Except it isn't working right. oh well, kudos to you.
By Christinacanboogie on Apr 18, 2008 1:57 am
Tutorial Details
| Author |
technicolour
|
| Submitted on | Aug 12, 2007 |
| Page views | 25,795 |
| Favorites | 219 |
| Comments | 21 |
| Reviewer |
Alvin
|
| Approved on | Aug 12, 2007 |