Tutorial
Click on thumbnailed images to enlarge
In this tutorial I'll give you the basics of Photoshop Brushes
The Brush tool , located on the toolbox, applies foreground color as you drag within an image, in the form of freehand lines that could be sharp or blurry. Pressing Shift while you drag the tool keeps the line straight
You can activate the Brush tool by pressing B or by selecting it on the toolbox. When the Brush tool is active you'll see in the Options bar settings for controlling the Brush Mode, Opacity, Flow, you can activate the Airbrush function, you can select brushes, and a drop-down arrow where you can control the Diameter of your brush, the Hardness, and you can also create Brush presets, Reset, Load, Save and Replace brushes. But a nice thing to know is that you can also right-click anywhere in the image window when the Brush tool is active and you'll see a small palette of preset brush shapes with a drop-down menu with additional options
----------------------------------------------------------------------------------------------------------------------------------------------------------------
So here's a view of the Options bar when the Brush tool is active
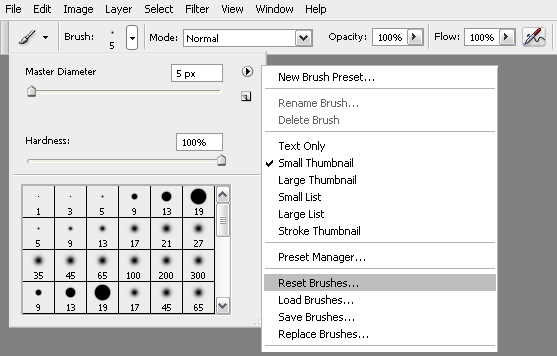
The Brush Modes, located in the Options bar when the Brush tool is active, provides 25 different modes that mix colors inside a layer
The Opacity setting controls how opaque your brush is going to paint
The Flow setting controls how quickly paint is applied
With the Airbrush function On, the color applied by your brush continues to build as long as you press the mouse button, even when holding the cursor in the same position. You can invoke the Airbrush function when your Brush tool is active by pressing Shift + Alt + P, and pressing it again turns if off
 Remember that is best to paint in a separate layer, and not in the same layer of your images, cause you can always delete or modify that layer, and your brush won't affect your image layer. Also remember that you can use the Eyedropper tool to sample colors from an image by Alt clicking when using the Brush tool
The Master Diameter value represents the width of the brush. You can type a value here in pixels and you can also use your right ( ] ) bracket key to make the brush bigger or the left ( [ ) one to make it smaller
With the Hardness slider you can soften the edges of a brush by dragging the slider bar to the left
When you click the top right-arrow in the Brushes menu, you'll get this ↓ menu along with a list of all your installed brushes

Here you can make New Brush Presets, rename and delete brushes, from Text Only to Stroke Thumbnail are settings for your brush thumbnails in the Brush menu, and Reset, Load, Save and Replace, they all let you do exactly that
How to define custom Brushes in PS?
You can make Brushes in PS really easy and out of anything (text, images, shapes, selections etc). With your image or whatever your making the brush of already opened, go to Edit → Define Brush Preset type the name of your brush in the Brush Name dialog box, click OK]/b] and thats it, your brush should appear last in your current brush list...really easy right!
To ensure that your custom brushes are saved in case you delete the preferences file or for use on another computer, choose Save Brushes from the palette menu
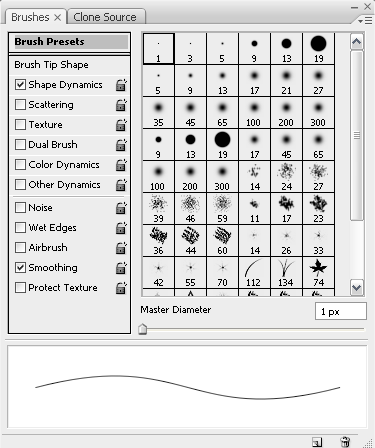
The Brushes palette gives you lots of options for modifying your brush tips. If you don't see your Brushes palette press F5 or go to [b]Window → Brushes
How to install Brushes in PS?
 Installing brushes in PS it's really easy too. PS Brushes have the .abr file extension, you just have to find it in your downloaded file, copy it by right-clicking → Copy or selecting it first and then press Ctrl + C, then go to the disk where PS is installed on your computer C: → Program Files → Adobe → Adobe Photoshop → Presets → Brushes → right-click Paste or press Ctrl + V, now you should see your Brush in your brushes list
How to save Brush sets?
To save all brushes currently displayed in the Brushes palette, choose Save Brushes from the palette menu. If you want to save only some of the brushes as a set, however, choose Edit → Preset Manager, Shift + click the brushes you want to save, and then click the Save Set button, but if you want to select non-contiguous brushes, use the Ctrl key as you click on the brushes you want to save
(c) The Photoshop Group
The Brush tool
, located on the toolbox, applies foreground color as you drag within an image, in the form of freehand lines that could be sharp or blurry. Pressing Shift while you drag the tool keeps the line straightYou can activate the Brush tool by pressing B or by selecting it on the toolbox. When the Brush tool is active you'll see in the Options bar settings for controlling the Brush Mode, Opacity, Flow, you can activate the Airbrush function, you can select brushes, and a drop-down arrow where you can control the Diameter of your brush, the Hardness, and you can also create Brush presets, Reset, Load, Save and Replace brushes. But a nice thing to know is that you can also right-click anywhere in the image window when the Brush tool is active and you'll see a small palette of preset brush shapes with a drop-down menu with additional options
----------------------------------------------------------------------------------------------------------------------------------------------------------------
So here's a view of the Options bar when the Brush tool is active
The Brush Modes, located in the Options bar when the Brush tool is active, provides 25 different modes that mix colors inside a layer
The Opacity setting controls how opaque your brush is going to paint
The Flow setting controls how quickly paint is applied
With the Airbrush function On, the color applied by your brush continues to build as long as you press the mouse button, even when holding the cursor in the same position. You can invoke the Airbrush function when your Brush tool is active by pressing Shift + Alt + P, and pressing it again turns if off
Remember that is best to paint in a separate layer, and not in the same layer of your images, cause you can always delete or modify that layer, and your brush won't affect your image layer. Also remember that you can use the Eyedropper tool to sample colors from an image by Alt clicking when using the Brush toolThe Master Diameter value represents the width of the brush. You can type a value here in pixels and you can also use your right ( ] ) bracket key to make the brush bigger or the left ( [ ) one to make it smaller
With the Hardness slider you can soften the edges of a brush by dragging the slider bar to the left
When you click the top right-arrow in the Brushes menu, you'll get this ↓ menu along with a list of all your installed brushes
Here you can make New Brush Presets, rename and delete brushes, from Text Only to Stroke Thumbnail are settings for your brush thumbnails in the Brush menu, and Reset, Load, Save and Replace, they all let you do exactly that
How to define custom Brushes in PS?
You can make Brushes in PS really easy and out of anything (text, images, shapes, selections etc). With your image or whatever your making the brush of already opened, go to Edit → Define Brush Preset type the name of your brush in the Brush Name dialog box, click OK]/b] and thats it, your brush should appear last in your current brush list...really easy right!
To ensure that your custom brushes are saved in case you delete the preferences file or for use on another computer, choose Save Brushes from the palette menuThe Brushes palette gives you lots of options for modifying your brush tips. If you don't see your Brushes palette press F5 or go to [b]Window → Brushes
How to install Brushes in PS?
Installing brushes in PS it's really easy too. PS Brushes have the .abr file extension, you just have to find it in your downloaded file, copy it by right-clicking → Copy or selecting it first and then press Ctrl + C, then go to the disk where PS is installed on your computer C: → Program Files → Adobe → Adobe Photoshop → Presets → Brushes → right-click Paste or press Ctrl + V, now you should see your Brush in your brushes listHow to save Brush sets?
To save all brushes currently displayed in the Brushes palette, choose Save Brushes from the palette menu. If you want to save only some of the brushes as a set, however, choose Edit → Preset Manager, Shift + click the brushes you want to save, and then click the Save Set button, but if you want to select non-contiguous brushes, use the Ctrl key as you click on the brushes you want to save
(c) The Photoshop Group
Tutorial Comments
Showing latest 1 of 1 comments

i got lost on the first step for downloading brushes....please help :]
By asswipex666 on Jan 7, 2008 11:45 pm
Tutorial Details
| Author |
elrene06
|
| Submitted on | Dec 29, 2007 |
| Page views | 12,773 |
| Favorites | 22 |
| Comments | 1 |
| Reviewer |
themarkster
|
| Approved on | Dec 29, 2007 |