Tutorial
Click on thumbnailed images to enlarge

Then we'll make it into this:

2. Before flipping the image you must copy it as it is. Press Ctrl+A and Ctrl+C. DO NOT paste yet. Now to flip the image, go to Image>Rotate Canvas>Flip Canvas Horizontal.

Now you should make a new layer then paste the image that you have copied before hand. It should look like this:

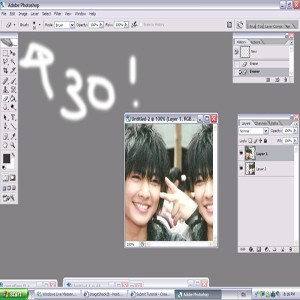
3. Now it's time to make the image look like the one above by moving it. Click on the move tool and move LAYER 2 to the left. It should be something like this:

Then you should swap the layers so layer 1 is on the stop and layer 2 is on the bottom. Then click on image 1 and move it just a little bit over to the left and it would look like this:

Now use the erase tool and erase the right side of layer very carefully. I used the circle to erase and make sure the px is small. Less than 30 at least. It should then look something smiliar:
4. Now to add on a simple brushes to make it look like the one above. Make a new layer and dump #28aec0 on the image. Then set it to color burn at 79%. Looks like this:

Now we'll do that again. Instead we'll make a new layer and dump #383838 on it and set it to vivid light at 38%.
5. Now we will have to resize the image to 100x100. Click Alt+Ctrl+I then set the width and height at 100 pixels. Click okay.
6. Now for the final touchings. Instead of me telling you what to do, you pick your own brushes and text! The texted that I used was from dafont.com and it is called Starry Night!

Just because I didn't put credits on the icon doesn't mean that it is yours. Please don't copy the exact brushes I did, use your imagination!
Visit me at www.xanga.com/colouremotion for more questions. More tutorials will be coming!
Tutorial Comments
Showing latest 10 of 12 comments

this tutorial will be good for the grudge one' i'm currently making. :D nice coloring.

its good..but i cant find the move tool..pls reply

I just wanted to say, Arron has very short fingers X3
hey i was wondering do u know how to like umm take only the person of the pic to make a banner or wallie like this one they have only the persons' not the whole entire picture
http://i205.photobu cket.com/albums/bb213/namistyl e_wall/fah_w20.jpg

for the text all you have to do is right click your text and then there is this thing at the bottom which is like warp text or something xD dont remember the name. and you can use drop shadow which is my personal favourite. ^^
hey i need help of how to copy it from where and how to paste it on step 2

hi there! I love the tutorial, ive learnt tons {noob photoshopper} I was wondering if you have an tips on text? I cant get my pic looking nice but the text always looks boring or out of place. Any adive would be amazing!
lovelove.
you have the img. Copy the image you hve and then flip it! now you may paste it.

Ahah, I opened it cuhs it said Arron Yan(:
hey i need help with step 2 the second part how do i copy and paste it plxz reply