Tutorial
Click on thumbnailed images to enlarge
Firstly, you'll need a photoshop addon, a style package. That is here:
[url=http://www.megaupload.com/?d=01JPFRSU]http://www.megaupload.com/?d=01JPFRSU[/url] (-> this will be taken down after 30 days of unuse, so if that happens post/PM me)
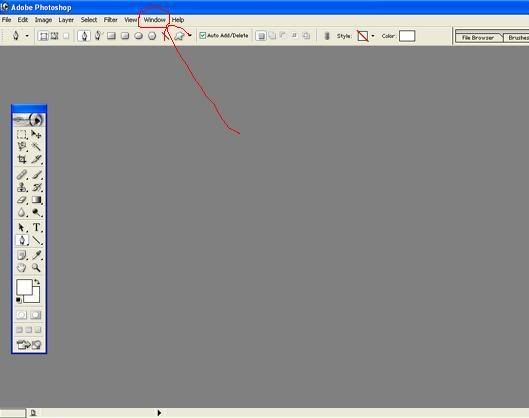
Once downloaded, open Photoshop. Make sure you have the "Colors" window open, which can be found about a third of the way down the dropdown menu located here:
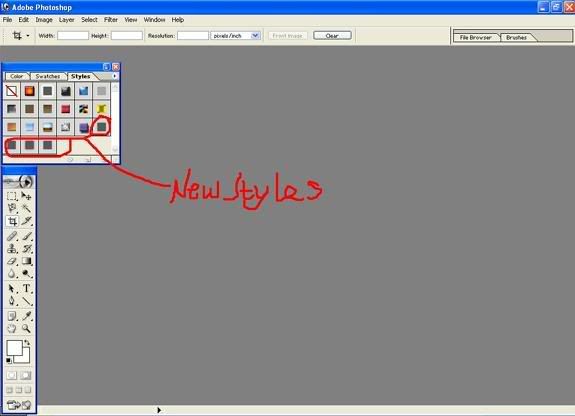
Also, both colour boxes near the bottom of the "Tools" window (foreground and background) should be white. Then, click on the rightmost tab, "Styles", and then the little arrow in the cirle to the right of that. A dropdown menu will appear, of which you will click "Load Styles". Browse your computer to find "Otis Frampton's Lightsaber Styles.asl" and double-click it. You will see four new styles appear: these are red, purple, green and blue. Your screen should now look like this (but without the big red letters):
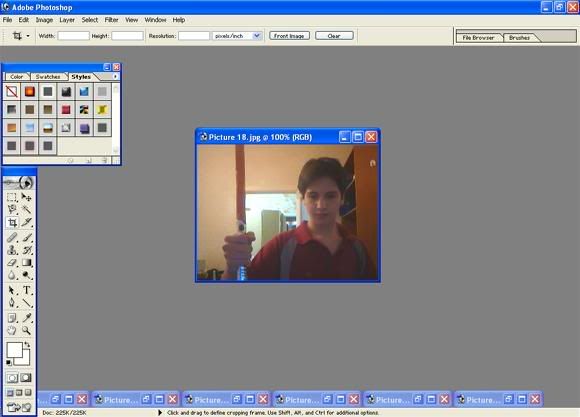
Next, take the picture and load it. For mine, I got my friend to hold a broken plastic broomstick with some foil around the handle and decorated with a marker. You should now have this screen, but with your own picture:
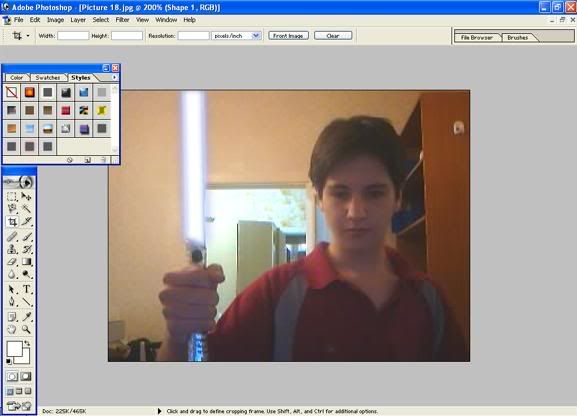
Now! Next, we select the "Pen" tool. Make sure it's the "Pen" and not "Freeform" or "Anchor" or anything else; just pen. Then (zooming in on the blade at this point is recommended), you click on one corner of your blade, then the next and any more points in sequence until you have something that looks a little like this:

Now is where our newfound styles come in. Choose your color - in this case, blue - and click on it once. There should now be a haze of that colour around the white area selected. From here, there are two options of finishing that both have the lightsabre result, however there is a difference between them. I'll show both.
The more popular one is the Gaussian Blur. Click on "Filter" at the top and then hover over "Blur", and another menu will pop out. On it, click "Gaussian Blur". When you've done this, it will tell you the shape must be rasterised: you must click OK. A box will appear asking with a sliderbar asking how much blue you want (make sure you have the "preview" box checked when doing this). Slide this around till you find a blue you like, I prefer something around 1.6. This method will give you a softish, shapely blade that fades from the inside to out, like the lightsabre effects from episodes IV-VI.
Alternative, and easier, is the other option. Instead of "Gaussian Blur" in the "Blur" menu, click simply "Blur" again. It will also ask for the shape to be rasterised, to which you must also answer OK. This will give you a harder, sharper blade, more like the effect from episodes I-III.
Gaussian Blur:
Blur:

I actually can't decide which I like better. Both have their charms. After finishing the blade, flatten the image by clicking "Layers" and then "Flatten" and the bottom of the dropdown menu.
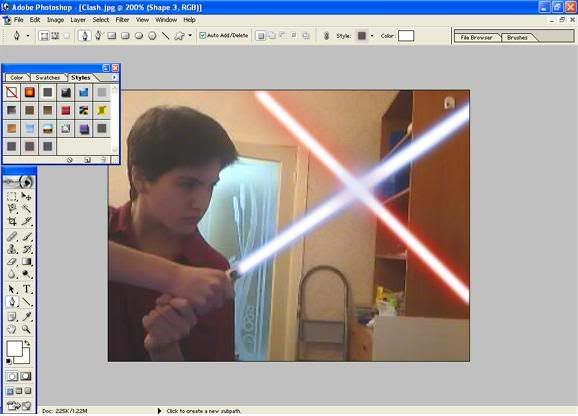
Now, if you want to make a picture with two clashing sabres, it's just as easy. You simply complete the above steps but with a second blade intersecting your one. This works with both methods of blade, but with the "Blur" one, I like to use the pen tool to highlight a cirlcish area where the blades meet and use the (inbuilt) style which looks like a white box with a line through it - which is just like the lightsabre style but white - then put a bit of "Gaussian Blur" on that. All that does is make it so you can't see which blade is in front, which is how it is in any of the recent Star Wars movies, instead, they kind of blend together just a little bit where they meet. Then, like before, flatten the image.
Clashing sabres with the Gaussian Blur:
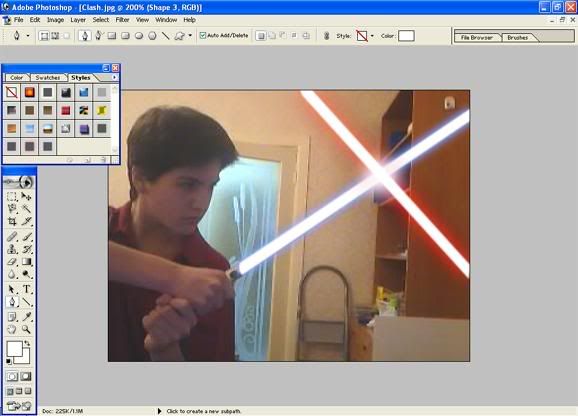
Clashing sabres with the Blur:
And now you're ready to go! Enjoy your new trick and go kill yourself some Sith! Or Jedi, if that's the way you want to go.
[url=http://www.megaupload.com/?d=01JPFRSU]http://www.megaupload.com/?d=01JPFRSU[/url] (-> this will be taken down after 30 days of unuse, so if that happens post/PM me)
Once downloaded, open Photoshop. Make sure you have the "Colors" window open, which can be found about a third of the way down the dropdown menu located here:
Also, both colour boxes near the bottom of the "Tools" window (foreground and background) should be white. Then, click on the rightmost tab, "Styles", and then the little arrow in the cirle to the right of that. A dropdown menu will appear, of which you will click "Load Styles". Browse your computer to find "Otis Frampton's Lightsaber Styles.asl" and double-click it. You will see four new styles appear: these are red, purple, green and blue. Your screen should now look like this (but without the big red letters):
Next, take the picture and load it. For mine, I got my friend to hold a broken plastic broomstick with some foil around the handle and decorated with a marker. You should now have this screen, but with your own picture:
Now! Next, we select the "Pen" tool. Make sure it's the "Pen" and not "Freeform" or "Anchor" or anything else; just pen. Then (zooming in on the blade at this point is recommended), you click on one corner of your blade, then the next and any more points in sequence until you have something that looks a little like this:
Now is where our newfound styles come in. Choose your color - in this case, blue - and click on it once. There should now be a haze of that colour around the white area selected. From here, there are two options of finishing that both have the lightsabre result, however there is a difference between them. I'll show both.
The more popular one is the Gaussian Blur. Click on "Filter" at the top and then hover over "Blur", and another menu will pop out. On it, click "Gaussian Blur". When you've done this, it will tell you the shape must be rasterised: you must click OK. A box will appear asking with a sliderbar asking how much blue you want (make sure you have the "preview" box checked when doing this). Slide this around till you find a blue you like, I prefer something around 1.6. This method will give you a softish, shapely blade that fades from the inside to out, like the lightsabre effects from episodes IV-VI.
Alternative, and easier, is the other option. Instead of "Gaussian Blur" in the "Blur" menu, click simply "Blur" again. It will also ask for the shape to be rasterised, to which you must also answer OK. This will give you a harder, sharper blade, more like the effect from episodes I-III.
Gaussian Blur:
Blur:
I actually can't decide which I like better. Both have their charms. After finishing the blade, flatten the image by clicking "Layers" and then "Flatten" and the bottom of the dropdown menu.
Now, if you want to make a picture with two clashing sabres, it's just as easy. You simply complete the above steps but with a second blade intersecting your one. This works with both methods of blade, but with the "Blur" one, I like to use the pen tool to highlight a cirlcish area where the blades meet and use the (inbuilt) style which looks like a white box with a line through it - which is just like the lightsabre style but white - then put a bit of "Gaussian Blur" on that. All that does is make it so you can't see which blade is in front, which is how it is in any of the recent Star Wars movies, instead, they kind of blend together just a little bit where they meet. Then, like before, flatten the image.
Clashing sabres with the Gaussian Blur:
Clashing sabres with the Blur:
And now you're ready to go! Enjoy your new trick and go kill yourself some Sith! Or Jedi, if that's the way you want to go.
Tutorial Comments
Showing latest 5 of 5 comments

Hey I Need The Download Link For The Style Trial.
Thanks!! =D
By DarthVader on Apr 9, 2009 10:39 am

thats cool ^____^ >> =D
By JRock-Layouts-and-Graphics on Jun 29, 2008 3:15 am
lmfao this is pretty fucking neat.
By autumnhxc on Oct 30, 2007 2:39 am

hey i cant find where to download the style trial..
By 83RN15 on Sep 7, 2006 12:56 am
coool!
By 83RN15 on Sep 7, 2006 12:46 am