
Tutorial
Click on thumbnailed images to enlarge
NOTE! This tutorial uses selective coloring so it's not translatable, sorryyyyyyyy!
1. Open up you image, i'm using this image of leighton meester;

2. make a selective coloring layer;
CYANS:
cyan: -100
yellow: -55
MAGENTAS:
cyan: -100
magenta: +96
yellow: +100
black: +100
NEUTRALS:
cyan: -33
magenta: -17
yellow: +8
black: +9
BLACKS:
black: +37

3. another selective coloring layer;
REDS:
cyan: -100

4. color balance layer;
MIDTONES:
-27
-13
+13
HIGHLIGHTS:
-30

5. selective coloring layer;
REDS:
cyan: -63
yellow: +49
NEUTRALS:
cyan: -4
magenta: +13
black: -13
BLACKS:
black: +12

6. curves layer;
RGB:
output; 186
input; 204
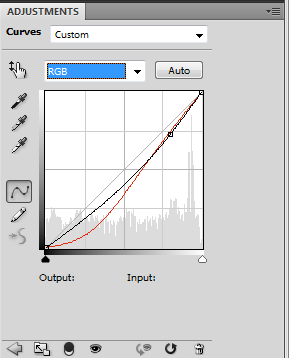
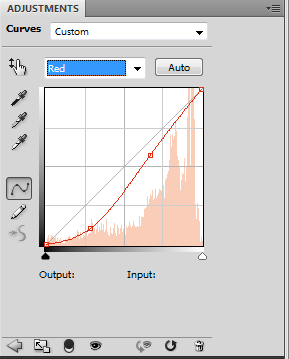
RED:
1st point;
output; 26
input; 72
2nd point;
output; 147
input; 171

7. yep, ANOTHER selective coloring layer;
REDS:
cyan: -33
yellow: +30

8. make a color fill layer;
#c4a994
set to exclusion 11%.

now press CRTL+ALT+SHIFT+E and sharpen the new layer and thats ittt :)

1. Open up you image, i'm using this image of leighton meester;
2. make a selective coloring layer;
CYANS:
cyan: -100
yellow: -55
MAGENTAS:
cyan: -100
magenta: +96
yellow: +100
black: +100
NEUTRALS:
cyan: -33
magenta: -17
yellow: +8
black: +9
BLACKS:
black: +37
3. another selective coloring layer;
REDS:
cyan: -100
4. color balance layer;
MIDTONES:
-27
-13
+13
HIGHLIGHTS:
-30
5. selective coloring layer;
REDS:
cyan: -63
yellow: +49
NEUTRALS:
cyan: -4
magenta: +13
black: -13
BLACKS:
black: +12
6. curves layer;
RGB:
output; 186
input; 204
RED:
1st point;
output; 26
input; 72
2nd point;
output; 147
input; 171
7. yep, ANOTHER selective coloring layer;
REDS:
cyan: -33
yellow: +30
8. make a color fill layer;
#c4a994
set to exclusion 11%.
now press CRTL+ALT+SHIFT+E and sharpen the new layer and thats ittt :)
Tutorial Comments
Showing latest 2 of 2 comments

This is gorgeous!
By xchangminniex on Jan 8, 2012 7:29 pm

Love this =]
By foundry on Jun 4, 2010 5:54 pm
Tutorial Details
| Author |
fiercest
|
| Submitted on | May 16, 2010 |
| Page views | 9,322 |
| Favorites | 23 |
| Comments | 2 |
| Reviewer |
manny-the-dino
|
| Approved on | May 20, 2010 |