
Tutorial
Click on thumbnailed images to enlarge
In this tutorial we are going to create a polaroid picture. I chose this picture of Lindsay Lohan:

Step 1: Open up your picture
Step 2: Chose the selection tool from the left side. Then chose selection type to select square as shown below:

Step 3: Now select the area of the picture that you want. Then go to Image>Crop to Selection. This is what I have now:

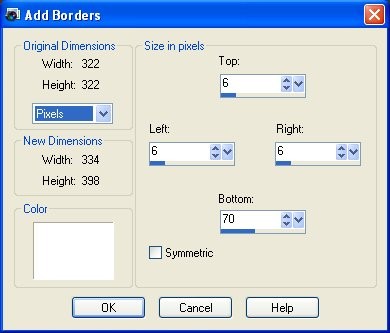
Step 4: We are now going to add borders. So go to Image>Add Borders and chose these settings:
Step 5: Set your color palette to #ebe5e6. Then chose textures and select the canvas fine texture. The next think you want to do is fill in the white area. So get your fill tool and fill it in! It should now look like this:

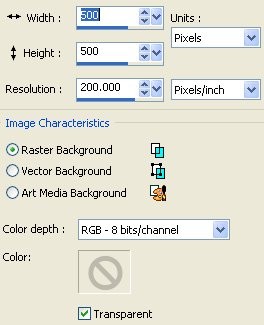
Step 6: Don't worry guys we're almost done. The next thing you want to do is go to Edit>Copy then go to File>New and set the size to 500 x 500px and make sure you check the transparent box like so:
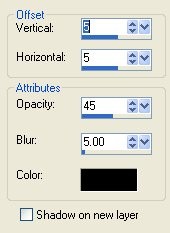
Step 7: Now edit past as new selection. Go to Effects>3D Effects and once again change your settings to match mine:
Step 8: Once you have done that go to Image>Crop to Selection. Then Layers>Merge>Merge All.
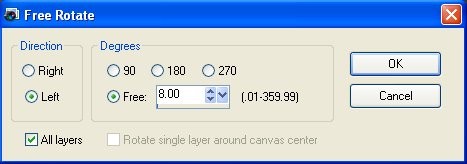
Step 9: If you want to you can tilt your polaroid by going to Image>Free Rotate and these are my settings that I chose:
And your done! Wasn't that easy? Here is my final picture:

Step 1: Open up your picture
Step 2: Chose the selection tool from the left side. Then chose selection type to select square as shown below:
Step 3: Now select the area of the picture that you want. Then go to Image>Crop to Selection. This is what I have now:
Step 4: We are now going to add borders. So go to Image>Add Borders and chose these settings:
Step 5: Set your color palette to #ebe5e6. Then chose textures and select the canvas fine texture. The next think you want to do is fill in the white area. So get your fill tool and fill it in! It should now look like this:
Step 6: Don't worry guys we're almost done. The next thing you want to do is go to Edit>Copy then go to File>New and set the size to 500 x 500px and make sure you check the transparent box like so:
Step 7: Now edit past as new selection. Go to Effects>3D Effects and once again change your settings to match mine:
Step 8: Once you have done that go to Image>Crop to Selection. Then Layers>Merge>Merge All.
Step 9: If you want to you can tilt your polaroid by going to Image>Free Rotate and these are my settings that I chose:
And your done! Wasn't that easy? Here is my final picture:
Tutorial Comments
Showing latest 3 of 3 comments

i've always wanted to know how this was done!
By MacabreMadi on Jul 5, 2009 5:53 am

neat!
By futura on Feb 5, 2009 7:25 pm

love it!
By classypinkbarbie on Feb 5, 2009 5:23 pm
Tutorial Details
| Author |
lc2008
|
| Submitted on | Feb 4, 2009 |
| Page views | 14,634 |
| Favorites | 29 |
| Comments | 3 |
| Reviewer |
manny-the-dino
|
| Approved on | Feb 5, 2009 |