Tutorial
Click on thumbnailed images to enlarge
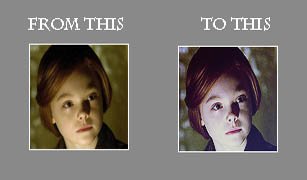
Step One: Crop your image so that it will be 100x100. This is the image I am using. Go ahead and use it if you would like to.
Step Two: Sharpen your base image.
Step three: Duplicate your base image and set it to screen 100%.
Step four: Duplicate your base again and set it to screen 45%.
Step five: Go to Layer -> New Adjustment Layer -> Levels and put these settings: 44, 1,17, 255.
Step six: Go to Layer -> New Adjustment Layer -> Color Balance and put these settings:
Midtones: 4, 11, 59 Shadows: 4, -11, 11 Highlights: 5, 5, 72.
Step seven: Go to Layer -> New Adjustment Layer -> Selective Coloring
Reds: 8,7,-52,-11
Neutrals: 14,4,-8,11
Blacks: 9,14,30,-26
Step eight: Use this gradient and set it to soft light 100%.
Step nine: Use this gradient and set it to soft light 100%.
Step ten: Set this gradient to multiply 25%.
Step eleven: Make a new fill layer with the color cb2f45 and set to Exclusion 15%.
Final Step!
Step twelve: Duplicate base layer and drag it to the top. Sharpen it, again, and set it to soft light, 49%. And this should be your final outcome!
I hope you liked the tutorial!
Tutorial Comments
Showing latest 2 of 2 comments

nice!
By futura on Jan 3, 2009 2:11 am

Neato. ;]]]
Thanks for posting.
By Skootch on Jan 1, 2009 6:35 am
Tutorial Details
| Author |
chirocracy
|
| Submitted on | Dec 31, 2008 |
| Page views | 3,703 |
| Favorites | 17 |
| Comments | 2 |
| Reviewer |
manny-the-dino
|
| Approved on | Dec 31, 2008 |