Tutorial
Click on thumbnailed images to enlarge
1. File > New [customize the pixel size to 100x100]
2. Go to the bucket tool and fill with black if your background is not already black.
3. Pick four of your favorite colors and create four dots on your background. Each dot a different color and different size [normally a soft brush between sizes 10-25]
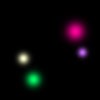
4. Filter>Render>Lens Flare and make a 50-300mm on each dot. Make sure that the flare is not bigger than the dot.

5. Now you will go to Filter>Distort>Polar Coordinates and click "rectangular to polar" option... and done!
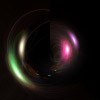
If you want to see your new texture take a different shape, re-do the filter>distort>polar coordinates step until you're satisfied :) Now you're free to apply this texture to any icon you make! Enjoy
2. Go to the bucket tool and fill with black if your background is not already black.
3. Pick four of your favorite colors and create four dots on your background. Each dot a different color and different size [normally a soft brush between sizes 10-25]
4. Filter>Render>Lens Flare and make a 50-300mm on each dot. Make sure that the flare is not bigger than the dot.
5. Now you will go to Filter>Distort>Polar Coordinates and click "rectangular to polar" option... and done!
If you want to see your new texture take a different shape, re-do the filter>distort>polar coordinates step until you're satisfied :) Now you're free to apply this texture to any icon you make! Enjoy
Tutorial Comments
Showing latest 10 of 11 comments

ahh~ awesome!
By xchangminniex on Jul 1, 2009 6:38 pm

hmm, this is good if you want to make your own textures. :)
awesomeee
By creole on Aug 17, 2008 10:17 pm

really pretty!!
thankxx!
By choualee12 on Aug 13, 2008 3:02 am

very fantastic and simple!
By digitalivory on Aug 12, 2008 10:59 pm

PRETTY...even tho i don't know how you did it.
By chaiina on Jul 19, 2008 6:45 pm

Great, thanks!!
By millyj on Jul 16, 2008 10:40 pm

do you have to do this on Photoshop??please help...
By coolacm11 on Jul 14, 2008 6:17 am
what bucket tool??
By coolacm11 on Jul 14, 2008 3:53 am

I tried separating the dots like you said, and it helped.
Thanks so much, & this tutorial is amazee .
By Kirikireii on Jul 12, 2008 7:49 pm

nice , it looks pretty =] , like just the stars looking part could be like stars just make it on a bigger pic =]
By N4th4li3L on Jul 7, 2008 4:01 pm
Tutorial Details
| Author |
kumomo
|
| Submitted on | Jul 5, 2008 |
| Page views | 12,207 |
| Favorites | 43 |
| Comments | 11 |
| Reviewer |
manny-the-dino
|
| Approved on | Jul 5, 2008 |