Tutorial
Click on thumbnailed images to enlarge
The first part of this tutorial shows you how to take a basic image and convert it to a PSD (an image with no background). If your image is already a PSD, then skip to Part Two!
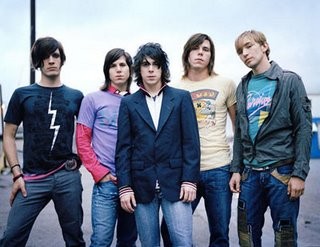
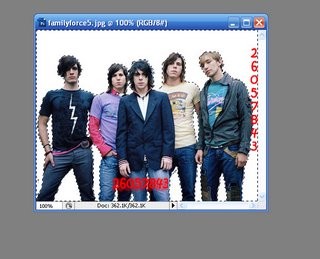
Here is the before:
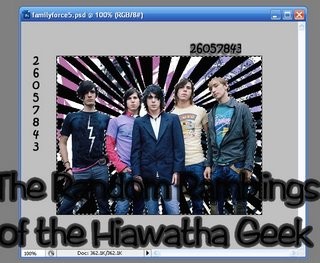
And here is the after:

Let's get started! I found this picture at Jesus Freak Hideout. If you want to use this picture, head on over there and search for "Family Force 5"
Step One: Open up your picture
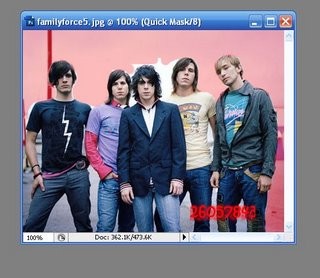
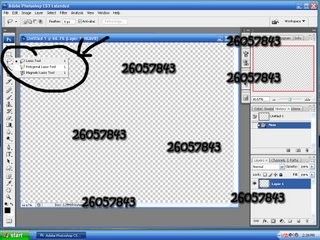
Step Two: Select "QuickMask" mode (see screenshot)

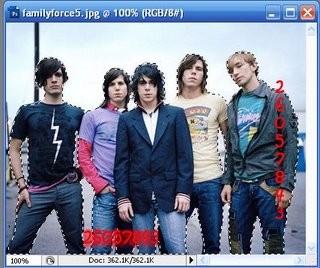
Step Three: Select a brush tool. Begin to paint over the areas that you do NOT want selected. This is important! No matter what color you have selected, the brush tool will paint in red. That's what it's supposed to do! It should look something like this:
Step Four: Once you have all of the background painted, click on the Quick Mask tool again. Then do a "ctrl+I" to invert your selection:
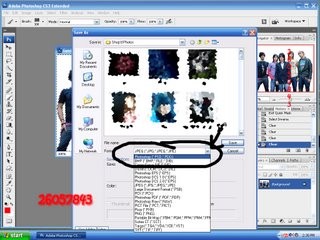
Step Five: Click delete. The background will either turn white, or turn into a grey&white checkered color. Then save the file as a PSD, as seen below.

Voila! A PSD image! Now you're ready for Part Two!
PART TWO:
Here is the second part of that tutorial! This is where I'll show you how to create the sunblast in the background and add it to your original photo.
Let's get started! Remember... I did this in Photoshop CS3.
Make sure your foreground and background colors are set to the default. You can do this by pressing "D"
Step One: Open a NEW image that is the same size as your original photo. You can check the size of the original photo by going to "Image>Image Size"
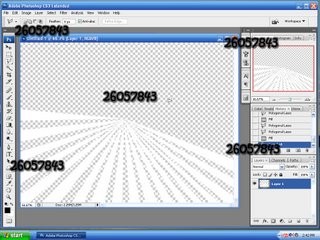
Step Two: Select the "Polygonal Lasso Tool," as shown in the screenshot below.
Step Three: Click in the middle of the page. Begin to make long, lopsided triangles. After one is complete, press "Ctrl+Backspace" to fill it. I know that didn't make sense, so look at my screenshot.
Step Four: If you're stupid like me, you just filled all of those spaces with WHITE. For the next step, they need to be BLACK. So, use the Magic Wand tool. Select as many as you can, then hold down "SHIFT" to select the rest. Do an "ALT+BACKSPACE" to fill them with BLACK!
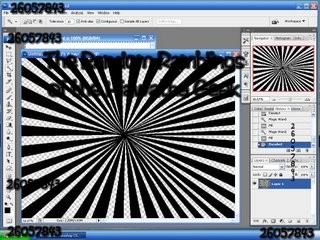
Step 5: Go to "Edit>Define Brush Preset" and save your picture as a brush.
Step 6: Open up that original PSD again!
Step 7: Use the Magic Wand tool to select just the background. Find some fun brushes that fit with your picture, and put them everywhere! This does not include the sunblast brush that we just made! We will use that later! If the brushes touch the actual picture, go back and reselect just the background. I didn't make a screenshot of this step, sorry.
Step 8: Select the sunblast brush that we just made. Put it on the picture. It should look something like this: (of course, if you used different brushes, like me, it will be slightly different)
Step 9: Use the text tool to add words. You can add some fun text effects, too, if you want! And, voila! Your beautiful picture! Now, go to www.hiawathayouthcamp.com and register for Hiawatha, and you will be finished!

Tutorial Comments
Showing latest 10 of 17 comments

this is to easy to be advance, but i like this tutorial. thanks

ummm..if you are trying to clear the background and the delete button dont work...you guys should use the QUICK MASK ON THE BACKGROUND not THE LAYER

OMFG THE DELETE BUTTON WILL NOT WORK; HELP!!

umm were excacly is duh delete button??
lol
umm do dey have to be blk
or can i choose the color i want?

instead of making you're "sunblast" brush, couldn't you download it?

um..
help?
got lost in the ...*scrolls back up* lopsided triangles bit...
extra help!

heeeeelp!! i did everything up to the delete part!! it wont delete!! im pressing the heck out the delete button...oh n is it the delete button on the keyboard..or does photoshop have a delete selection..if so i cnt find it! help me please!!
yes. delete button deletes!

yay! family force 5 =]
great job, very easy instructions.
Tutorial Details
| Author |
hycgrl226
|
| Submitted on | Mar 5, 2008 |
| Page views | 29,881 |
| Favorites | 110 |
| Comments | 17 |
| Reviewer |
MissHygienic
|
| Approved on | Mar 6, 2008 |