Tutorial
Click on thumbnailed images to enlarge
This tutorial is for beginners that want to learn how to create basic animations
First I'm going to show you the basics of the
Animation palette. So start by going to Window → Animation to display the Animation palette
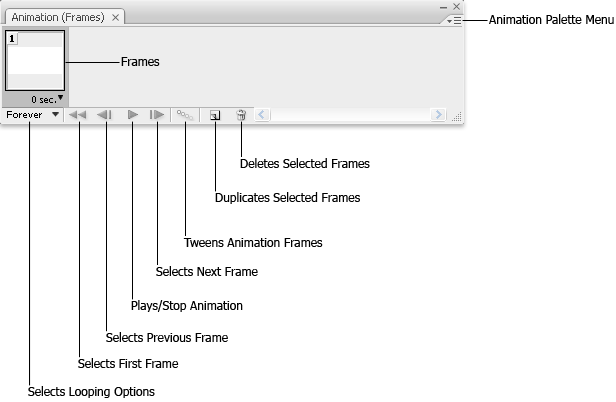
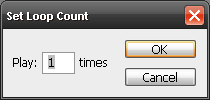
Looping-looping has three options, Once, Forever and Other which allows you to determine the time duration of the frame. If you select Other you will be able to type how many times you want your animation to play
Select First Frame-goes to the first frame of the animation
Select Previous Frame-this refers to the frame before the selected frame
Play/Stop Animation-allows you to play and stop the animation at any time
Select Next Frame-selects the frame after the selected frame
Tween-allows smooth blending between frames in an animation and creates an illusion of motion
Duplicate Current Frame-duplicates the selected frame
Delete-deletes the selected frame
 When setting out to create an animation, it's a good idea to plan it out a bit first. Doing so can help you get to the finished product faster than working in a trial and error fashion and it will also help you keep the file size low.
The Animation window offers three options for working with layers to create and edit animated GIF files in PS
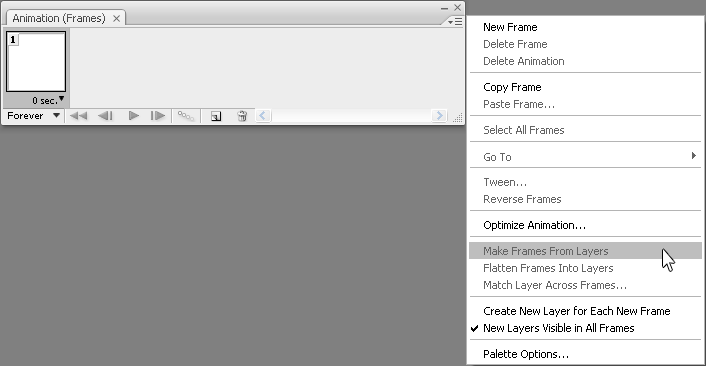
Make Frames From Layers-creates a corresponding frame on the Animation palette from each layer in an image
Flatten Frames Into Layers-creates a corresponding layer on the Layers palette for each frame in an animation
Match Layers Across Frames-applies layer attributes(position, visibility, style across all frames in an animation
 Layers within animation frames can be edited in terms of opacity, position, visibility, blending modes, and styles. An important concept in using PS for animation is that frames, are independent from the image layers. In PS, each frame of the animation reflects a specific state of each of the layers, for example, one frame may show two layers and the next frame five. Is important to note that changes you make to the layers in Frame 1 affect all frames in which the layers are identical
 You can rearrange frames by dragging them on the Animation palette, or by selecting multiple frames and choosing Reverse Frames from the Animation palette menu. Each animation frame can contain modifications to layers. If you make a change to a layer, you'll find that it doesn't automatically apply to all of the frames. If you want it to apply to all of them, select the layer, and choose Match Layer Across Frames from the Animation palette menu
So let's get the dice rolling
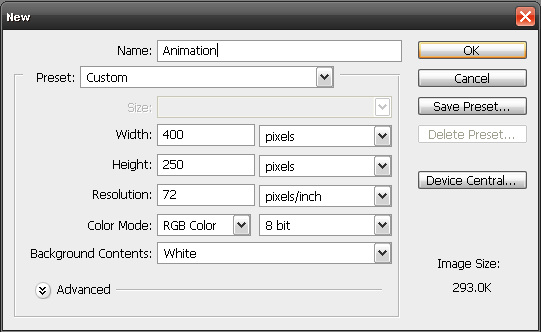
1. Start by making a new document, press Ctrl + N or go to File → New, make it 400px x 250px with your background white
2. For the purpose of this tut I'm using this image and I'm placing it in my image window by going to File → Place, and I'm naming my layer basketball
3. Now with the Elliptical tool I'm making what is going to be the shadow of my basketball with this settings:
-Color=black
-Width=68px
-Height=20px
-Opacity=30%
-Gaussian Blur with a 4.0 Radius (Filter → Blur →Gaussian Blur)
4. Name that layer shadow and drag it below your basketball layer
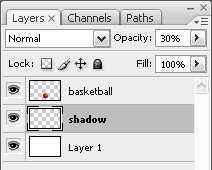
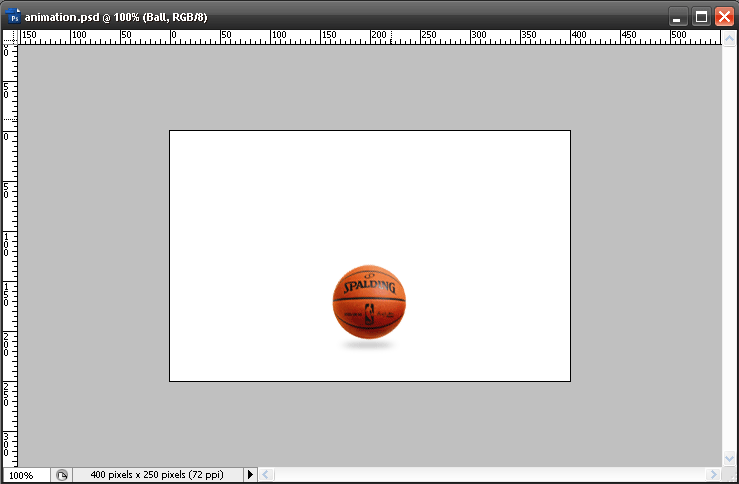
5. Press the letter V to select the Move tool and align that shadow right below your basketball so that your document resembles the image below
6. Now with your shadow layer selected press and hold Shift and click to select the basketball layer also, and with both layers selected press and hold Shift + Alt and click the Create a New Group icon in the layers palette to group the layers
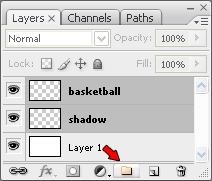
7. Now you should see the new group dialog box where you can name the group Ball and press Ok

8. Now with both layers grouped, click in the triangle next to the group to expand it, and click the eyeball next to the shadow layer to turn off the visibility of that layer momentarily
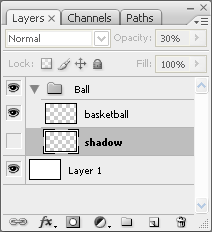
9. Now make sure you select the Ball group in your layers palette and go to the ball in the image window and drag it left outside the image window and place it like in the image below
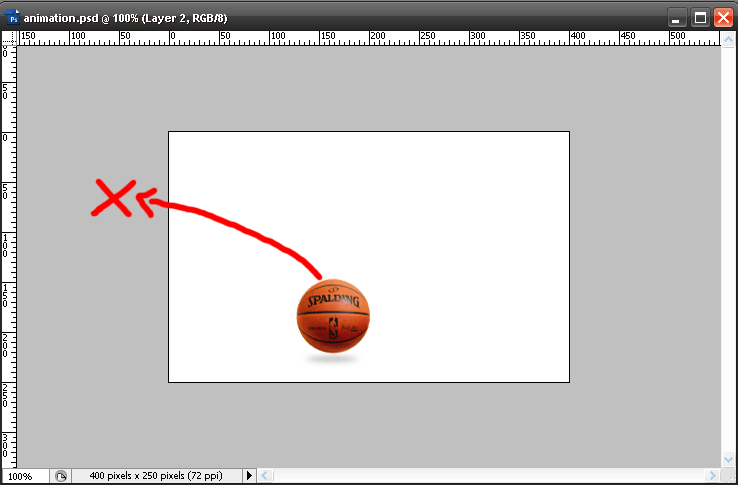
Notice that since the basketball and the shadow layers are grouped they both move when you move the ball
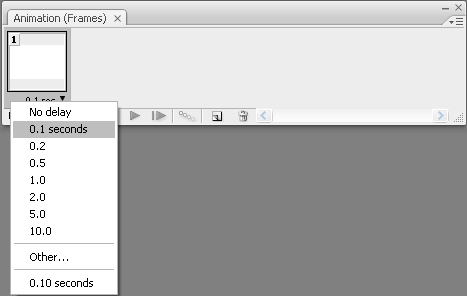
10. Now comes the good part of the tut, if you don't see your Animation palette go to Window → Animation, you should see only Frame 1, change the frame delay time to .1 seconds and with your Frame 1 selected press the Duplicates selected frames button in the Animation palette
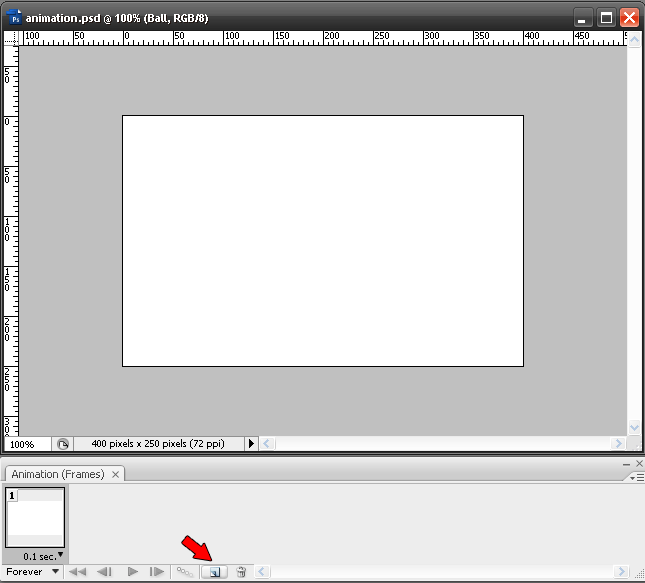
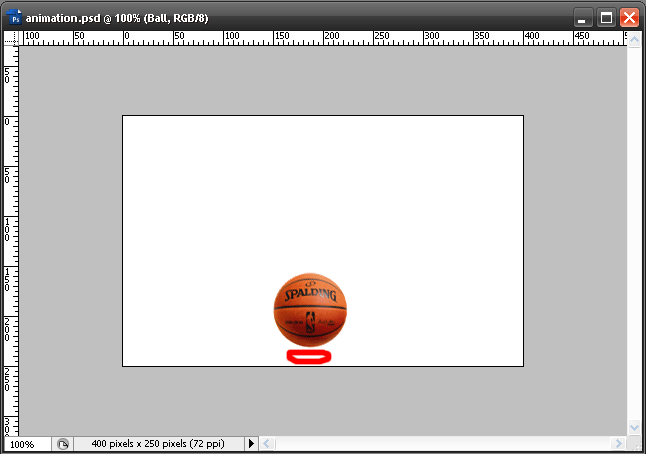
11. Now with Frame 2 selected and your Ball group selected in your layers palette, drag the ball and place it almost in the bottom center of your document so that it resembles the image below leaving space between your ball and the image window for your shadow, remember that the shadow is just hidden but is still there
12. Select Frame 1 and press the Tweens animations frames button in the Animation palette and type 3 to add 3 frames between frame 1 and 2
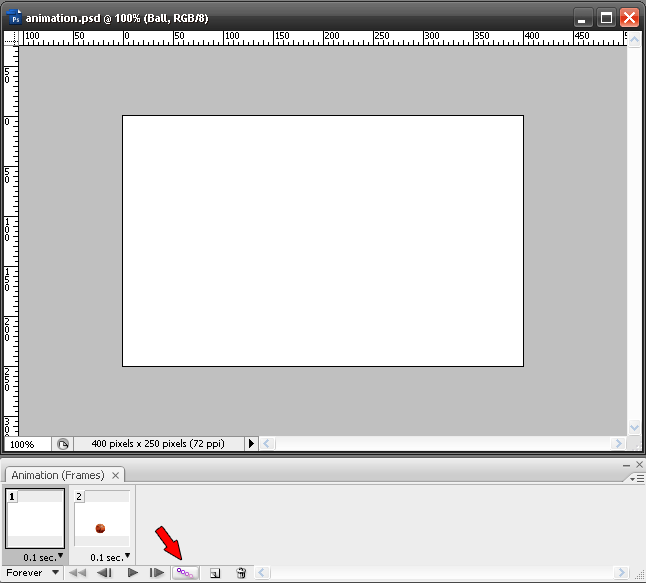
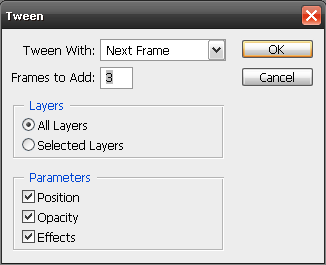
13. Now you should have 5 frames, select frame 5 and press the Duplicates selected frames button again to duplicate that frame, and with your Ball group selected drag the ball right outside the image window
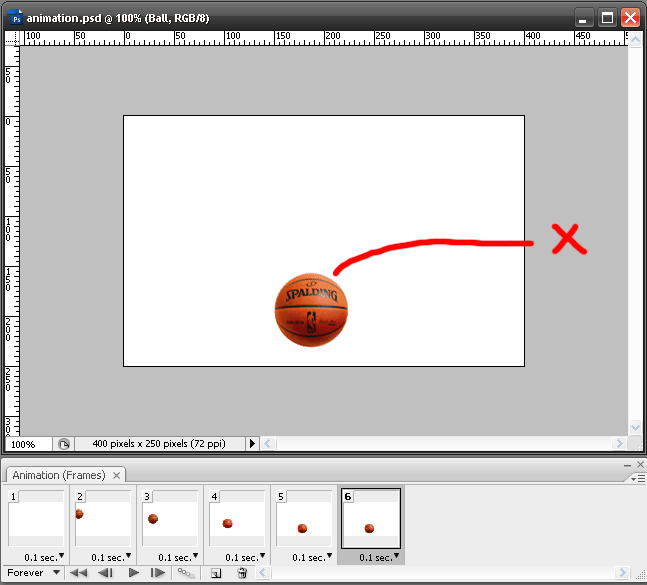
14. Now go back to frame 5 and select it and press the Tweens animations frames button in the Animation palette again and type 3 to add 3 more frames between frame 5 and 6, and now you should have 9 frames
15. Go back to frame 5 and select it, and go to your layers palette and turn on the eyeball of your shadow layer to turn on the visibility of that layer only in frame 5
16. Now your animation is all set, go to frame 1 and select it and press in your Animation palette to play your animation
17. Go to File → Save for Web or press Ctrl + Shift + Alt + S and make sure you're saving it as a GIF or otherwise this won't work since the only image file that saves animation is the GIF file, and you're done!

(c) The Photoshop Group
First I'm going to show you the basics of the
Animation palette. So start by going to Window → Animation to display the Animation palette

Looping-looping has three options, Once, Forever and Other which allows you to determine the time duration of the frame. If you select Other you will be able to type how many times you want your animation to play

Select First Frame-goes to the first frame of the animation
Select Previous Frame-this refers to the frame before the selected frame
Play/Stop Animation-allows you to play and stop the animation at any time
Select Next Frame-selects the frame after the selected frame
Tween-allows smooth blending between frames in an animation and creates an illusion of motion
Duplicate Current Frame-duplicates the selected frame
Delete-deletes the selected frame
 When setting out to create an animation, it's a good idea to plan it out a bit first. Doing so can help you get to the finished product faster than working in a trial and error fashion and it will also help you keep the file size low.
The Animation window offers three options for working with layers to create and edit animated GIF files in PS

Make Frames From Layers-creates a corresponding frame on the Animation palette from each layer in an image
Flatten Frames Into Layers-creates a corresponding layer on the Layers palette for each frame in an animation
Match Layers Across Frames-applies layer attributes(position, visibility, style across all frames in an animation
 Layers within animation frames can be edited in terms of opacity, position, visibility, blending modes, and styles. An important concept in using PS for animation is that frames, are independent from the image layers. In PS, each frame of the animation reflects a specific state of each of the layers, for example, one frame may show two layers and the next frame five. Is important to note that changes you make to the layers in Frame 1 affect all frames in which the layers are identical
 You can rearrange frames by dragging them on the Animation palette, or by selecting multiple frames and choosing Reverse Frames from the Animation palette menu. Each animation frame can contain modifications to layers. If you make a change to a layer, you'll find that it doesn't automatically apply to all of the frames. If you want it to apply to all of them, select the layer, and choose Match Layer Across Frames from the Animation palette menu
So let's get the dice rolling
1. Start by making a new document, press Ctrl + N or go to File → New, make it 400px x 250px with your background white

2. For the purpose of this tut I'm using this image
3. Now with the Elliptical tool I'm making what is going to be the shadow of my basketball with this settings:
-Color=black
-Width=68px
-Height=20px
-Opacity=30%
-Gaussian Blur with a 4.0 Radius (Filter → Blur →Gaussian Blur)
4. Name that layer shadow and drag it below your basketball layer

5. Press the letter V to select the Move tool and align that shadow right below your basketball so that your document resembles the image below

6. Now with your shadow layer selected press and hold Shift and click to select the basketball layer also, and with both layers selected press and hold Shift + Alt and click the Create a New Group icon in the layers palette to group the layers

7. Now you should see the new group dialog box where you can name the group Ball and press Ok

8. Now with both layers grouped, click in the triangle next to the group to expand it, and click the eyeball next to the shadow layer to turn off the visibility of that layer momentarily

9. Now make sure you select the Ball group in your layers palette and go to the ball in the image window and drag it left outside the image window and place it like in the image below

Notice that since the basketball and the shadow layers are grouped they both move when you move the ball
10. Now comes the good part of the tut, if you don't see your Animation palette go to Window → Animation, you should see only Frame 1, change the frame delay time to .1 seconds and with your Frame 1 selected press the Duplicates selected frames button in the Animation palette


11. Now with Frame 2 selected and your Ball group selected in your layers palette, drag the ball and place it almost in the bottom center of your document so that it resembles the image below leaving space between your ball and the image window for your shadow, remember that the shadow is just hidden but is still there

12. Select Frame 1 and press the Tweens animations frames button in the Animation palette and type 3 to add 3 frames between frame 1 and 2


13. Now you should have 5 frames, select frame 5 and press the Duplicates selected frames button again to duplicate that frame, and with your Ball group selected drag the ball right outside the image window

14. Now go back to frame 5 and select it and press the Tweens animations frames button in the Animation palette again and type 3 to add 3 more frames between frame 5 and 6, and now you should have 9 frames
15. Go back to frame 5 and select it, and go to your layers palette and turn on the eyeball of your shadow layer to turn on the visibility of that layer only in frame 5
16. Now your animation is all set, go to frame 1 and select it and press
 in your Animation palette to play your animation
17. Go to File → Save for Web or press Ctrl + Shift + Alt + S and make sure you're saving it as a GIF or otherwise this won't work since the only image file that saves animation is the GIF file, and you're done!

(c) The Photoshop Group
Tutorial Comments
Showing latest 3 of 3 comments

thz u , it's really help me a lot ^^
By nolee on Jan 13, 2009 7:15 pm
I'm lost..wich adobe do you have to have to use this?
By LinkTH on May 11, 2008 5:47 pm
XD thankkyou
By Chlowee-Chan on Jan 1, 2008 10:42 pm
Tutorial Details
| Author |
elrene06
|
| Submitted on | Dec 28, 2007 |
| Page views | 22,929 |
| Favorites | 110 |
| Comments | 3 |
| Reviewer |
themarkster
|
| Approved on | Dec 28, 2007 |

