Tutorial
Click on thumbnailed images to enlarge
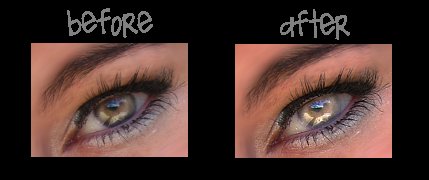
1. First get a picture of an eye or a picture with an eye:
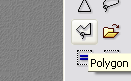
2. Once you have the eye click on the selection tool and then the polygon selection tool.
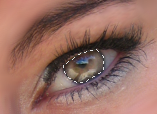
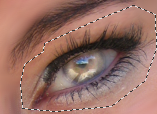
3. Select part of the eye like so:
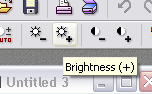
4. Now go to the brightness tool and click it three times.
5. Your eye should look something like this:

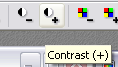
6. Now go to the contrast tool and click it about 4 times, more or less depending on the picture.
7. Your eye should now look like this:

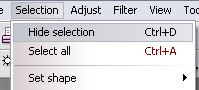
8. Then go to selection>>hide selection OR CTRL+D to hide what you have selected.
9. Now as you can see the eye is a little rigid along the outside where the brightness and contrast of the eye was changed:

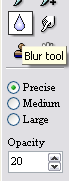
10. To get rid of this go to the Blur Tool and make sure you have the following settings:
11. Blur the rigid part ONLY. The eye looks like this now

12. Now go the polygon selection tool again and select around the eye like this:
13. Then go to Filter>Sharpen>Sharpen
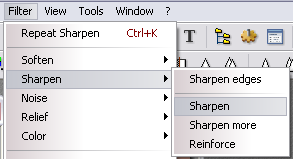
14. The eye now looks sharper.
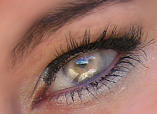
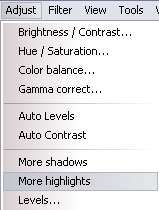
15. Finally to enhance the color slightly go to Adjust>more hightlights
16.And you're done
2. Once you have the eye click on the selection tool and then the polygon selection tool.
3. Select part of the eye like so:
4. Now go to the brightness tool and click it three times.
5. Your eye should look something like this:
6. Now go to the contrast tool and click it about 4 times, more or less depending on the picture.
7. Your eye should now look like this:
8. Then go to selection>>hide selection OR CTRL+D to hide what you have selected.
9. Now as you can see the eye is a little rigid along the outside where the brightness and contrast of the eye was changed:
10. To get rid of this go to the Blur Tool and make sure you have the following settings:
11. Blur the rigid part ONLY. The eye looks like this now
12. Now go the polygon selection tool again and select around the eye like this:
13. Then go to Filter>Sharpen>Sharpen
14. The eye now looks sharper.
15. Finally to enhance the color slightly go to Adjust>more hightlights
16.And you're done
Tutorial Comments
Showing latest 5 of 5 comments

Completely amazing! I never new how easy things would be!
By janessap91 on Oct 11, 2011 6:37 pm

Amazing =)
very helpful
By DivaRama on Oct 1, 2009 2:04 am
Eh, I think I like the first one better.
By isaysummer on Jul 31, 2009 9:24 am
thats really good! but you can see the lines so it kinda showing
By pippet-doll on Jul 30, 2009 9:36 pm

:o
yur ahhhmazingg
By xii3 on Jul 30, 2009 12:56 pm
Tutorial Details
| Author |
xColour
|
| Submitted on | Jul 29, 2009 |
| Page views | 8,493 |
| Favorites | 18 |
| Comments | 5 |
| Reviewer |
manny-the-dino
|
| Approved on | Jul 30, 2009 |