Tutorial
Click on thumbnailed images to enlarge
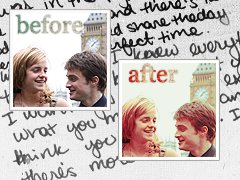
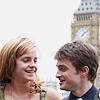
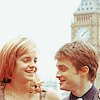
How to turn this:  to this:
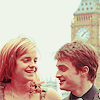
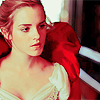
1. We'll start off by opening an image. I used one of the amazing Emma Watson and Daniel Radcliffe courtesy of here. Crop it to your liking. I think this coloring works best with high-quality bright to semi-bright celebrity photoshoot photos. To avoid confusion, try using the same image that I'm using.
2. Sharpen and Duplicate your base. Now set the first copy ("Layer 1 copy" or "Background copy") to Screen at 30% opacity. If your picture is already bright, you can lower the opacity, if it's too dark, leave it at 100%. This basically brightens up your picture.
>> 
3. Go to Layers >> Adjustment Layers >> Hue/Saturation. The Hues/Saturation window will pop up. Follow my settings:
Hue: -2
Saturation:+15
Lightness: -5
This adds some color to the dullness of this icon.
 >>
>> 
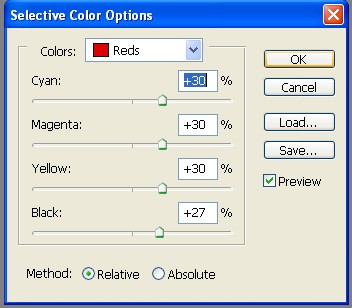
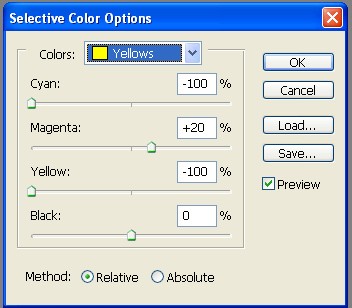
4.Go to Layers >> Adjustment Layers >> Selective Coloring. The Selective Coloring window will pop up. Follow my settings:
Colors: Red
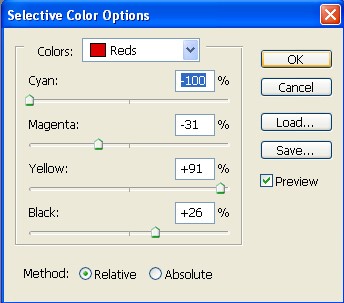
Colors: Yellow
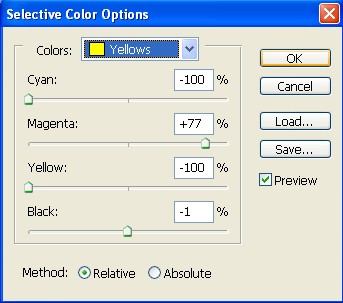
Added some red and orange to the warm up the picture.
 >>
>> 
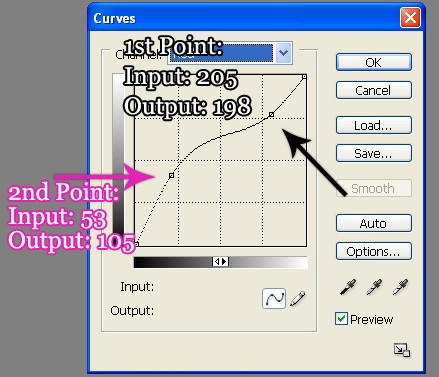
5. Go to Layers >> Adjustment Layers >> Curves. The Curves window will pop up.To make a point, press anywhere in the grid, and put the numbers in the little white boxes that appear in the bottom of the grid. Follow my settings:
Channel: RGB
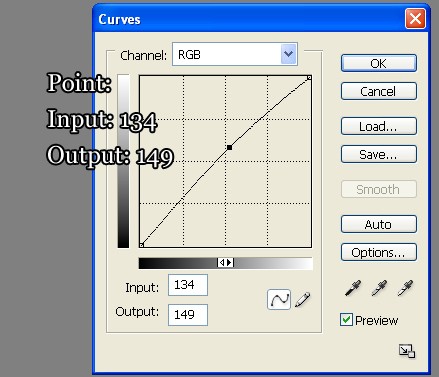
Channel: Red
Channel: Green
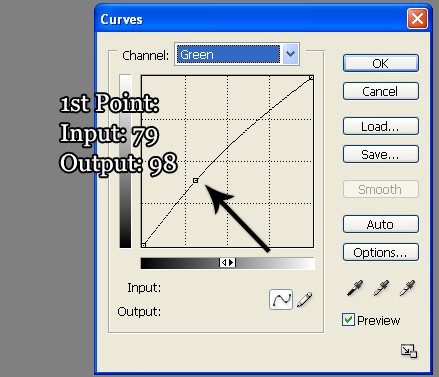
This added some green to it. It will look like this now:
6. Finally, go to Layers >> Adjustment Layers >> Selective Coloring for the second time. The Selective Coloring window will pop up.Follow my settings:
Colors: Red
Colors: Yellow
Colors: White
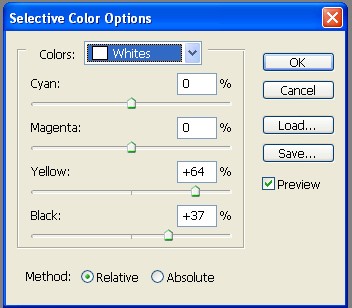
We've darkened the reds and greens by adding that last Selective Coloring layer.
Your Final Icon:
Other Results using different pictures:

More Sweet Tutorials?
to this: 1. We'll start off by opening an image. I used one of the amazing Emma Watson and Daniel Radcliffe courtesy of here. Crop it to your liking. I think this coloring works best with high-quality bright to semi-bright celebrity photoshoot photos. To avoid confusion, try using the same image that I'm using.
2. Sharpen and Duplicate your base. Now set the first copy ("Layer 1 copy" or "Background copy") to Screen at 30% opacity. If your picture is already bright, you can lower the opacity, if it's too dark, leave it at 100%. This basically brightens up your picture.
>> 3. Go to Layers >> Adjustment Layers >> Hue/Saturation. The Hues/Saturation window will pop up. Follow my settings:
Hue: -2
Saturation:+15
Lightness: -5
This adds some color to the dullness of this icon.
>> 4.Go to Layers >> Adjustment Layers >> Selective Coloring. The Selective Coloring window will pop up. Follow my settings:
Colors: Red
Colors: Yellow
Added some red and orange to the warm up the picture.
>> 5. Go to Layers >> Adjustment Layers >> Curves. The Curves window will pop up.To make a point, press anywhere in the grid, and put the numbers in the little white boxes that appear in the bottom of the grid. Follow my settings:
Channel: RGB
Channel: Red
Channel: Green
This added some green to it. It will look like this now:
6. Finally, go to Layers >> Adjustment Layers >> Selective Coloring for the second time. The Selective Coloring window will pop up.Follow my settings:
Colors: Red
Colors: Yellow
Colors: White
We've darkened the reds and greens by adding that last Selective Coloring layer.
Your Final Icon:
Other Results using different pictures:
More Sweet Tutorials?
Tutorial Comments
Showing latest 5 of 5 comments

thank you!
By Junetran on Sep 2, 2009 2:28 pm

this is such an awesome tut!
thanks :)
this is how mine came out of the beautiful Demi Lovato :)
before:
http://i211.photo bucket.com/albums/bb312/Lauren io/normal_1838.jpg
after:
ht tp://i211.photobucket.com/albu ms/bb312/Laurenio/demiiconblue red.jpg
By Lauren-Greenie-Bean on Aug 4, 2009 12:25 am

can i use that tom felton icon for the boards? haha
By futura on Jul 14, 2009 8:59 am

The results usually depend on the picture you're using. If your picture is dark, then it'll turn pink.
By broken-doll on Jul 10, 2009 12:03 am

Somethng went wrong for me and it ended up pink :|
By Daisie-May on Jul 9, 2009 11:45 am
Tutorial Details
| Author |
broken-doll
|
| Submitted on | Jul 7, 2009 |
| Page views | 10,269 |
| Favorites | 46 |
| Comments | 5 |
| Reviewer |
manny-the-dino
|
| Approved on | Jul 7, 2009 |