Tutorial
Click on thumbnailed images to enlarge
this tutorial will show you how to turn a normal picture and make it look like an old, vintage photo.
i know another vintage photo effect. but, don't worry you'll enjoy this one. ;)
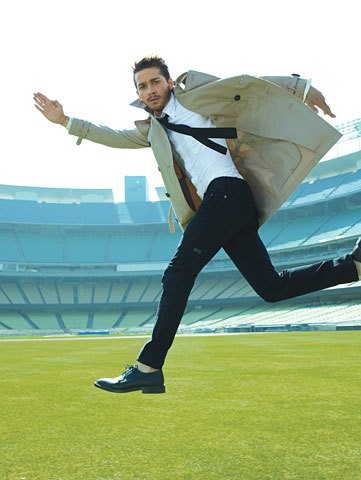
01. open your image
i'm using shia labeouf because he is gorgeous!
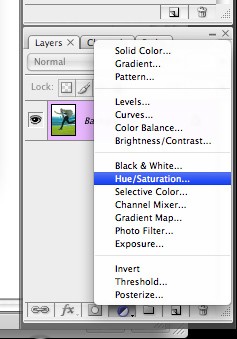
02. choose 'create new adjustment layer' icon on the bottom of the layers palette. from the pop-up menu, choose 'hue/saturation'
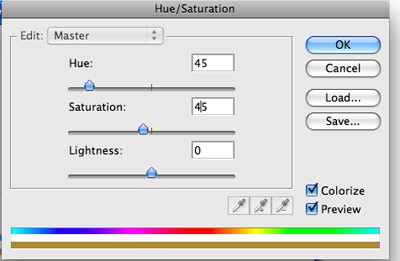
03. turn on 'colorize' in the dialog box. move the sliders to desired tint.
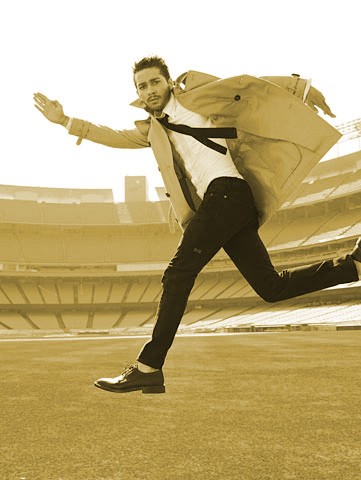
you should have something like this:
04. select the background layer. click on the 'create new layer' icon on the bottom of the layers palette.
05. fill it with white by pressing d, then press ctrl-backspace. on macs press, command-delete.
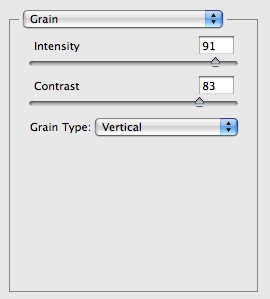
06. choose filter > texture > grain.
change the grain type to 'vertical' and input desired values.
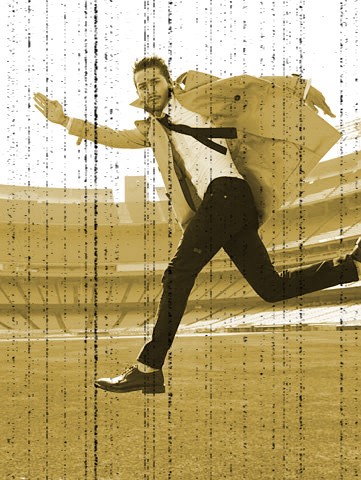
07. change the blend mode to 'multiply'.
this is what you should have now:
08. click 'add layer mask' icon on the bottom of the layers palette.
09. choose filter > render > clouds.
then press control-f (command-f for macs)
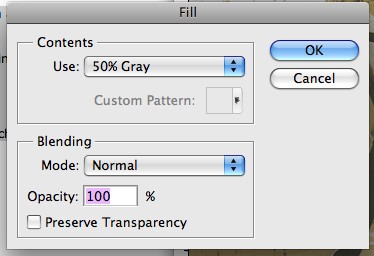
10. add a new layer. change the fill to 50%
11. click edit > fill.
from the drop-down menu choose '50% gray'.
12. choose filter > noise > add noise.
turn on 'monochromatic'

13. change the blend mode to 'hard light'.
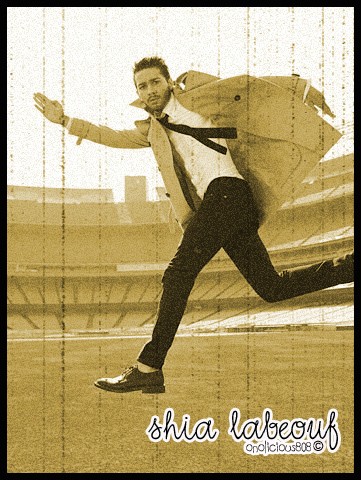
and you're done!
the final result:
before:
after:
i know another vintage photo effect. but, don't worry you'll enjoy this one. ;)
01. open your image
i'm using shia labeouf because he is gorgeous!
02. choose 'create new adjustment layer' icon on the bottom of the layers palette. from the pop-up menu, choose 'hue/saturation'
03. turn on 'colorize' in the dialog box. move the sliders to desired tint.
you should have something like this:
04. select the background layer. click on the 'create new layer' icon on the bottom of the layers palette.
05. fill it with white by pressing d, then press ctrl-backspace. on macs press, command-delete.
06. choose filter > texture > grain.
change the grain type to 'vertical' and input desired values.
07. change the blend mode to 'multiply'.
this is what you should have now:
08. click 'add layer mask' icon on the bottom of the layers palette.
09. choose filter > render > clouds.
then press control-f (command-f for macs)
10. add a new layer. change the fill to 50%
11. click edit > fill.
from the drop-down menu choose '50% gray'.
12. choose filter > noise > add noise.
turn on 'monochromatic'
13. change the blend mode to 'hard light'.
and you're done!
the final result:
before:
after:
Tutorial Comments
Showing latest 9 of 9 comments

Great Tutorial. Simple.
Hey, SoWrongItsAbby - the font is called "Dj Fancy" which you can search/download for free at www.dafont.com.
By missagonyx on Jul 9, 2008 5:57 am

great tutorial, what font did you use for the final result? (:
By SoWrongItsAbby on Jul 5, 2008 4:40 pm

thats a really cute font you wrote shia labeouf in. what was it? Very good tutorial. love it!
By maceyboox3 on Jul 4, 2008 5:05 am

this is soooo cool!
By digitalivory on Jul 1, 2008 10:29 pm

ahahh.
shia :)
love him.
By Leabean94 on Jun 30, 2008 5:35 am

KOOL!
By xFamous on Jun 29, 2008 9:20 am

cool :]
By smileyface on Jun 20, 2008 12:38 am

That's hot.
By IzzyGrace on Jun 18, 2008 2:52 am

NICE
By constantino1000 on Jun 17, 2008 11:16 am
Tutorial Details
| Author |
f00LisH_h3aRt63
|
| Submitted on | Jun 17, 2008 |
| Page views | 18,502 |
| Favorites | 52 |
| Comments | 9 |
| Reviewer |
manny-the-dino
|
| Approved on | Jun 17, 2008 |