
Tutorial
Click on thumbnailed images to enlarge
I did this tutorial in Photoshop CS3 Extended which is why some of you may have problems. However, that does't mean this tutorial won't work in other versions of Photoshop. Just try it out.
Okay so for this tutorial, I'm going to use a picture of Drake Bell ;)
Here's the before:

Here's the after:

(You can use it for this tutorial if you would like to). Let's get started!
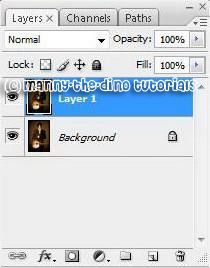
001.First open up your image & do a ctrl+j. That copies the background layer. It should look like this:
002.With "Layer 1" selected, hold down the ctrl key & click on the "New Layer" icon in the layers' palette. A new layer should appear in between "Layer 1" & your "Background" layer.
003.Now, reset your foreground & background colors if you need to. You can do that by pressing "D" on your keyboard. To see if your fg & bg colors are reset, just check it in your tools palette. The black will be the background of the picture & the white will be the polaroid's color.
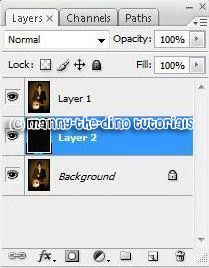
004.With black as the foreground color and the new blank layer selected, fill the new layer with black by doing an alt+backspace. it might look like nothing happened to your image but if you look at "Layer 2," you'll notice it will be black.
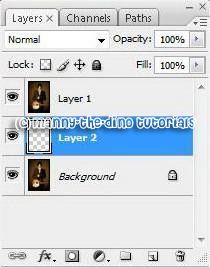
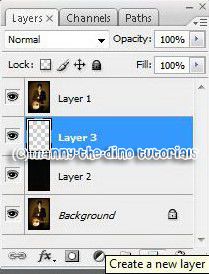
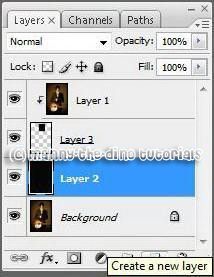
005.Now, with "Layer 2" selected, click on the "New Layer" button to create a layer between "Layer 1" & "Layer 2."
006.Then select the Rectangle Marquee Tool from your tools palette & select something from the picture you want to appear.

007.For my example, I did Drake's face.

008.Now, have your "Layer 3" selected & do an atl+backspace. That will make the area where I selected Drake's face black... on the layer in the layer's palette.

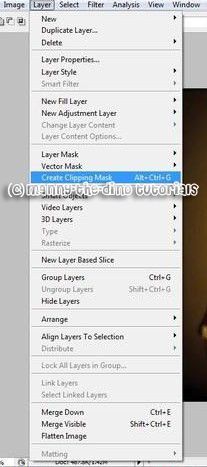
009.With "Layer 1" selected, go Layer>Create Clipping Mask.
010.Your picture should look like this:

011.Your layer should look like this: (the arrown indicates that the layer is being clipped to the layer below).
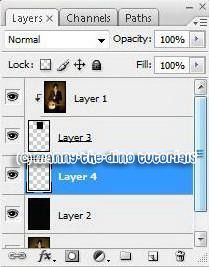
012.With "Layer 2" selected, click on the "Create New Layer" button. You should have this in your layers palette now:
013.Okay now get your Rectangle Marquee Tool again & make another square around the first rectangle you made. This will make the white part of your polaroid. You should end up with something like my screenshot below.

014.With "Layer 4" selected, do a ctrl+backspace to fill the selection with white. Then deselect it by doing a ctrl+d. It should look like this:

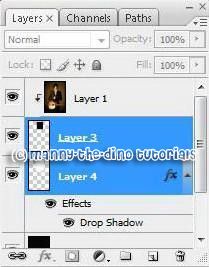
15.If you want a drop shadow to your polaroids, select your "Layer 4" & click on the Layers Styles button & select "Drop Shadow." You won't see the effect right now but you will when you have your final result. Apply the following settings when the screen pops up.
Opacity: 30
Angles: 120
Then click OK.

016.Now we're going to rotate the polaroid. You have to select "Layer 3" & "Layer 4." You can do this by clicking on "Layer 4" & then holding shift WHILE clicking on "Layer 3." Or if that doesn't work for you, another way you can do it is by doing the same thing but instead of holding down shift, you can hold down Ctrl. If you have a Mac you have to use ImageReady and when you go to select the layers, hold down the apple key and click on the layers.
017.Do a crtl+t & now there will be a like rectangle around the polaroid. If you point your cursor at one of the corners, then you will get an arrow that is kind of curved. When you see that, click & rotate the polariod, just like my example below.

018.Now, select "Layer 1," "Layer 3," & "Layer 4". Do a ctrl+g. That will group those layers.

019.In order to make another polaroid, select your "Group 1" & drag it to the Create New Layer button.
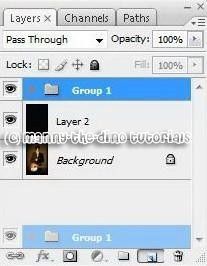
020.you should have a "Group 1 Copy" layer.

021.In order to make another polaroid, click on the little arrow in front of "Group 1 Copy." Then select "Layer 3 Copy" & "Layer 4 Copy."
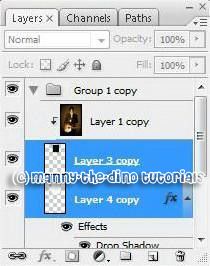
022.Do a ctrl+t & another polaroid should appear on top of your first one. Just click on it & drag it to the part of your picture you want to show.

023.You can also rotate it if you want to.

024.Just repeat steps 20-24 to add more polaroids. You should end up with something like this:
If you got lost or have any questions, comment the tutotial & I'll get back to you as soon as I can. :D
Tutorial Comments
Showing latest 10 of 102 comments

good job
thanks a lot
laser cutter
laser engraver
cutting plotters
vinyl cutters
cutting plotter
vinyl cutter
laser engraver
laser cutting machine
cnc router
stone cnc router
granite cnc router
woodworking cnc router

What if i don't have a Mac keyboard and computer? What else can i do to select the layers?
this post is very helpful for me creating a my new web site politics. thanks for nice tutorial.
heres my result: http://i34.tinypic.com/i56fdf. png
I LOVE THIS...ADDED TO FAVS!

This is sweeet!

Its not letting me do more than 2 poloroids. Its jus moving the 2nd one around. Help me out here please!

i like this tutorial it worked in cs2, but its only limited.... like 5 polaroids?

+Fav. =]

Nevermind , i figured it out (:
thanks for the tut.
Tutorial Details
| Author |
manny-the-dino
|
| Submitted on | Sep 6, 2007 |
| Page views | 393,017 |
| Favorites | 479 |
| Comments | 102 |
| Reviewer |
flardnarf
|
| Approved on | Sep 7, 2007 |