Tutorial
Click on thumbnailed images to enlarge
Since there have been requests from my last tutorial on how I had different colors on my final product, I'll show you. I honestly thought they had a utorial on here that would help demonstrate what I did.
Step 1:
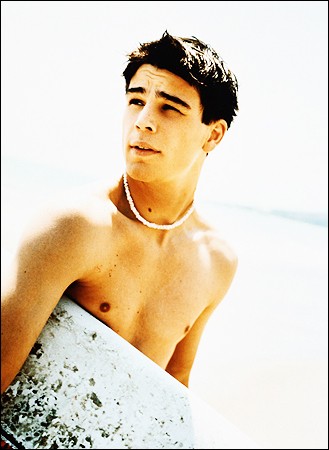
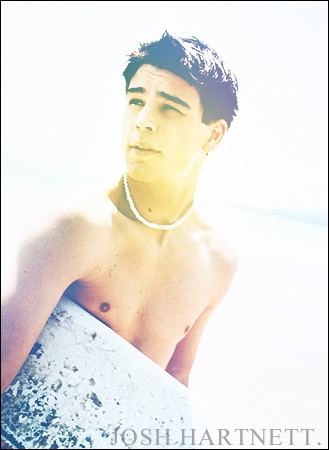
Grab your picture. I'm going to be using this picture of Josh Hartnett.
Step 2:
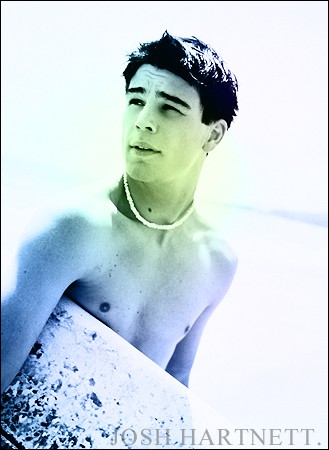
Next, add a layer (shift + control + n for those of you who are lazy) & use your brush tool with the round soft edge that is sort of fluffy on the edges. Make sure you are on LAYER 1 and not your image layer. Obviously there have been some issues with people who are really new to photoshop. If you do not have a layers window or you just don't know what the heck it is, press F7. It should pop up and that way you'll see what I'm talking about. Next, select any colors you'd like & plot them on the layer. Since Josh is on the beach, I thought I'd stick to a more blue scene with a touch of yellow, purple, & green. I like the combination of those colors, as you will see in the end.
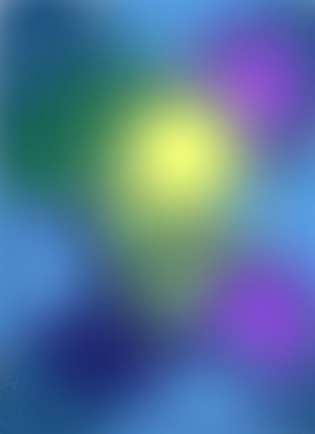
If you are going to add that yellow blob, you should place it somewhere precise where it would look good, otherwise everything else can be random but I usually place it to where I actually want it to be dark or light. It's really important that you fill out the entire picture so that way it will blend better.
Step 3:
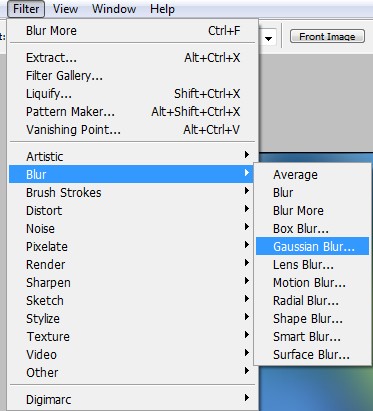
On the same layer, go to Filter > Blur > Gaussian Blur & set it to 40 or somewhere between 40-60. Just as long as it seems blurred enough to the point that you don't see any blobs or figures but a blur of color. But beware: If you blur it too much, the colors might not show up as well.
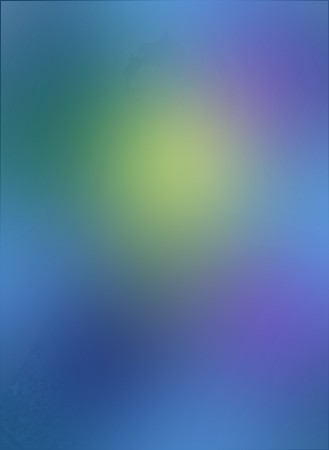
Then it should look like..
Step 4:
Finally, you're practically finished. On the same layer, change the setting to Lighten, Screen, Saturation, or Color. Those are my recommended ones but if you want the color to be a little more profound, you should stick to Color. Again, if you have no idea where this is, which you SHOULD, look at your layers window. Underneath the layers tab should say Normal. Change this by clicking on the little arrow that shows a drop-down menu. Click different settings. Mess around with them. I'll show you some examples I used. You obviously can set the setting to any style you like best.
Screen.
Color.
I hope this was satisfactory to your coloring needs. Thank you so much for adding this to your favorites!
Step 1:
Grab your picture. I'm going to be using this picture of Josh Hartnett.
Step 2:
Next, add a layer (shift + control + n for those of you who are lazy) & use your brush tool with the round soft edge that is sort of fluffy on the edges. Make sure you are on LAYER 1 and not your image layer. Obviously there have been some issues with people who are really new to photoshop. If you do not have a layers window or you just don't know what the heck it is, press F7. It should pop up and that way you'll see what I'm talking about. Next, select any colors you'd like & plot them on the layer. Since Josh is on the beach, I thought I'd stick to a more blue scene with a touch of yellow, purple, & green. I like the combination of those colors, as you will see in the end.
If you are going to add that yellow blob, you should place it somewhere precise where it would look good, otherwise everything else can be random but I usually place it to where I actually want it to be dark or light. It's really important that you fill out the entire picture so that way it will blend better.
Step 3:
On the same layer, go to Filter > Blur > Gaussian Blur & set it to 40 or somewhere between 40-60. Just as long as it seems blurred enough to the point that you don't see any blobs or figures but a blur of color. But beware: If you blur it too much, the colors might not show up as well.
Then it should look like..
Step 4:
Finally, you're practically finished. On the same layer, change the setting to Lighten, Screen, Saturation, or Color. Those are my recommended ones but if you want the color to be a little more profound, you should stick to Color. Again, if you have no idea where this is, which you SHOULD, look at your layers window. Underneath the layers tab should say Normal. Change this by clicking on the little arrow that shows a drop-down menu. Click different settings. Mess around with them. I'll show you some examples I used. You obviously can set the setting to any style you like best.
Screen.
Color.
I hope this was satisfactory to your coloring needs. Thank you so much for adding this to your favorites!
Tutorial Comments
Showing latest 10 of 19 comments

he's hot.
& great tutorial.
loved it.
By MangoPancakes on Feb 21, 2009 2:17 am

i love this tutorial ALOT Thank you so much!
By bbyni on Aug 23, 2008 5:16 pm

awwwwesome.
By NoWorriesDesigns on Jul 6, 2008 1:34 am

Amazing I love it!
By kaylag on Jun 30, 2008 8:08 am

omg i was looking all over for this
thanks!
By kimboxxkimi on May 28, 2008 2:09 am

This worked really good for me and it was super easy (:
Thanks so much.
By Taskig on May 18, 2008 5:01 pm

thankyouu this really helpedd!
made my picture look fabb.
By daniellebby on Apr 22, 2008 3:23 am

im stuck on #2 HELPPPPPPPPPPPPPPPPP.!
By accidentlyxxalaina on Jan 13, 2008 6:03 pm

very good. since im new i put this in my favies so i wouldnt forget it. thanx!!
By sarahxboys on Dec 28, 2007 9:47 pm

it really helps. THANKS ALOT.
By julievue on Oct 13, 2007 8:42 pm
Tutorial Details
| Author |
TiffanyFactorial
|
| Submitted on | Jul 7, 2007 |
| Page views | 42,263 |
| Favorites | 230 |
| Comments | 19 |
| Reviewer |
superstitious
|
| Approved on | Jul 7, 2007 |