Tutorial
Click on thumbnailed images to enlarge
S K I N
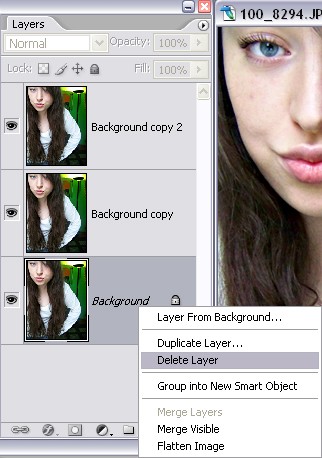
step 1 - duplicate your image twice and delete the bottom or "background" layer
step 2 - make sure you click back on the top layer, this is the one you'll be working with
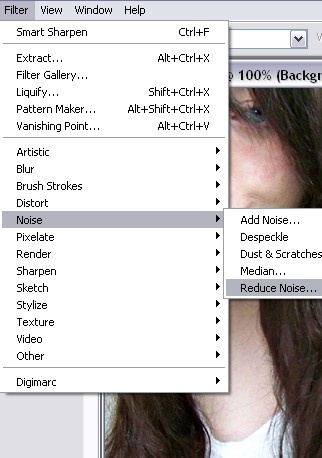
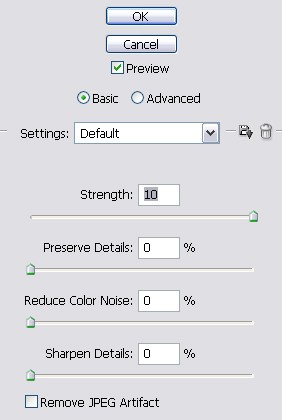
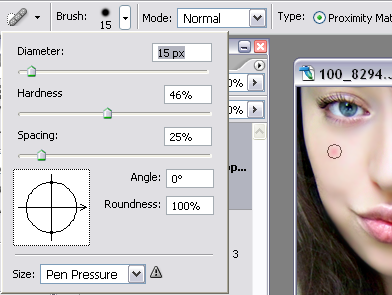
step 3 - always sharpen your image, go up to FILTER > SHARPEN > SMART SHARPEN

step 4 - adjust the settings you see so they look similar to this:
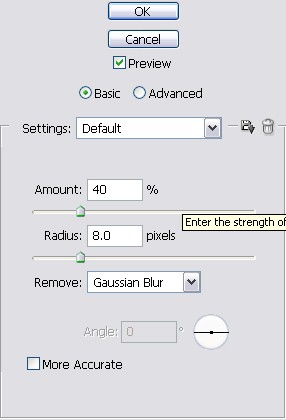
step 5 - duplicate the layer then go up to FILTER > NOISE > REDUCE NOISE this will blur your photo
step 6 - adjust your settings so they look like this:
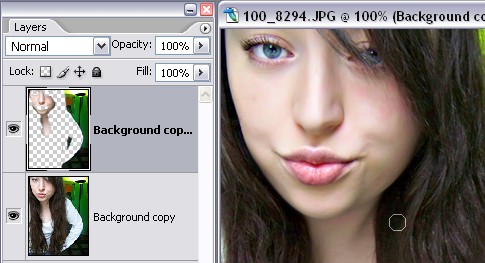
step 7 - now choose the eraser tool and set it to about size 30 depending on how big your image is
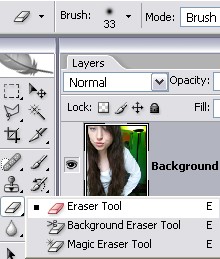
step 8 - start erasing the features you want to stand out like the eyes, mouth, hair, clothes, everything but the skin
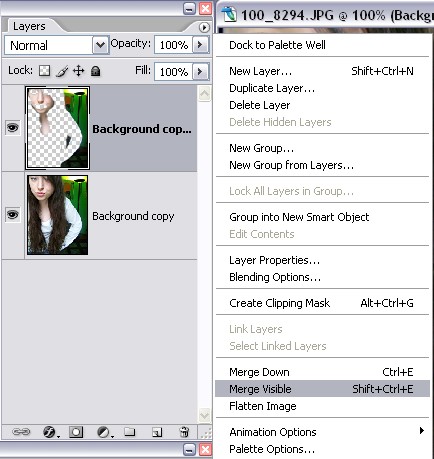
step 9 - merge the layers together and then duplicate that image
step 10 - go in and if you feel an area could need a little more work choose your blur tool and just blur over any imperfections
step 11 - if your still having trouble spots, there are two ways to correct this problem, the first is your spot healing brush tool
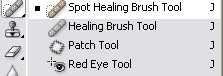
step 12 - adjust the size of the brush a little larger than your problem area and click, now your problem spot should have dissapeared, if it looks a bit uneven just use the blur tool again to even things out, the spot healing brush will only work for small areas by the way
step 13 - now as i mentioned there are two ways to deal with serious problem areas, say like a double chin, or uneven skintones, this would be a larger area to cover, to correct this problem choose your clone stamp tool
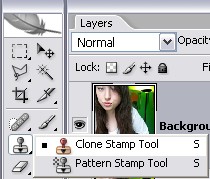
step 14 - to use this tool you'll need to hold down the ALT key on your keyboard and click on an area that is close to your problem spot, this will basically copy that area so you can "paint" it over your problem spot.


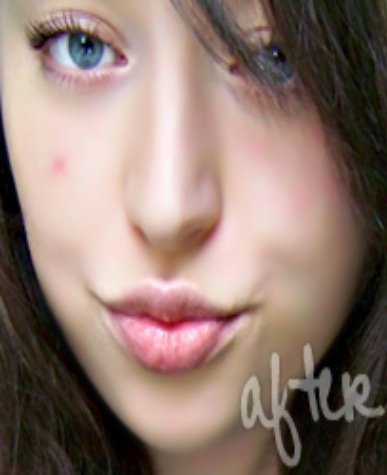
Now your skin should be flawless! I hope this helped! :D
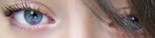
E Y E S
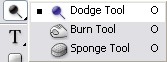
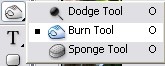
step 1 - zoom in on the eye area then select your "dodge tool" set it to a very small size, between 1 and 4 depeding on the size of your image, I chose size 2
step 2 -set your exposure to about 30% or so, make sure your settings look like this:

step 3 - start brushing over the white areas of your eyes and the white little spots in your pupil, the dodge tool makes things lighter, you may have to go over it a couple times to see a difference
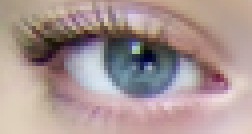
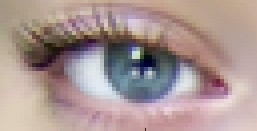
step 4 - adjust the brush size so it's a bit bigger at size 5 or 6 and brush around the inner iris just once!
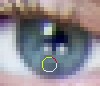

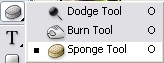
step 5 - select your "burn tool" and set it to size 1-3 as well, make sure your settings look like this
step 6 - start brushing over the outer rim of your iris and the dark part of your pupil

T E E T H
step 1 - zoom in on the teeth area and select the DODGE TOOL, set the size to about 7 or 8 depending on your image size
step 2 - start brushing over the whitest areas of your teeth, make sure not to go too bright or it will look fake
step 3 - now select your SPONGE TOOL:
make sure your seetings look like this:
step 4 - start brushing over your teeth, only stay away from the gums, this will take the color out of the them
don't do it too much, just a bit, or it will look odd!

Thats all you need to do to get whiter teeth! Hope it helped!
step 1 - duplicate your image twice and delete the bottom or "background" layer
step 2 - make sure you click back on the top layer, this is the one you'll be working with
step 3 - always sharpen your image, go up to FILTER > SHARPEN > SMART SHARPEN
step 4 - adjust the settings you see so they look similar to this:
step 5 - duplicate the layer then go up to FILTER > NOISE > REDUCE NOISE this will blur your photo
step 6 - adjust your settings so they look like this:
step 7 - now choose the eraser tool and set it to about size 30 depending on how big your image is
step 8 - start erasing the features you want to stand out like the eyes, mouth, hair, clothes, everything but the skin
step 9 - merge the layers together and then duplicate that image
step 10 - go in and if you feel an area could need a little more work choose your blur tool and just blur over any imperfections
step 11 - if your still having trouble spots, there are two ways to correct this problem, the first is your spot healing brush tool
step 12 - adjust the size of the brush a little larger than your problem area and click, now your problem spot should have dissapeared, if it looks a bit uneven just use the blur tool again to even things out, the spot healing brush will only work for small areas by the way
step 13 - now as i mentioned there are two ways to deal with serious problem areas, say like a double chin, or uneven skintones, this would be a larger area to cover, to correct this problem choose your clone stamp tool
step 14 - to use this tool you'll need to hold down the ALT key on your keyboard and click on an area that is close to your problem spot, this will basically copy that area so you can "paint" it over your problem spot.
Now your skin should be flawless! I hope this helped! :D
E Y E S
step 1 - zoom in on the eye area then select your "dodge tool" set it to a very small size, between 1 and 4 depeding on the size of your image, I chose size 2
step 2 -set your exposure to about 30% or so, make sure your settings look like this:
step 3 - start brushing over the white areas of your eyes and the white little spots in your pupil, the dodge tool makes things lighter, you may have to go over it a couple times to see a difference
step 4 - adjust the brush size so it's a bit bigger at size 5 or 6 and brush around the inner iris just once!
step 5 - select your "burn tool" and set it to size 1-3 as well, make sure your settings look like this
step 6 - start brushing over the outer rim of your iris and the dark part of your pupil
T E E T H
step 1 - zoom in on the teeth area and select the DODGE TOOL, set the size to about 7 or 8 depending on your image size
step 2 - start brushing over the whitest areas of your teeth, make sure not to go too bright or it will look fake
step 3 - now select your SPONGE TOOL:
make sure your seetings look like this:
step 4 - start brushing over your teeth, only stay away from the gums, this will take the color out of the them
don't do it too much, just a bit, or it will look odd!
Thats all you need to do to get whiter teeth! Hope it helped!
Tutorial Comments
Showing latest 3 of 3 comments

I liked it a lot :D very nice and ez :)
By buddyboy on Oct 15, 2009 8:08 pm

Looks very natural, I really like it.
By creole on Oct 5, 2009 8:04 pm

This helped a ton.
Thank you!
By Kara18 on Oct 5, 2009 8:29 am
Tutorial Details
| Author |
xColour
|
| Submitted on | Oct 3, 2009 |
| Page views | 13,263 |
| Favorites | 34 |
| Comments | 3 |
| Reviewer |
manny-the-dino
|
| Approved on | Oct 4, 2009 |