Tutorial
Click on thumbnailed images to enlarge
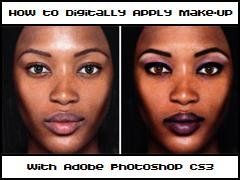
HOW TO APPLY MAKE-UP WITH ADOBE PHOTOSHOP CS3
I decided to redo this tutorial because I wasn't satisfied with my original model, Kate Winslet. She often goes for a natural look and since this is a makeup tutorial, I decided to go for someone who wears more dramatic makeup. I found this series of pictures of models with no makeup on the left and makeup on the right and thought it would be perfect to use for this tutorial. For more practice on photoshop makeup, you can try the other models. The picture will be available at the end for you to right-click and save.
I will be using the picture below to show you how I digitally apply makeup with Adobe Photoshop CS3. Take note, I am in no way a professional and have just learned how to do things by messing around. I suggest you photoshop the picture of the model (Naomi Campbell, I think) (right-click, "Save As") along with the tutorial, so you can learn how and then apply it to your own photos.

CREATING A DUPLICATE/BACK-UP LAYER
First, create a duplicate layer of the picture you're going to photoshop. You will use this layer to compare what you're doing to how the picture originally is. Also the original layer is good to have in case you want to start over.
------------------------------------------------------------------------
REMOVING BLEMISHES (Freckles, Wrinkles, Etc)
Let's remove the freckles. On the duplicate layer (do NOT create a new, transparent layer), I use the round size 19 brush. Using the SPOT HEALING BRUSH tool (right above the paint brush, looks like a band-aid), select a brush size and simply highlight the freckles that you want to get rid of. If the area is large, you can paint it like you would a paint brush and the whole area will be "healed." If it comes out looking weird, try doing the large area in smaller bits. Repeat until all blemishes are corrected. Next is shaping eyebrows.
[Or you can try the CLONE STAMP tool (right under the paint brush). Create a new, transparent layer. Name it. Select an area with clear, blemish-free skin as the source by pressing "alt" and highlighting the areas like you would with the spot healing brush. You will probably need to select new sources (because of lighting, etc) when you're correcting the blemishes. Repeat until all the blemishes are gone. With the blur tool, set to around 25% strength, blur your corrections so they look natural. The brush size is up to you, but I like the soft, round size 18.]

------------------------------------------------------------------------
SHAPING EYEBROWS
Now the model's eyebrows don't really need reshaping, so I'll refer to Kate Winslet for this part. The below pic is the before and after of Kate's eyebrows. Feel free to right-click and save this photo and shape the eyebrows from the before half of the picture. To shape the Kate's eyebrows, go to "Filter" and then click on "Liquefy" (do this on the picture copy). For brush size, I used 15, brush density 25, brush pressure 50, brush rate 80, turbulent jitter 50. For her right eyebrow, starting at the left (near the nose), start pushing her eyebrow up to make it thinner and as you make your way across the eyebrow, start to shape it how you want her brow shaped. Then, if you wish, do the same to the top of her eyebrow, but push down instead. Repeat with the left eyebrow.
There is a small shadow on her right eyebrow and some stray hairs on her left eyebrow that you may want to get rid of. Use the cloning technique from above to get rid of the stray hairs.

------------------------------------------------------------------------
COLORING EYEBROWS & EYES
First create a new duplicate layer of "duplicate layer" and name it "new duplicate layer." To color the model's eyebrows darker, enter "Quick Mask" (icon under colors that looks like a circle within a rectangle) by pressing "Q." Next with your brush (use the hard round brush, not soft round), select the model's eyebrows (it should show up in red). You may need to change the brush size a couple times as her eyebrows get thinner towards the edges. You can erase any mistakes. You can also use the pen tool which is quicker, if you know how.
When you're finished, click on the magic wand tool and click on both eyebrows. Then exit quick mask mode by pressing "Q" again. Now that her eyebrows are selected (to inverse the selection click "Select" then "Inverse" in case the whole picture instead of just the eyebrows are selected), simply go to "Image" then "Adjustments" and to "Hue/Saturation." Slide the lightness level to the left, to about -75. To change the eyebrow color, change the saturation to create different hair colors. Then deselect and change the layer opacity to 65%. Highlight the "new duplicate layer" and "duplicate layer" from the layers menu. Right-click and select "merge layers" to merge both layers into one layer.
Repeat with her eyes.
Note: Sometimes hue/saturation doesn't always work well on some pictures (like this one), so in those cases, instead of hue/saturation, go to "color balance"
(located somewhere above "hue/saturation") and find the color you want there. And then if you like, you can further adjust it on hue/saturation after. I chose +100, 0, -100 for the 3 boxes, starting from the left on the color balance menu. Now the model has honey-colored eyes.

------------------------------------------------------------------------
EYESHADOW/BLUSH
Create a new, transparent layer. Name it.
Using the paint brush, color model's eyelids with the colors you want her eyeshadow to be. Use different opacity depending on how much you want a particular color to stand out (for example, if you wanted her eyelids to stand out from the brow bone color, increase opacity). I recommend using soft round brushes of varying sizes (to create different eyeshadow effects).
When you're finished, blur the eyeshadow so it looks smooth and blended. Then change the layer to "Overlay" or "Soft Light" (whichever you prefer).
Next, go to "Image" then "Adjustments" to "Hue/Saturation" and mess around until the colors look more natural.
Do the same for blush if wanted. I personally did not put blush on the model.

------------------------------------------------------------------------
EYELINER
You can do eyeliner exactly how you do eyeshadow, or you can do the following:
*Learn how to use the pen tool first if you don't know how.
Create a new, transparent layer. Name it.
Choose the shade you want the eye liner to be. Using the pen tool, trace around the model's right eye. When you're finished, go to the paint brush and choose the size however thick you want the eyeliner to be. Next, choose the "paths" tab where you find "layers" and then on the bottom left there are three circles. Choose the middle one called "stroke." Now choose "smudge" (where you find "blur") and smudge the eyeliner. Then blur it. Repeat with the other eye. Lastly, change the opacity to blend the eyeliner better.

------------------------------------------------------------------------
WHITEN TEETH
Since the model isn't showing teeth, I will again use Kate for reference for this section.
Enter "Quick Mask" mode (press "Q") and fill in Kate's teeth. Next click the "Magic Wand" and click on her teeth. Invert the selection ("Select" then "Inverse").
Go to "Image," "Adjustments," and "Curves" and change the settings (just a little, not too much) on the bar(s) until you find your desired whiteness for her teeth.
The picture below, might not show much of a difference, but the whitening looks natural, not photoshopped which is what we want.

------------------------------------------------------------------------
LIPCOLOR
Create a new, transparent layer. Name it.
Using the pen tool, trace around the model's lips. When you're finished, right click and choose "Make Selection." If the model is showing teeth, make sure to trace around the inner portion of her lips (so her teeth/gums won't be colored). Choose the color you want her lips to be. When you're finished, right click and choose "Fill Path." Next you may want to go to "Image," "Adjustments," and "Hue/Saturation" to change the lip color to something that blends better or if you want to change the lip shade. Make the layer "soft light." If you want to do multi-colored lips, instead of filling the path, just use the paint brush and paint the different colors in whatever pattern you want on the lips. Make sure to change the layer to "soft light!"

------------------------------------------------------------------------
FINISHING TOUCHES
Go to "Image," "Adjustments" and "Curves" and fiddle around until you get your desired lighting effects.
If you want to make the skin smoother, do the following steps. Select all your layers (except the background layer) and merge them (right click, "merge all layers"). Duplicate this layer. On the duplicated layer, choose "Filter," "Blur," and "Smart Blur." Change the settings to however you want (I chose a radius of 1 and a threshold of 25). Click ok. Next change the opacity (I chose 40%) until you're satisfied. Merge the two layers.
Now that you're finished, you can photoshop your own pictures!

------------------------------------------------------------------------
This is the final result from (left to right) no makeup > photoshop makeup before final touches > photoshop makeup after final touches > real makeup.

------------------------------------------------------------------------
Here are two others I've done on Adriana Lima and Cate Blanchett, so you can see different effects:

------------------------------------------------------------------------
Link to more pictures you can practice on:
http://img220.imageshack.us/img220/5885/makeupmodels.jpg
------------------------------------------------------------------------
If you have any questions/comments regarding this tutorial, message me.
I decided to redo this tutorial because I wasn't satisfied with my original model, Kate Winslet. She often goes for a natural look and since this is a makeup tutorial, I decided to go for someone who wears more dramatic makeup. I found this series of pictures of models with no makeup on the left and makeup on the right and thought it would be perfect to use for this tutorial. For more practice on photoshop makeup, you can try the other models. The picture will be available at the end for you to right-click and save.
I will be using the picture below to show you how I digitally apply makeup with Adobe Photoshop CS3. Take note, I am in no way a professional and have just learned how to do things by messing around. I suggest you photoshop the picture of the model (Naomi Campbell, I think) (right-click, "Save As") along with the tutorial, so you can learn how and then apply it to your own photos.
CREATING A DUPLICATE/BACK-UP LAYER
First, create a duplicate layer of the picture you're going to photoshop. You will use this layer to compare what you're doing to how the picture originally is. Also the original layer is good to have in case you want to start over.
------------------------------------------------------------------------
REMOVING BLEMISHES (Freckles, Wrinkles, Etc)
Let's remove the freckles. On the duplicate layer (do NOT create a new, transparent layer), I use the round size 19 brush. Using the SPOT HEALING BRUSH tool (right above the paint brush, looks like a band-aid), select a brush size and simply highlight the freckles that you want to get rid of. If the area is large, you can paint it like you would a paint brush and the whole area will be "healed." If it comes out looking weird, try doing the large area in smaller bits. Repeat until all blemishes are corrected. Next is shaping eyebrows.
[Or you can try the CLONE STAMP tool (right under the paint brush). Create a new, transparent layer. Name it. Select an area with clear, blemish-free skin as the source by pressing "alt" and highlighting the areas like you would with the spot healing brush. You will probably need to select new sources (because of lighting, etc) when you're correcting the blemishes. Repeat until all the blemishes are gone. With the blur tool, set to around 25% strength, blur your corrections so they look natural. The brush size is up to you, but I like the soft, round size 18.]
------------------------------------------------------------------------
SHAPING EYEBROWS
Now the model's eyebrows don't really need reshaping, so I'll refer to Kate Winslet for this part. The below pic is the before and after of Kate's eyebrows. Feel free to right-click and save this photo and shape the eyebrows from the before half of the picture. To shape the Kate's eyebrows, go to "Filter" and then click on "Liquefy" (do this on the picture copy). For brush size, I used 15, brush density 25, brush pressure 50, brush rate 80, turbulent jitter 50. For her right eyebrow, starting at the left (near the nose), start pushing her eyebrow up to make it thinner and as you make your way across the eyebrow, start to shape it how you want her brow shaped. Then, if you wish, do the same to the top of her eyebrow, but push down instead. Repeat with the left eyebrow.
There is a small shadow on her right eyebrow and some stray hairs on her left eyebrow that you may want to get rid of. Use the cloning technique from above to get rid of the stray hairs.
------------------------------------------------------------------------
COLORING EYEBROWS & EYES
First create a new duplicate layer of "duplicate layer" and name it "new duplicate layer." To color the model's eyebrows darker, enter "Quick Mask" (icon under colors that looks like a circle within a rectangle) by pressing "Q." Next with your brush (use the hard round brush, not soft round), select the model's eyebrows (it should show up in red). You may need to change the brush size a couple times as her eyebrows get thinner towards the edges. You can erase any mistakes. You can also use the pen tool which is quicker, if you know how.
When you're finished, click on the magic wand tool and click on both eyebrows. Then exit quick mask mode by pressing "Q" again. Now that her eyebrows are selected (to inverse the selection click "Select" then "Inverse" in case the whole picture instead of just the eyebrows are selected), simply go to "Image" then "Adjustments" and to "Hue/Saturation." Slide the lightness level to the left, to about -75. To change the eyebrow color, change the saturation to create different hair colors. Then deselect and change the layer opacity to 65%. Highlight the "new duplicate layer" and "duplicate layer" from the layers menu. Right-click and select "merge layers" to merge both layers into one layer.
Repeat with her eyes.
Note: Sometimes hue/saturation doesn't always work well on some pictures (like this one), so in those cases, instead of hue/saturation, go to "color balance"
(located somewhere above "hue/saturation") and find the color you want there. And then if you like, you can further adjust it on hue/saturation after. I chose +100, 0, -100 for the 3 boxes, starting from the left on the color balance menu. Now the model has honey-colored eyes.
------------------------------------------------------------------------
EYESHADOW/BLUSH
Create a new, transparent layer. Name it.
Using the paint brush, color model's eyelids with the colors you want her eyeshadow to be. Use different opacity depending on how much you want a particular color to stand out (for example, if you wanted her eyelids to stand out from the brow bone color, increase opacity). I recommend using soft round brushes of varying sizes (to create different eyeshadow effects).
When you're finished, blur the eyeshadow so it looks smooth and blended. Then change the layer to "Overlay" or "Soft Light" (whichever you prefer).
Next, go to "Image" then "Adjustments" to "Hue/Saturation" and mess around until the colors look more natural.
Do the same for blush if wanted. I personally did not put blush on the model.
------------------------------------------------------------------------
EYELINER
You can do eyeliner exactly how you do eyeshadow, or you can do the following:
*Learn how to use the pen tool first if you don't know how.
Create a new, transparent layer. Name it.
Choose the shade you want the eye liner to be. Using the pen tool, trace around the model's right eye. When you're finished, go to the paint brush and choose the size however thick you want the eyeliner to be. Next, choose the "paths" tab where you find "layers" and then on the bottom left there are three circles. Choose the middle one called "stroke." Now choose "smudge" (where you find "blur") and smudge the eyeliner. Then blur it. Repeat with the other eye. Lastly, change the opacity to blend the eyeliner better.
------------------------------------------------------------------------
WHITEN TEETH
Since the model isn't showing teeth, I will again use Kate for reference for this section.
Enter "Quick Mask" mode (press "Q") and fill in Kate's teeth. Next click the "Magic Wand" and click on her teeth. Invert the selection ("Select" then "Inverse").
Go to "Image," "Adjustments," and "Curves" and change the settings (just a little, not too much) on the bar(s) until you find your desired whiteness for her teeth.
The picture below, might not show much of a difference, but the whitening looks natural, not photoshopped which is what we want.
------------------------------------------------------------------------
LIPCOLOR
Create a new, transparent layer. Name it.
Using the pen tool, trace around the model's lips. When you're finished, right click and choose "Make Selection." If the model is showing teeth, make sure to trace around the inner portion of her lips (so her teeth/gums won't be colored). Choose the color you want her lips to be. When you're finished, right click and choose "Fill Path." Next you may want to go to "Image," "Adjustments," and "Hue/Saturation" to change the lip color to something that blends better or if you want to change the lip shade. Make the layer "soft light." If you want to do multi-colored lips, instead of filling the path, just use the paint brush and paint the different colors in whatever pattern you want on the lips. Make sure to change the layer to "soft light!"
------------------------------------------------------------------------
FINISHING TOUCHES
Go to "Image," "Adjustments" and "Curves" and fiddle around until you get your desired lighting effects.
If you want to make the skin smoother, do the following steps. Select all your layers (except the background layer) and merge them (right click, "merge all layers"). Duplicate this layer. On the duplicated layer, choose "Filter," "Blur," and "Smart Blur." Change the settings to however you want (I chose a radius of 1 and a threshold of 25). Click ok. Next change the opacity (I chose 40%) until you're satisfied. Merge the two layers.
Now that you're finished, you can photoshop your own pictures!
------------------------------------------------------------------------
This is the final result from (left to right) no makeup > photoshop makeup before final touches > photoshop makeup after final touches > real makeup.
------------------------------------------------------------------------
Here are two others I've done on Adriana Lima and Cate Blanchett, so you can see different effects:
------------------------------------------------------------------------
Link to more pictures you can practice on:
http://img220.imageshack.us/img220/5885/makeupmodels.jpg
------------------------------------------------------------------------
If you have any questions/comments regarding this tutorial, message me.
Tutorial Comments
Showing latest 10 of 18 comments

this just teaches people how to make them pretty (i used this) :P
nice tut
By BrokenHero on Jul 7, 2009 11:12 am

this tutorial is AMAZING,
:)
By hellotyra on Jul 3, 2009 8:01 pm

Oh Goodness this is mother loving, lipstick wearing, Celebrity Gossip having beeeeeatuiful!. I adooooooooooooore the [last 2] =]
By koobecaf on May 9, 2009 9:00 pm

Wow your end images are awesome.. I think you made them look beautiful and it looks real. Makeup is just makeup.. Just something you put on, like clothes. Great tutorial and great work. :}
By oranger0cks on Mar 31, 2009 3:05 am

this is really good the bottom 2 are incredibly badass
By meltmyheart2stone on Mar 23, 2009 9:45 am
doesn't look fake to me:) i love this tut
By diana170 on Mar 22, 2009 6:37 pm

wow i like the last two
By Eww on Mar 19, 2009 11:18 pm

niceee
By turnupthevolume on Mar 3, 2009 7:56 pm

OH MY, that's scarily amazing =PP
By na-nancy on Mar 3, 2009 6:27 pm

woah, blanchett's nose looks different haha
cool though
By futura on Mar 2, 2009 3:07 pm
Tutorial Details
| Author |
fallenmuse
|
| Submitted on | Feb 14, 2009 |
| Page views | 64,862 |
| Favorites | 120 |
| Comments | 18 |
| Reviewer |
manny-the-dino
|
| Approved on | Feb 15, 2009 |