
Tutorial
Click on thumbnailed images to enlarge
In this tutorial I will show you how to resize andcut from background a small logo so that you can use it in your projects.
This problem is quite frequent actually when you work with small companies: they hire you to create their website, business cards, etc, but when you ask them for their logo you end up with a really small thumbnail jpeg with the quality of a bad mobile phone picture. So, what I will try to show you may turn up to be really useful when you are in a delicate situation.
First, we need a logo. I will use the new Photoshop logo (I`ve placed it on a random background, because those details are not really important).

The size for this image is:
Width: 226px
Height: 190px
So, this image is useless if you want to use it, for example, on a business card.
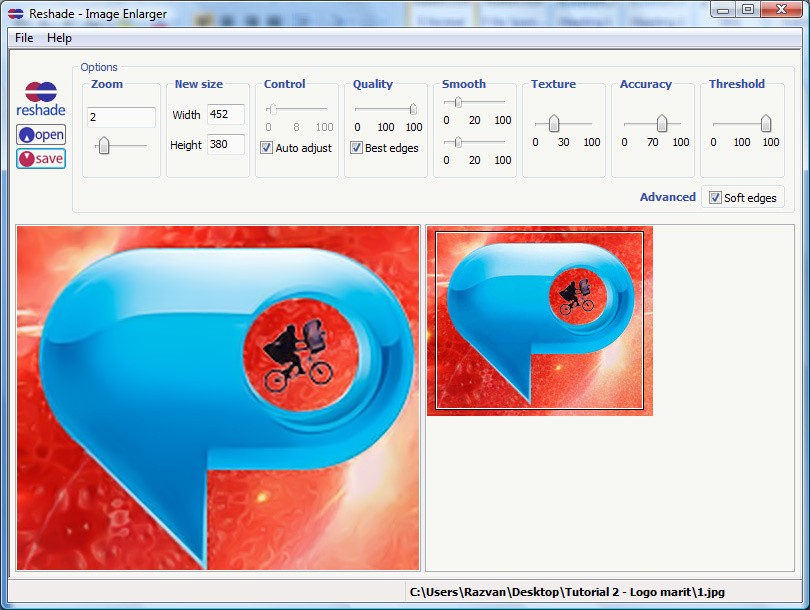
As we all know and experienced, Photoshop has some problems when it comes to enlarging images. The image is all blurry and that`s just useless. So, to enlarge this image properly I will use Reshade – Image Enlarger, the perfect solution when it comes to enlarging images.
Here is the image enlarged (2x) in Reshade – Image Enlarger:

Here are the settings that I`ve used:
Now that we have a bigger logo, all we have to do is to delete the background.To do this, I will use a fast method that is easy to apply for almost any image.
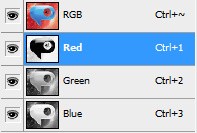
Open the image in Photoshop (the enlarged one, of course).Go to the Channels panel (if you do not have this panel active, go to Window -> Channels). There you will have 4 channels by default: RGB, Red, Green and Blue. Look for the one that has the greatest contrast between the logo and the background. In this case, it`s the Red channel.
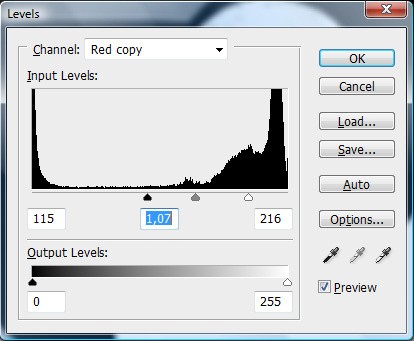
Now, right click on that channel and select Duplicate Channel (name it as you want). Deactivate all other channels by clicking on the eye next to the thumbnail.With the duplicated channel selected, go to Image -> Adjustments -> Levels (or simply press CTRL+L).Move the cursors around so that the logo turns more to black and the background turns more to white (do not exaggerate with that, we don`t want to have a MS Paint looking logo).
I`ve used this settings for the levels:
The channel should look something like this:
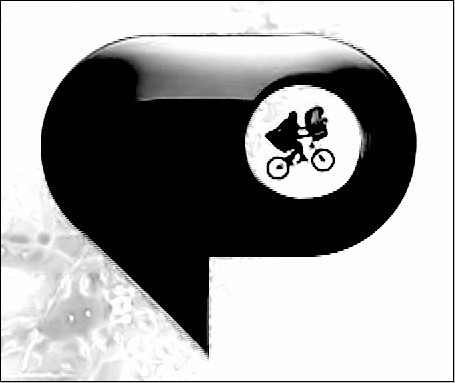
Now, select the brush, and by using a soft edged brush simply paint over the logo with black and outside with white (this logo has some basic shapes so if you want you can use the Rectangular and Elliptical Marquee Tools to fill the logo with black).
In the end, your channel should look something like this:
Now go to Select -> Load Selection (make sure you have the right channel selected) and just click OK. Reactivate the other channels by clicking on the RGB channel (this activates the Red, Green and Blue channels and deactivates the modified channel).
Go back to the layers panel, right click on the Background layer and select Layer From Background. Hit OK. And then hit the delete key.The result should look like this:

This problem is quite frequent actually when you work with small companies: they hire you to create their website, business cards, etc, but when you ask them for their logo you end up with a really small thumbnail jpeg with the quality of a bad mobile phone picture. So, what I will try to show you may turn up to be really useful when you are in a delicate situation.
First, we need a logo. I will use the new Photoshop logo (I`ve placed it on a random background, because those details are not really important).
The size for this image is:
Width: 226px
Height: 190px
So, this image is useless if you want to use it, for example, on a business card.
As we all know and experienced, Photoshop has some problems when it comes to enlarging images. The image is all blurry and that`s just useless. So, to enlarge this image properly I will use Reshade – Image Enlarger, the perfect solution when it comes to enlarging images.
Here is the image enlarged (2x) in Reshade – Image Enlarger:
Here are the settings that I`ve used:
Now that we have a bigger logo, all we have to do is to delete the background.To do this, I will use a fast method that is easy to apply for almost any image.
Open the image in Photoshop (the enlarged one, of course).Go to the Channels panel (if you do not have this panel active, go to Window -> Channels). There you will have 4 channels by default: RGB, Red, Green and Blue. Look for the one that has the greatest contrast between the logo and the background. In this case, it`s the Red channel.
Now, right click on that channel and select Duplicate Channel (name it as you want). Deactivate all other channels by clicking on the eye next to the thumbnail.With the duplicated channel selected, go to Image -> Adjustments -> Levels (or simply press CTRL+L).Move the cursors around so that the logo turns more to black and the background turns more to white (do not exaggerate with that, we don`t want to have a MS Paint looking logo).
I`ve used this settings for the levels:
The channel should look something like this:
Now, select the brush, and by using a soft edged brush simply paint over the logo with black and outside with white (this logo has some basic shapes so if you want you can use the Rectangular and Elliptical Marquee Tools to fill the logo with black).
In the end, your channel should look something like this:
Now go to Select -> Load Selection (make sure you have the right channel selected) and just click OK. Reactivate the other channels by clicking on the RGB channel (this activates the Red, Green and Blue channels and deactivates the modified channel).
Go back to the layers panel, right click on the Background layer and select Layer From Background. Hit OK. And then hit the delete key.The result should look like this:
Tutorial Comments
Showing latest 2 of 2 comments

fun :D ♫♪♥
By StephyDH on Jan 16, 2009 8:28 pm

nice
By JRock-Layouts-and-Graphics on Jan 14, 2009 9:31 pm
Tutorial Details
| Author |
web
|
| Submitted on | Jan 13, 2009 |
| Page views | 7,802 |
| Favorites | 20 |
| Comments | 2 |
| Reviewer |
manny-the-dino
|
| Approved on | Jan 13, 2009 |