
Tutorial
Click on thumbnailed images to enlarge
I'll be using this:

1.) Now open your picture.
2.) Select the rectangular marquee tool.

3.) Then select an area of the picture, leave just enough room for the fade to show.

4.) Then right click the image and click feather.
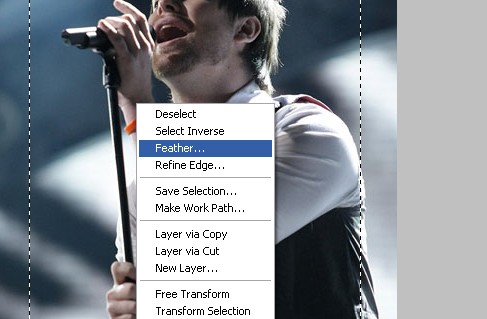
5.) Type 9. (You can go higher just more rounder fade)
Then click okay.
6.) Then press and hold CTRL SHIFT and I.
Now the area you originally selected and the border of the image should be selected.

(There should be two different selections)
Or another way is to go to select, then inverse.
7.) Then just simply press Delete (DEL) on your keyboard.
(If you want more fade, simply keep pressing Delete (DEL) until you get your desired fade).
Then your have a faded boarder!
1.) Now open your picture.
2.) Select the rectangular marquee tool.
3.) Then select an area of the picture, leave just enough room for the fade to show.
4.) Then right click the image and click feather.
5.) Type 9. (You can go higher just more rounder fade)
Then click okay.
6.) Then press and hold CTRL SHIFT and I.
Now the area you originally selected and the border of the image should be selected.
(There should be two different selections)
Or another way is to go to select, then inverse.
7.) Then just simply press Delete (DEL) on your keyboard.
(If you want more fade, simply keep pressing Delete (DEL) until you get your desired fade).
Then your have a faded boarder!
Tutorial Comments
Showing latest 10 of 10 comments

this is terrific! very useful ^^
thank u so much~
By xchangminniex on Jun 26, 2009 9:10 am

I've been looking for something like this for quite a while.
By PeterBeepBeep on Apr 28, 2009 10:43 pm

always wondered how to do it without using the eraser tool! cool! thanks.
By calilani on Mar 19, 2009 7:24 am

LovEly....
By crdots2786 on Feb 27, 2009 8:11 am

This is super easy to follow,
And looks really nice.
Thanks for posting this.
~
By AznsakuraCF on Feb 16, 2009 7:40 am

Wow, thats really cool! Tankyuuu!!
By Peace4President on Jan 28, 2009 4:08 pm

thanks! this is easy! =)
By liviia on Jan 15, 2009 2:43 am
THANK YOU SO MUCH! your tutorial is easy to understand!!!
By nanadnakatsu on Jan 11, 2009 9:24 pm

neat.
By futura on Jan 5, 2009 12:34 am

Wow!
I love it!
Tres simple and looks incredibly cool!
Thanksss!
=]]
-GiGi
By Z0MGsz on Jan 4, 2009 9:46 pm
Tutorial Details
| Author |
dyindyinjohnson
|
| Submitted on | Jan 2, 2009 |
| Page views | 59,443 |
| Favorites | 66 |
| Comments | 10 |
| Reviewer |
manny-the-dino
|
| Approved on | Jan 4, 2009 |