
Tutorial
Click on thumbnailed images to enlarge
1. Open up your picture. Feel free to grab mine or use your own.

2. Crop it to 100x100 pixelz.

3. This depends on your picture. I felt like it needed to pop, so I sharpened it by going Filter >> Sharpen >> Sharpen.

4. Duplicate your image by hitting ctrl + J. Set that layer to Soft Light @ 100%, ch'yeah.

5. Duplicate the image again. Put this layer above the Soft Light one and set it to Screen @ 25%.

6. I wanted to make her dress pop, so I went Layer >> New Adjustment Layer >> Selective Color and upped the Yellow and Neutrals. This also gave her face a little more color.
Yellow:
-45 / 24 / 43 / 40
Neutrals:
-6 / -6 / 9 / 5

7. Take the following texture by parkbench @ LJ.com and add it to your icon. Set it to Multiply @ 100%. I erased the bits covering Brookelle.
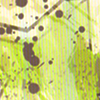 + =
+ = 
And that's all there is to it.
Other examples:


[the last one I changed slightly. I duplicated the selective color layer and set the screen layer to 46%. I didn't sharpen this one either.]
2. Crop it to 100x100 pixelz.
3. This depends on your picture. I felt like it needed to pop, so I sharpened it by going Filter >> Sharpen >> Sharpen.
4. Duplicate your image by hitting ctrl + J. Set that layer to Soft Light @ 100%, ch'yeah.
5. Duplicate the image again. Put this layer above the Soft Light one and set it to Screen @ 25%.
6. I wanted to make her dress pop, so I went Layer >> New Adjustment Layer >> Selective Color and upped the Yellow and Neutrals. This also gave her face a little more color.
Yellow:
-45 / 24 / 43 / 40
Neutrals:
-6 / -6 / 9 / 5
7. Take the following texture by parkbench @ LJ.com and add it to your icon. Set it to Multiply @ 100%. I erased the bits covering Brookelle.
+ = And that's all there is to it.
Other examples:
[the last one I changed slightly. I duplicated the selective color layer and set the screen layer to 46%. I didn't sharpen this one either.]
Tutorial Comments
Showing latest 10 of 10 comments

done!! thanx!!
By falconcyborg on May 8, 2009 7:38 am

Love the way the icons are when they are done
By SilentgirlDk on Feb 16, 2009 10:58 am

:D I like it, might use this tutorial.
By patternhouses on Feb 13, 2009 7:56 pm

love itt. :]]
will def have to try it!
By cyaattheswingset on Jan 7, 2009 1:04 pm

I hope you're not a JOCKER. Because I found the EXACT same tutorial here:
http://community.livejo urnal.com/icon_tutorial/100293 38.html#cutid1
This tutorial on LJ was posted on different days? Hmmm.
By creole on Jan 2, 2009 7:47 pm
=0 lovely effect.
By creole on Jan 2, 2009 6:31 pm

@-retired-
LJ.com means livejournal.
parkbench.livejo urnal.com
By skywalkers on Dec 29, 2008 5:52 pm

love it!
By freshlikewha on Dec 29, 2008 3:48 pm

and another thing wer u got the texture again?
the site that you gave was just a textile site.
errm..
By -retired- on Dec 28, 2008 12:12 pm
whew! nyc one..
i wasn't expecting bout' this thing.
thanks fer sharing :)
By -retired- on Dec 28, 2008 11:48 am
Tutorial Details
| Author |
skywalkers
|
| Submitted on | Dec 27, 2008 |
| Page views | 54,081 |
| Favorites | 42 |
| Comments | 10 |
| Reviewer |
manny-the-dino
|
| Approved on | Dec 27, 2008 |