Tutorial
Click on thumbnailed images to enlarge
Idea was from this gimp tutorial.
This mud texture is optional to use. (You will get a better result if you use it. In part 1.2 and part 2.2)
Part 1.1 - The Texture (If your using the mud texture go to Part 1.2 below this part)
1) Make a new document, and fill the color with black as our background color.
2) Now duplicate that layer once, and make it transparent.
3) Now make a new layer (Layer-New-Layer), and select your Elliptical Marquee Tool, and make a circle in the new layer. (The layer must be transparent first)
4) Fill in that circle with whatever color (I’m using Red = FF0000)
5) Now on that layer, right click on it and select Blending Options. Now check Bevel and Emboss, and now move size up to 80, and check Texture. Now click ok
6) Merge the layer down once to the transparent layer. (Your background color should be right below now)
Part 2.1 - The Explosion
1) Right click on the layer we merged down and go to Filter-Distort-Spherize, and make it 66%
2) Now make sure the circle isn’t selected and go to Filter-Distort-Polar Coordinates. now check Polar to Rectangular
3) Now rotate the image 90 degrees (Image-Rotate Canvas-90 degrees CW)
4) Now go to Filter-Stylize-Wind leave everything how it is and click ok, and now repeat that same step, or just click CTRL-F
5) Now rotate the image 90 degrees again (Image-Rotate Canvas-90 degrees CCW)
6) Now go back to Filter-Distort-Polar Coordinates, and now check Rectangular to Polar.
7) Now mess with the color to have it fit your needs. (Image-Adjustments-Color Balance Image-Adjustments-Gradient Map Image-Adjustments-Hue/Saturation)
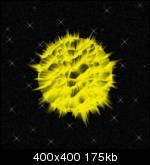
My Final Result (click to enlarge)
------------------------------------------------------------------------------------------------------------
Part 1.2 - The Texture
1) Make a new document, and fill the color with black as our background color.
2) Now duplicate that layer once, and make it transparent.
3) Now copy and paste this image into photoshop. (feel free to resize it or w/e so you can get a better looking explosion)
4) Grap your Elliptical Marquee Tool and make a circle on the mud texture. Now just copy that circle.
5) Now make that whole layer transparent and paste the circle mud texture down.
Part 2.2 - The Explosion
1) Don’t deselect the layer, because we need to and go to Filter-Distort-Spherize, and make it 70%
2) Now make sure the circle isn’t selected and go to Filter-Distort-Polar Coordinates. now check Polar to Rectangular
3) Now rotate the image 90 degrees (Image-Rotate Canvas-90 degrees CW)
4) Now go to Filter-Stylize-Wind leave everything how it is and click ok, and now repeat that same step, or just click CTRL-F
5) Now rotate the image 90 degrees again (Image-Rotate Canvas-90 degrees CCW)
6) Now go back to Filter-Distort-Polar Coordinates, and now check Rectangular to Polar.
7) Now mess with the color to have it fit your needs. (Image-Adjustments-Color Balance Image-Adjustments-Gradient Map Image-Adjustments-Hue/Saturation)
My Final Result (click to enlarge)
This mud texture is optional to use. (You will get a better result if you use it. In part 1.2 and part 2.2)
Part 1.1 - The Texture (If your using the mud texture go to Part 1.2 below this part)
1) Make a new document, and fill the color with black as our background color.
2) Now duplicate that layer once, and make it transparent.
3) Now make a new layer (Layer-New-Layer), and select your Elliptical Marquee Tool, and make a circle in the new layer. (The layer must be transparent first)
4) Fill in that circle with whatever color (I’m using Red = FF0000)
5) Now on that layer, right click on it and select Blending Options. Now check Bevel and Emboss, and now move size up to 80, and check Texture. Now click ok
6) Merge the layer down once to the transparent layer. (Your background color should be right below now)
Part 2.1 - The Explosion
1) Right click on the layer we merged down and go to Filter-Distort-Spherize, and make it 66%
2) Now make sure the circle isn’t selected and go to Filter-Distort-Polar Coordinates. now check Polar to Rectangular
3) Now rotate the image 90 degrees (Image-Rotate Canvas-90 degrees CW)
4) Now go to Filter-Stylize-Wind leave everything how it is and click ok, and now repeat that same step, or just click CTRL-F
5) Now rotate the image 90 degrees again (Image-Rotate Canvas-90 degrees CCW)
6) Now go back to Filter-Distort-Polar Coordinates, and now check Rectangular to Polar.
7) Now mess with the color to have it fit your needs. (Image-Adjustments-Color Balance Image-Adjustments-Gradient Map Image-Adjustments-Hue/Saturation)
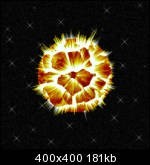
My Final Result (click to enlarge)

------------------------------------------------------------------------------------------------------------
Part 1.2 - The Texture
1) Make a new document, and fill the color with black as our background color.
2) Now duplicate that layer once, and make it transparent.
3) Now copy and paste this image into photoshop. (feel free to resize it or w/e so you can get a better looking explosion)
4) Grap your Elliptical Marquee Tool and make a circle on the mud texture. Now just copy that circle.
5) Now make that whole layer transparent and paste the circle mud texture down.
Part 2.2 - The Explosion
1) Don’t deselect the layer, because we need to and go to Filter-Distort-Spherize, and make it 70%
2) Now make sure the circle isn’t selected and go to Filter-Distort-Polar Coordinates. now check Polar to Rectangular
3) Now rotate the image 90 degrees (Image-Rotate Canvas-90 degrees CW)
4) Now go to Filter-Stylize-Wind leave everything how it is and click ok, and now repeat that same step, or just click CTRL-F
5) Now rotate the image 90 degrees again (Image-Rotate Canvas-90 degrees CCW)
6) Now go back to Filter-Distort-Polar Coordinates, and now check Rectangular to Polar.
7) Now mess with the color to have it fit your needs. (Image-Adjustments-Color Balance Image-Adjustments-Gradient Map Image-Adjustments-Hue/Saturation)
My Final Result (click to enlarge)

Tutorial Comments
Showing latest 4 of 4 comments

http://www.createblog.com/foru ms/index.php?showtopic=112857& hl=
I made this back in 05.
By carolannexbh on Dec 21, 2008 2:40 am

cool
By masterz on Dec 13, 2008 10:17 am

This is a really cool tutorial. This tutorial will definitely help my friend for his band layout. Thanks for posting!
By YDG on Sep 15, 2008 10:00 pm

cool
By JRock-Layouts-and-Graphics on Sep 15, 2008 4:09 pm
Tutorial Details
| Author |
mikethedj4
|
| Submitted on | Sep 13, 2008 |
| Page views | 11,213 |
| Favorites | 8 |
| Comments | 4 |
| Reviewer |
manny-the-dino
|
| Approved on | Sep 26, 2008 |