Tutorial
Click on thumbnailed images to enlarge
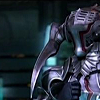
One: Find an image or a base. I'll be using a picture from Final Fantasy XII (my current obsession :3)
Two: Duplicate the base and go to Filter >> Blur >> Gaussian Blur. Set the radius to 3.0. Set the layer to Overlay at 60%. Flatten image (layer >> flatten image)
Three: Create a new layer and fill it in with #a099c5. Set the layer to soft light at 80%.
Four: Use the texture below and paste it on top of the layer. Set it to Lighten. You can move the texture around if you like or use the eraser tool to erase some parts you don't want.
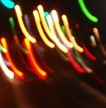
texture provided by egg9700 on deviant art.
Optional Step: If you want to brighten up your image a bit more, go to your background layer (the very first layer), then go to Image >> Adjustments >> Brightness/Contrast. Play around with the settings until you're happy with it.
Five: Create a new layer. Go to your color palette(sp?) and choose white. Then, click on the rectangle tool (which should be under the text tool) and draw a small rectangle to the side. Now, right click on the rectangle you just created and choose Fill Path. Make sure you have foreground color for your settings. Click 'ok'. Now, right click inside the rectangle again and choose Make Selection. Deselect it.
Six: Add text to it or add small rectangles or whatever to your icon until your satisfied. Don't overdo it though!
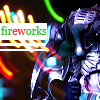
When you're done, flatten your image and save it : ) PNG gives you the best quality. This is my final result:
Hope this tutorial helps : )
Two: Duplicate the base and go to Filter >> Blur >> Gaussian Blur. Set the radius to 3.0. Set the layer to Overlay at 60%. Flatten image (layer >> flatten image)
Three: Create a new layer and fill it in with #a099c5. Set the layer to soft light at 80%.
Four: Use the texture below and paste it on top of the layer. Set it to Lighten. You can move the texture around if you like or use the eraser tool to erase some parts you don't want.
texture provided by egg9700 on deviant art.
Optional Step: If you want to brighten up your image a bit more, go to your background layer (the very first layer), then go to Image >> Adjustments >> Brightness/Contrast. Play around with the settings until you're happy with it.
Five: Create a new layer. Go to your color palette(sp?) and choose white. Then, click on the rectangle tool (which should be under the text tool) and draw a small rectangle to the side. Now, right click on the rectangle you just created and choose Fill Path. Make sure you have foreground color for your settings. Click 'ok'. Now, right click inside the rectangle again and choose Make Selection. Deselect it.
Six: Add text to it or add small rectangles or whatever to your icon until your satisfied. Don't overdo it though!
When you're done, flatten your image and save it : ) PNG gives you the best quality. This is my final result:
Hope this tutorial helps : )
Tutorial Comments
Showing latest 9 of 9 comments

imma do this right now! (:
By younqxquizit on Nov 23, 2008 3:51 pm

Omg,thanks. I think I'm getting the hang of this. Arigatou.
By o0AkaruiSakura0o on Nov 8, 2008 6:14 am

thankxx a lot
this is pretty easy!! =D
By choualee12 on Aug 13, 2008 2:57 am

i just dont get it, someone please help me...
By coolacm11 on Jul 14, 2008 3:39 am

deviant art, as stated in the tutorial.
By cielxx on Jul 11, 2008 9:29 pm

where did you get da texture from?
By stephhhx on Jul 11, 2008 9:06 pm
Save the texture. Open it, then go to select >> select all. Copy it then go to your icon and paste it.
By cielxx on Jul 10, 2008 3:03 am
how do i put the texture on the layer?
By dumbdiddydumb on Jul 10, 2008 1:05 am

Thanks!
This is nice.
Great final product :D
By chod3994 on Jul 9, 2008 11:17 pm
Tutorial Details
| Author |
cielxx
|
| Submitted on | Jul 9, 2008 |
| Page views | 52,670 |
| Favorites | 29 |
| Comments | 9 |
| Reviewer |
manny-the-dino
|
| Approved on | Jul 9, 2008 |