Tutorial
Click on thumbnailed images to enlarge
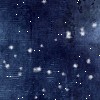
We'll start with this:

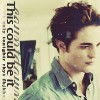
And end up with this:

1) Open your picture. Make a new layer. Use #c0b594 and fill the layer. Set it to Vivid Light at 58%

2) Make a new layer again. Use #908cb0 and fill it. Set it to Saturation at 73%.

3) New layer. Take #a76707 fill it. Set to Lighten Colour at 31%.

4) Take this awesome texture I found and set it at Lighten Colour at 31% again.

5) Now take this brush and use the colour #af9f9f and brush the left side. Just brush it up and down. I personally then set it to hard light. You don't have too, it's just what you would like.
Here's the difference:


6) Now to put text on the side like mine. Go to image > rotate canvas > 90 degress CCW. Now type! After typing whatever you want image > rotate > 90 degress CW.
7) Now hopefully you know how to use the pen tool. To make the dotted lines go to windows > brushes or F5. Click brush tip shape. You see the spacing at the bottom make it 350-400. You're choice. And Voila!
Edward Cullen
*** To learn to use the pen tool click
And end up with this:
1) Open your picture. Make a new layer. Use #c0b594 and fill the layer. Set it to Vivid Light at 58%
2) Make a new layer again. Use #908cb0 and fill it. Set it to Saturation at 73%.
3) New layer. Take #a76707 fill it. Set to Lighten Colour at 31%.
4) Take this awesome texture I found and set it at Lighten Colour at 31% again.
5) Now take this brush and use the colour #af9f9f and brush the left side. Just brush it up and down. I personally then set it to hard light. You don't have too, it's just what you would like.
Here's the difference:
6) Now to put text on the side like mine. Go to image > rotate canvas > 90 degress CCW. Now type! After typing whatever you want image > rotate > 90 degress CW.
7) Now hopefully you know how to use the pen tool. To make the dotted lines go to windows > brushes or F5. Click brush tip shape. You see the spacing at the bottom make it 350-400. You're choice. And Voila!
Edward Cullen
*** To learn to use the pen tool click
Tutorial Comments
Showing latest 10 of 13 comments

sharpening it wouldn't hurt either.
By goth-nina on Aug 17, 2009 3:18 pm

awesomee
By xchangminniex on Jul 1, 2009 2:35 pm

Mmm. Spunk Ransom.
I'll be using this. ^_^
By XxDanceToThisBeatxX on Dec 30, 2008 10:12 pm

very cute, if you wanna see what i did with this tutorial, check out www.xanga.com/seasideXxDesigns . I made two edward cullen icons with it. Except the opacity's for the dif colors didn't work right cuz mine were darker, but i still used the textures and colors and basic idea =]
faving
By x3briiittany on Sep 9, 2008 4:58 pm

This is cool, I think I'm going to upload mine
=]
By xCaseyLynnnn on Aug 4, 2008 10:27 pm

Thanks (: This is an awesome tut .It's really helpful and easy to understand (;
By SoWrongItsAbby on Jul 2, 2008 3:28 pm

cool
By kat07tan on Jun 30, 2008 8:10 am

amazing :D)
By cavallejo101 on Jun 28, 2008 10:14 pm

awesome
By JRock-Layouts-and-Graphics on Jun 28, 2008 9:45 pm

very nice.
i like it a lot :]
By brunette925 on Jun 25, 2008 11:58 am
Tutorial Details
| Author |
Mizuro
|
| Submitted on | Jun 18, 2008 |
| Page views | 12,367 |
| Favorites | 69 |
| Comments | 13 |
| Reviewer |
manny-the-dino
|
| Approved on | Jun 18, 2008 |