Tutorial
Click on thumbnailed images to enlarge
In this tutorial we are going to take this image:

and turn it into this:

Step 1: Open your image up
Step 2: Go to Layers>New Raster Layer
Step 3: Now click on the tool free hand selection which should be located on the left
Step 4: Make your settings to match this:

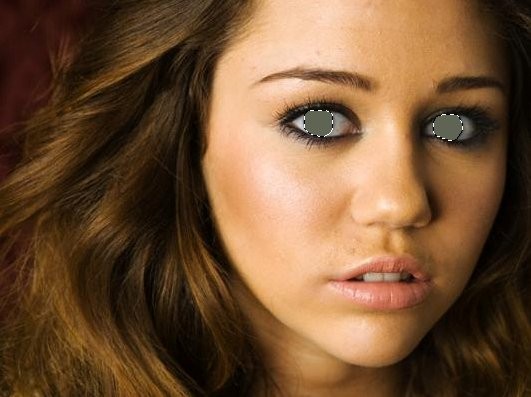
Step 5: Now go around the iris then click shift and do the same to the other eye. It should look like this now:

Step 6: Now click the eye dropper tool and click somewhere in the eye so you get the right eye color (unless you want a different eye color). In my case it's #606455
Step 7: Now select the brush tool and fill in both the eyes with the color you just selected. Mine looks like this:

Step 8: Go to Layers>Properties and set the blend mode to overlay at 100% opacity.
Step 9: Now chose the eraser brush and erase the area of the pupils.
Step 10: Go to Layers>Merge>Merge All
Step 11: Now go to Layers>New Raster Layer
Step 12: Now take the brush tool and set the size to 4 (depending on the image the size can be smaller or bigger) and set the color to white. Draw 2 lines on the right and the left of both of the iris'. Your image should look like this:

Step 13: Now go to Layer>Properties and set the blend mode to overlay at 100% opacity
Step 14: Go to Layers>Merge>Merge All and this is the final image:


and turn it into this:

Step 1: Open your image up
Step 2: Go to Layers>New Raster Layer
Step 3: Now click on the tool free hand selection which should be located on the left
Step 4: Make your settings to match this:

Step 5: Now go around the iris then click shift and do the same to the other eye. It should look like this now:

Step 6: Now click the eye dropper tool and click somewhere in the eye so you get the right eye color (unless you want a different eye color). In my case it's #606455
Step 7: Now select the brush tool and fill in both the eyes with the color you just selected. Mine looks like this:

Step 8: Go to Layers>Properties and set the blend mode to overlay at 100% opacity.
Step 9: Now chose the eraser brush and erase the area of the pupils.
Step 10: Go to Layers>Merge>Merge All
Step 11: Now go to Layers>New Raster Layer
Step 12: Now take the brush tool and set the size to 4 (depending on the image the size can be smaller or bigger) and set the color to white. Draw 2 lines on the right and the left of both of the iris'. Your image should look like this:

Step 13: Now go to Layer>Properties and set the blend mode to overlay at 100% opacity
Step 14: Go to Layers>Merge>Merge All and this is the final image:

Tutorial Comments
Showing latest 9 of 9 comments

It's in the "Paintshop Pro" section, so I'm guessing they used Paintshop Pro.
By UnseenQueen on Jun 28, 2010 12:25 pm
Awesome :]
By cutegurl712 on Sep 26, 2009 9:17 pm
what did you use to do this?
By MiissYER on Sep 4, 2009 9:50 pm
what phOtozhOp is this?
cs3?
By kaviarianlotz on Aug 5, 2009 11:48 am
i dont knoe how 2 uploud the pixture i need help
By shasha13 on Mar 29, 2009 10:31 pm
how do u do it to one of ur own pikz
By iloveu1208 on Mar 18, 2009 10:48 pm
wat if u got black or brown eyes???? i got brown eyes but its hard to see the color,wen i take my pics their mostly turn out black =[[
By The1nOnlySophia on Feb 20, 2009 9:24 pm
This is amazing.
Hard to believe that, thats Miley Virus =/
By dilligrout on Feb 11, 2009 3:48 am
i love this one tanks!
By classypinkbarbie on Feb 4, 2009 4:26 pm
Tutorial Details
| Author |
lc2008
|
| Submitted on | Feb 3, 2009 |
| Page views | 20,136 |
| Favorites | 48 |
| Comments | 9 |
| Reviewer |
manny-the-dino
|
| Approved on | Feb 4, 2009 |


