Tutorial
Click on thumbnailed images to enlarge
[color=orange][size=14]NEW WAY TO DO THIS!!!!!!!!!![/size][/color]
thanks to [url=http://www.createblog.com/forums/index.php?showuser=41206]GIGI[/url] and [url=http://www.createblog.com/forums/index.php?showuser=110944]Andrzej Błaszczyk[/url], i have learned a new way to do this tutorial. i was doing it the hard way! :crazy: if you would like to try it the easy way, than keep reading...but if you want to do it the long way, than go down to the red words. :wink:
---
gigi's way of explaining.
[quote=barelyy_coherent,Nov 15 2004, 11:04 PM]ohh...that is a tad faster, but I was talking about like, stretching it...
See...select something on MS Paint...like a rectangle or something. You can make the rectangle bigger by stretching out one of the dots on the edges. And then the whole thing gets stretched out...so it would save even more time!
Just a suggestion. I guess I'm just lazy. =_=
[right][snapback]745646[/snapback][/right]
[/quote]
Andrzej Błaszczyk way of explaining. :smile:
[quote=Andrzej Błaszczyk,Mar 9 2005, 6:24 AM]Let's try to do it faaaasssssster!!!!! :biggrin:
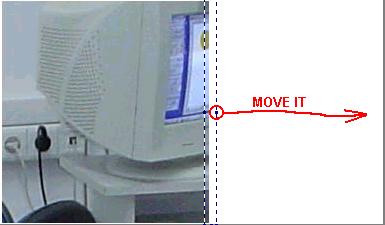
You need to select very narrow stripe and then move the small blue square to the right.
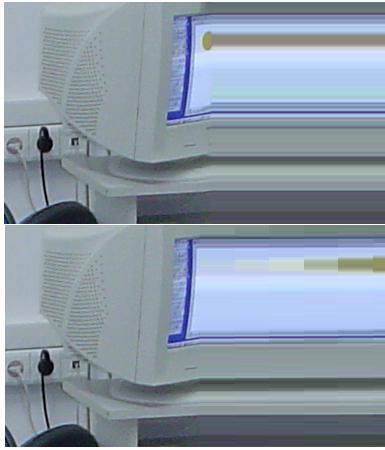
If selecting stripe is 1 pixel wide then you see picture on top. If it is about 6 px then look at bottom.
Sorry for my english :happy:
[right][snapback]1078951[/snapback][/right]
[/quote]
_____________________________________________________________________
_____________________________________________________________________
_____________________________________________________________________
[color=red][size=7]ATTENTION! THIS SPECIAL NOTE WILL HELP YOU FINISH THIS IN A SHORTER AMOUNT OF TIME![/size][/color]
Some people commented how long it takes for you to finish this, so here is a little tip for you: After you complete step #9 about 10 - 15 times, you can click on VIEW>ZOOM>CUSTOM>100%>OK. Then highlight the pixels that you have already extented. Then, click VIEW>ZOOM>CUSTOM>600%>OK, and the just Right click, then left click on EDIT>Paste. Then match up those 10 - 15 pixels up with the other ones. That should make it a bit easier for you! :happy:
----------
this will teach you how to turn this...

into this...

----------
Step #1.) Open up MS Paint -- Start>Programs>Accessories>Paint
Step #2.) Copy and Paste your desired image. In this tutorial, i will be using this pic of Lindsay Lohan...

Feel free to use it. :wink:
Step #3.) Resize the painting area by click on the little blue squares on the corners of the area.

make it so one side of the paint area is flush with the image, and the other is a extended a little from the pic.
like this...

or this...

I will be using the first one.
Step #4.) Click on the rectangluar select tool. it looks like this...
Step #5.) Highlight the first pixel of the side that you will be stretching. For example, if you were stretching the top, than you would highlight the last pixel of the top. and if you were stretching the right side, like i am, than you would highlight the right side. Do it like this...
Step #6.) Right-Click inside the selected part, and click on COPY
Step #7.) Click on VIEW>ZOOM>CUSTOM>600%>OK
Step #8.) Press CONTROL>G to display the grid.
Step #9.) Click EDIT>PASTE. then drag the last pixel of the image to match up with the edge of the image. Like this...

Step#10.) Repeat step #9 untill the remaining white space is filled with the last pixel of the image.
It should look something like this...
----------
If you have any questions, feel free to ask them.
----------
:smile:
thanks to [url=http://www.createblog.com/forums/index.php?showuser=41206]GIGI[/url] and [url=http://www.createblog.com/forums/index.php?showuser=110944]Andrzej Błaszczyk[/url], i have learned a new way to do this tutorial. i was doing it the hard way! :crazy: if you would like to try it the easy way, than keep reading...but if you want to do it the long way, than go down to the red words. :wink:
---
gigi's way of explaining.
[quote=barelyy_coherent,Nov 15 2004, 11:04 PM]ohh...that is a tad faster, but I was talking about like, stretching it...
See...select something on MS Paint...like a rectangle or something. You can make the rectangle bigger by stretching out one of the dots on the edges. And then the whole thing gets stretched out...so it would save even more time!
Just a suggestion. I guess I'm just lazy. =_=
[right][snapback]745646[/snapback][/right]
[/quote]
Andrzej Błaszczyk way of explaining. :smile:
[quote=Andrzej Błaszczyk,Mar 9 2005, 6:24 AM]Let's try to do it faaaasssssster!!!!! :biggrin:
You need to select very narrow stripe and then move the small blue square to the right.
If selecting stripe is 1 pixel wide then you see picture on top. If it is about 6 px then look at bottom.
Sorry for my english :happy:
[right][snapback]1078951[/snapback][/right]
[/quote]
_____________________________________________________________________
_____________________________________________________________________
_____________________________________________________________________
[color=red][size=7]ATTENTION! THIS SPECIAL NOTE WILL HELP YOU FINISH THIS IN A SHORTER AMOUNT OF TIME![/size][/color]
Some people commented how long it takes for you to finish this, so here is a little tip for you: After you complete step #9 about 10 - 15 times, you can click on VIEW>ZOOM>CUSTOM>100%>OK. Then highlight the pixels that you have already extented. Then, click VIEW>ZOOM>CUSTOM>600%>OK, and the just Right click, then left click on EDIT>Paste. Then match up those 10 - 15 pixels up with the other ones. That should make it a bit easier for you! :happy:
----------
this will teach you how to turn this...
into this...
----------
Step #1.) Open up MS Paint -- Start>Programs>Accessories>Paint
Step #2.) Copy and Paste your desired image. In this tutorial, i will be using this pic of Lindsay Lohan...
Feel free to use it. :wink:
Step #3.) Resize the painting area by click on the little blue squares on the corners of the area.
make it so one side of the paint area is flush with the image, and the other is a extended a little from the pic.
like this...
or this...
I will be using the first one.
Step #4.) Click on the rectangluar select tool. it looks like this...
Step #5.) Highlight the first pixel of the side that you will be stretching. For example, if you were stretching the top, than you would highlight the last pixel of the top. and if you were stretching the right side, like i am, than you would highlight the right side. Do it like this...
Step #6.) Right-Click inside the selected part, and click on COPY
Step #7.) Click on VIEW>ZOOM>CUSTOM>600%>OK
Step #8.) Press CONTROL>G to display the grid.
Step #9.) Click EDIT>PASTE. then drag the last pixel of the image to match up with the edge of the image. Like this...
Step#10.) Repeat step #9 untill the remaining white space is filled with the last pixel of the image.
It should look something like this...
----------
If you have any questions, feel free to ask them.
----------
:smile:
Tutorial Comments
No comments yet. Be the first one to comment!
Tutorial Details
| Author |
heyyfrankie
|
| Submitted on | Feb 12, 2006 |
| Page views | 7,032 |
| Favorites | 4 |
| Comments | 0 |