Tutorial
Click on thumbnailed images to enlarge
Click here to download the GIMP!
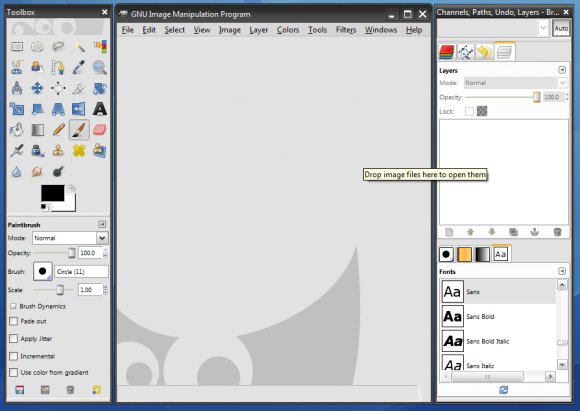
When most people first open gimp they become over whelmed by the odd interface and new look they have never seen. Especially if you are used to Photoshop. In this tutorial I’m going to tech you the basics of gimp and get you familiar with it. As you do this just
kind of play around. As I explain a tool to you try using and discovering for yourself what it does. So before you start open gimp and click file>new and set the width to 1024 and the height to 768.
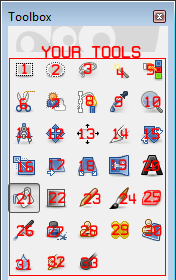
The above image is the toolbox! And following is the name of each tool and its main purpose corresponding to its number on the image. You can also find the name of a tool just by hovering your mouse over it and a little box will come up.
1. Rectangle select tool - make a rectangular selection that you can then fill with color using the bucket tool or click delete to delete what you have selected or change the settings on the selection to change things correspondingly.
2. Ellipse select tool - the same thing as #1 but it makes a circular selection as opposed to a square.
3. Free select tool - as the title suggests it is similar to #1 and #2 but it can make any shape you want or you can just hold down
and move your cursor and when you click on the original starting point it will turn it all into a selection. Try it out to see what I mean.
4. Fuzzy select tool - the fuzzy select tool selects a region a region based on matching color, and you can change the settings to select only very similar colors or less similar colors.
5. Select by color tool - This tool is similar to #4 but it is not limited to the area clicked. If you click on blue it will select any blue in the image. not just the area clicked.
6. Scissors select - This tool is very useful for selecting only bodies or changing backgrounds or anything like that because if you trace it along person for example it will detect a difference between a background and what you are trying to select and it will cling to it, making your job easier and less time consuming.
7. Foreground select tool - Use this tool to select a region containing foreground objects.
8. Paths tool - The paths tool can be used to make curve paths which can be turned into lines or selecting. It is the equivalent of the Photoshop, pen tool.
9. Color Picker - This tool selects a color from a image, of you click it on a brown dog, it will change the foreground color to brown. It does not select roughly though, it selects only 1x1 pixel spot.
10. Zoom tool - Use this to zoom in and out while working. It does not effect the outcome of the image when saved. It is only used
for when you are editing.
11. Measure tool - you can use this to measure from one point to another and it will tell you in pixels.
12. Move tool - As the title suggests, you can move layers, selections and other objects.
13. Alignment tool - This allows you to arrange layers and other objects.
14. Crop tool - Crops an entire image. You can also tell it exactly how large you would like the crop to be.
15. Rotate tool - You can use the rotate tool to rotate, a layer, or selection.
16. Scale tool - this can be used to change the size of a layer of selection. It is suggest to click the lock when doing this so it doesn’t change the proportion.
17. Shear tool - The shear tool lets you rotate an image but it stretches it and keeps two corners in place.
18. Perspective tool - The perspective changes the perspective of a layer, selection or path. It can make it look like the top of an image is farther away from the bottom.
19. Flip tool - The flip tool can make an image upside down or it can flip it horizontally.
20. Text tool - The text tool makes text in a new layer.
21. Bucket Fill Tool - you can use this tool to fill a selection with the current foreground color. You can set it to fill a whole
selection or just fill similar colors.
22. Blend tool - this tool is used to make gradients. The blend tool is similar to the bucket fill tool but instead of filling the
selection with a solid color it will fill it with two colors that blend into each other.
23. Pencil tool - this tool makes a hard edged stroke of the current foreground color.
24. Paintbrush - The paintbrush is identical to the Pencil tool but it has a softer edge.
25. Eraser Tool - the eraser tool, as it's title suggests, erases. Or if it will erase only from the selected layer.
26. Airbrush - Similar to the paintbrush but allows you to paint with a variable pressure.
27. Ink tool - again, similar to the paint brush the ink tool is the same but allows you to do Calligraphy style painting.
28. - Clone Tool - This tool allows you to clone the a selection from one spot and place it in another one.
29. Healing tool - You can use this tool to remove irregularities in skin. Useful for quickly removing blemishes on a face.
30. Perspective clone tool - This allows you to clone from an image source after applying to perspective transformation.
31. Blur/Sharpen tool - as the title suggests you can use this tool to either blur or sharpen a area using a brush.
32. Smudge tool - This allows you to smudge area using a brush.
33. Dodge Burn tool - Selectively lighten or burn using a brush.
The color switcher contains the foreground and background color which you can switch through. You can click on one color to change it. Or if you click the button towards the bottom left you can set the colors back to black and white.
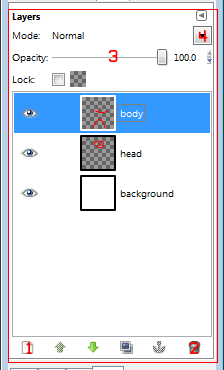
This image shows the layers dialog, and if you look in the image there are numbers, the below matches the numbers to their uses.
1. Click this to create a new layer.
2. click a layer then click this to delete it.
3. you can adjust this level to change the opacity of a layer.
4. Changes the mode of the layer. You may see use for this in various tutorials.
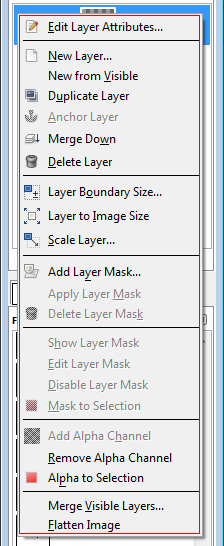
And below is a image of what it looks like when you right click a layer. Most of these shouls be self explanatory but it is good to
know what they do. The alpha to selection is very useful, if you click it, it will change that layer exactly into a selection.
Now that we have covered everything on the two bars on either side lets dive into the controls on the actual image.
Lets start from the left and go to the right. Now a lot of these controls are self explanatory. i suggest opening an image and trying all of these out.
In file there are a few self explanatory things such as save and open that every program has. One good thing to note though is the, "open as layers". Using this you can load an image into the current image you have now. Not open a whole new image.
In edit are some controls that I usually use shortcuts to use. It's a good idea to check out the keyboard shortcuts, its useful to know them so you can get around faster.
In select are some controls that have to do with selecting things. Its a good idea to remember CTRL+A which selects all and CTRL+I which selects all as well as SHIFT+CTRL+A even though it may be a little awkward to do on your keyboard. Also feather, grow, shrink and border will be very useful later.
In image there are things have to do with the image it self. Almost everything is self explanatory or it has a different way of using it. One thing I use a lot though is scale image and canvas size. Scale image changes the size of the entire image. And canvas size is another way of cropping but uses exact pixels.
Again Layer has some controls that are more easily accessible from the right side bar.
Next is colors! Colors is where you will go when you want to edit photography lighting! I would suggest playing around with all of these! Two of the most used tools are auto>white balance and brightness and contrast.
Tools is just another way to access some of the tools that are already in the toolbox.
Filters is a big! It has many preset filters that can do all kinds of things! So just play around with as many of these as you can and you'll see them come up in tutorials a lot!
And last but, well least or windows and help, both don't have anything to do with editing but rather changing some things in the interface and well, help!
Here are few tips to know when you are saving you images! Photography images can be saved as .jpg files but .png will give you the highest quality! If your image has transparency save it as .png. If you save it as .xcf when you open it up again everything will be exactly like it was when you saved it! Layers and all! If you want to send the version with layers and all to a friend who has Photoshop you can save it as a .psd. Also another quick tip! If you ever mess up, just click CTRL+Z. It will undo the last thing you did and you can keep using this until you revers what you messed up.
I hope this tutorial has helped you learn the wonderful interface of the GIMP! If you are to confused at first, don’t give up! In my opinion GIMP can achieve anything Photoshop can!
When most people first open gimp they become over whelmed by the odd interface and new look they have never seen. Especially if you are used to Photoshop. In this tutorial I’m going to tech you the basics of gimp and get you familiar with it. As you do this just
kind of play around. As I explain a tool to you try using and discovering for yourself what it does. So before you start open gimp and click file>new and set the width to 1024 and the height to 768.
The above image is the toolbox! And following is the name of each tool and its main purpose corresponding to its number on the image. You can also find the name of a tool just by hovering your mouse over it and a little box will come up.
1. Rectangle select tool - make a rectangular selection that you can then fill with color using the bucket tool or click delete to delete what you have selected or change the settings on the selection to change things correspondingly.
2. Ellipse select tool - the same thing as #1 but it makes a circular selection as opposed to a square.
3. Free select tool - as the title suggests it is similar to #1 and #2 but it can make any shape you want or you can just hold down
and move your cursor and when you click on the original starting point it will turn it all into a selection. Try it out to see what I mean.
4. Fuzzy select tool - the fuzzy select tool selects a region a region based on matching color, and you can change the settings to select only very similar colors or less similar colors.
5. Select by color tool - This tool is similar to #4 but it is not limited to the area clicked. If you click on blue it will select any blue in the image. not just the area clicked.
6. Scissors select - This tool is very useful for selecting only bodies or changing backgrounds or anything like that because if you trace it along person for example it will detect a difference between a background and what you are trying to select and it will cling to it, making your job easier and less time consuming.
7. Foreground select tool - Use this tool to select a region containing foreground objects.
8. Paths tool - The paths tool can be used to make curve paths which can be turned into lines or selecting. It is the equivalent of the Photoshop, pen tool.
9. Color Picker - This tool selects a color from a image, of you click it on a brown dog, it will change the foreground color to brown. It does not select roughly though, it selects only 1x1 pixel spot.
10. Zoom tool - Use this to zoom in and out while working. It does not effect the outcome of the image when saved. It is only used
for when you are editing.
11. Measure tool - you can use this to measure from one point to another and it will tell you in pixels.
12. Move tool - As the title suggests, you can move layers, selections and other objects.
13. Alignment tool - This allows you to arrange layers and other objects.
14. Crop tool - Crops an entire image. You can also tell it exactly how large you would like the crop to be.
15. Rotate tool - You can use the rotate tool to rotate, a layer, or selection.
16. Scale tool - this can be used to change the size of a layer of selection. It is suggest to click the lock when doing this so it doesn’t change the proportion.
17. Shear tool - The shear tool lets you rotate an image but it stretches it and keeps two corners in place.
18. Perspective tool - The perspective changes the perspective of a layer, selection or path. It can make it look like the top of an image is farther away from the bottom.
19. Flip tool - The flip tool can make an image upside down or it can flip it horizontally.
20. Text tool - The text tool makes text in a new layer.
21. Bucket Fill Tool - you can use this tool to fill a selection with the current foreground color. You can set it to fill a whole
selection or just fill similar colors.
22. Blend tool - this tool is used to make gradients. The blend tool is similar to the bucket fill tool but instead of filling the
selection with a solid color it will fill it with two colors that blend into each other.
23. Pencil tool - this tool makes a hard edged stroke of the current foreground color.
24. Paintbrush - The paintbrush is identical to the Pencil tool but it has a softer edge.
25. Eraser Tool - the eraser tool, as it's title suggests, erases. Or if it will erase only from the selected layer.
26. Airbrush - Similar to the paintbrush but allows you to paint with a variable pressure.
27. Ink tool - again, similar to the paint brush the ink tool is the same but allows you to do Calligraphy style painting.
28. - Clone Tool - This tool allows you to clone the a selection from one spot and place it in another one.
29. Healing tool - You can use this tool to remove irregularities in skin. Useful for quickly removing blemishes on a face.
30. Perspective clone tool - This allows you to clone from an image source after applying to perspective transformation.
31. Blur/Sharpen tool - as the title suggests you can use this tool to either blur or sharpen a area using a brush.
32. Smudge tool - This allows you to smudge area using a brush.
33. Dodge Burn tool - Selectively lighten or burn using a brush.
The color switcher contains the foreground and background color which you can switch through. You can click on one color to change it. Or if you click the button towards the bottom left you can set the colors back to black and white.
This image shows the layers dialog, and if you look in the image there are numbers, the below matches the numbers to their uses.
1. Click this to create a new layer.
2. click a layer then click this to delete it.
3. you can adjust this level to change the opacity of a layer.
4. Changes the mode of the layer. You may see use for this in various tutorials.
And below is a image of what it looks like when you right click a layer. Most of these shouls be self explanatory but it is good to
know what they do. The alpha to selection is very useful, if you click it, it will change that layer exactly into a selection.
Now that we have covered everything on the two bars on either side lets dive into the controls on the actual image.
Lets start from the left and go to the right. Now a lot of these controls are self explanatory. i suggest opening an image and trying all of these out.
In file there are a few self explanatory things such as save and open that every program has. One good thing to note though is the, "open as layers". Using this you can load an image into the current image you have now. Not open a whole new image.
In edit are some controls that I usually use shortcuts to use. It's a good idea to check out the keyboard shortcuts, its useful to know them so you can get around faster.
In select are some controls that have to do with selecting things. Its a good idea to remember CTRL+A which selects all and CTRL+I which selects all as well as SHIFT+CTRL+A even though it may be a little awkward to do on your keyboard. Also feather, grow, shrink and border will be very useful later.
In image there are things have to do with the image it self. Almost everything is self explanatory or it has a different way of using it. One thing I use a lot though is scale image and canvas size. Scale image changes the size of the entire image. And canvas size is another way of cropping but uses exact pixels.
Again Layer has some controls that are more easily accessible from the right side bar.
Next is colors! Colors is where you will go when you want to edit photography lighting! I would suggest playing around with all of these! Two of the most used tools are auto>white balance and brightness and contrast.
Tools is just another way to access some of the tools that are already in the toolbox.
Filters is a big! It has many preset filters that can do all kinds of things! So just play around with as many of these as you can and you'll see them come up in tutorials a lot!
And last but, well least or windows and help, both don't have anything to do with editing but rather changing some things in the interface and well, help!
Here are few tips to know when you are saving you images! Photography images can be saved as .jpg files but .png will give you the highest quality! If your image has transparency save it as .png. If you save it as .xcf when you open it up again everything will be exactly like it was when you saved it! Layers and all! If you want to send the version with layers and all to a friend who has Photoshop you can save it as a .psd. Also another quick tip! If you ever mess up, just click CTRL+Z. It will undo the last thing you did and you can keep using this until you revers what you messed up.
I hope this tutorial has helped you learn the wonderful interface of the GIMP! If you are to confused at first, don’t give up! In my opinion GIMP can achieve anything Photoshop can!
Tutorial Comments
Showing latest 6 of 6 comments

Can I "slice" in GIMP? I am building a myspace page and need to slice my header up for clickable links. I downloaded all the python plugins and such, but I have no idea how to use it.
By drumminsully on Mar 23, 2010 7:33 pm

Thanks for this, 'cause GIMP was really pissing
me off.
By BananaNugg3ts on May 14, 2009 12:36 am

Ya i think its always a good idea just to try pressing every button and using every tool.
By Maccabee on Apr 21, 2009 2:53 am

wow i didnt know there was that much to know about GIMP, i just usually figure it out by messing around with it and i got pretty good at it :D
but this will help me get better! >:D
By JamJam on Apr 21, 2009 2:04 am

this is GREAT. I don't think I'll be using Gimp anytime soon, because I have Photoshop, and it's my love
By korkybabyy on Apr 16, 2009 1:14 am

Good job! I think I'll be able to 'master' GIMP faster now! :-)
By theerinkal on Apr 15, 2009 11:39 pm
Tutorial Details
| Author |
Maccabee
|
| Submitted on | Apr 15, 2009 |
| Page views | 6,242 |
| Favorites | 20 |
| Comments | 6 |
| Reviewer |
A1Bassline
|
| Approved on | Apr 15, 2009 |