
Tutorial
Click on thumbnailed images to enlarge
Here's my favorite actress I admire so much, Ms. Cate Blanchett image credit
1. Open up the image you want to edit. Please crop your image if you need to, resize, whatever needs to be done. Please duplicate it twice.
2. Go to Filter >Unsharpen Mask :Sharpen: 74, Radius 0.4, Threshold 0.
3. Now zoom at least to 900% or up, grab your dodge tool to brighten her eyes

4. Now get burn tool, slighty burn her pupil so the outer blue eye can really brighten. Also her upper eyeliner makeup & eyebrows.

5. If you want, take your sharpening tool & sharpen her eyes ONLY. Very slight.

6. If you want that cool icy blue look I have, go to Layer > New Adjustment Layer >Color Balance: Color levels: -47, -7, +64.
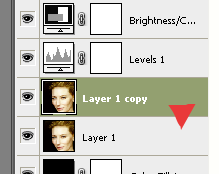
7. Select your current layer copy:
8. Select her lips with your Quick Selection tool like so:

9. Now go to go to Layer > New Adjustment Layer >Channel Mixer: red: 134%, green:-21%, blue: 0, constant: 0.
10. Ok, now you can brighten, level, Saturate it, etc. For the slight dark effect, Layer > New Adjustment Layer >Channel mixer: Red 141%, Green 39, Blue 0, Constant -16.
11. Take your marquee tool, select a nice border like so :

12. Layer >New Fill Layer >Solid Color: #423a3a
13. Now select a rectangle like so:

14. Right click inside that rectangle, >Refine Edge: Radius: 0.0, Contrast: 30%, Smooth 44, Feather 0, Contract/Expand: +2. Click ok.
15. Now Layer >New Fill Layer> Solid Color: #423a3a. Now put inside a nice cute text. Smallest text size should be 0.08px.
16. Take this icon texture I made (click to download the set): set it Linear Dodge (Add) 100%:
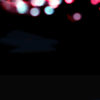
17. Now take this icon texture I made (click to download the set):
18. Drag it behind your border & text layer, like so:

19. Select most of it like so, with your marquee tool:

20. Take your eraser & erase the selected! Now right click that layer, >Blending Options >Pin Light 100%. Or if you want to keep it to Normal, that's great too.
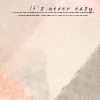
21. My final result:

[center]DONE![/center]
If you felt this didn't help you, visit Oblivion Shattered for more tutorials~
1. Open up the image you want to edit. Please crop your image if you need to, resize, whatever needs to be done. Please duplicate it twice.
2. Go to Filter >Unsharpen Mask :Sharpen: 74, Radius 0.4, Threshold 0.
3. Now zoom at least to 900% or up, grab your dodge tool to brighten her eyes
4. Now get burn tool, slighty burn her pupil so the outer blue eye can really brighten. Also her upper eyeliner makeup & eyebrows.
5. If you want, take your sharpening tool & sharpen her eyes ONLY. Very slight.
6. If you want that cool icy blue look I have, go to Layer > New Adjustment Layer >Color Balance: Color levels: -47, -7, +64.
7. Select your current layer copy:
8. Select her lips with your Quick Selection tool like so:
9. Now go to go to Layer > New Adjustment Layer >Channel Mixer: red: 134%, green:-21%, blue: 0, constant: 0.
10. Ok, now you can brighten, level, Saturate it, etc. For the slight dark effect, Layer > New Adjustment Layer >Channel mixer: Red 141%, Green 39, Blue 0, Constant -16.
11. Take your marquee tool, select a nice border like so :
12. Layer >New Fill Layer >Solid Color: #423a3a
13. Now select a rectangle like so:
14. Right click inside that rectangle, >Refine Edge: Radius: 0.0, Contrast: 30%, Smooth 44, Feather 0, Contract/Expand: +2. Click ok.
15. Now Layer >New Fill Layer> Solid Color: #423a3a. Now put inside a nice cute text. Smallest text size should be 0.08px.
16. Take this icon texture I made (click to download the set): set it Linear Dodge (Add) 100%:
17. Now take this icon texture I made (click to download the set):
18. Drag it behind your border & text layer, like so:
19. Select most of it like so, with your marquee tool:
20. Take your eraser & erase the selected! Now right click that layer, >Blending Options >Pin Light 100%. Or if you want to keep it to Normal, that's great too.
21. My final result:
[center]DONE![/center]
If you felt this didn't help you, visit Oblivion Shattered for more tutorials~
Tutorial Comments
Showing latest 7 of 7 comments

this is kool..thanx
By weny123 on Dec 28, 2009 6:05 pm

this is fantastic!
By broken-doll on Sep 18, 2009 8:44 pm

oh!!! *blush* ^-^
By goth-nina on Sep 14, 2009 11:38 pm

your eyecons are getting prettier by each one you make!
By creole on Sep 14, 2009 6:27 pm

Very nice (:
By aliiicimo on Sep 13, 2009 11:37 am

Lovely (:
By futura on Sep 11, 2009 4:12 pm

nicely done :]
By Christy on Sep 10, 2009 9:14 pm
Tutorial Details
| Author |
goth-nina
|
| Submitted on | Sep 8, 2009 |
| Page views | 12,502 |
| Favorites | 46 |
| Comments | 7 |
| Reviewer |
manny-the-dino
|
| Approved on | Sep 8, 2009 |