Tutorial
Click on thumbnailed images to enlarge
Okay, I will teach you how to recolour a black and white photograph! I have separated this tutorial in different parts.
*Note: So I don’t have to write “Create a new raster layer” over and over, know that you will have to create a new raster layer with each step.
Skin
First, you’ll want to colour the skin. So create a new raster layer and fill it with a skin colour. I usually use #f3dcb5. Set the layer to either Color or Color (L). Mess around with the opacity until you get the desired skin colour. You will want to erase the parts of the colour that is over the eyes, teeth, and other white parts.
Now, you’ll need to shade in the parts of the skin that appear to have a darker shadow. If you don’t understand what I’m talking about, look below, I’ve outlined the shadows in purple:

So select a dark skin colour, I use #dcb790. Set your paint brush hardness to 6 and your size to whatever you prefer. Now, just paint over the darker parts of the skin. Set the layer to either Color or Color (L). Again, mess around with the opacity.
Hair & Eyebrows
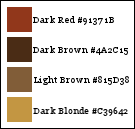
After you’re done with the skin, move onto the hair. Pick a desired hair colour you want to use. I’ve made up a little chart for you to see which colour is good to use for which hair colour.
Paint over the hair with your paintbrush tool. Again, you’ll want to set it on a low hardness. It’s easier to outline the hair with the Brush Tool, then to fill it in with the Flood Fill Tool. When you’re done shading the hair, set the layer to either Color or Color (L).
*Remember, you’re going to have to mess around with the opacities of every layer until you get the desired colour.
You do the eyebrows the same way, only you should make your colour a little darker than the hair colour. Doing so will make your image look more realistic.
Eyes
First, colour in the eye whites with the colour #ffffff. Set that layer to Overlay.
Now, pick your desired eye colour. Try not to make the colour too bright, as this will look very fake. Paint over the cornea (coloured part) of the eye. If you get the colour on the pupil (the black part), erase it. Set that layer to Color or Color (L).
Make-up
First we'll do the eye make-up. Take your paint brush and paint over the eyelids. When you’ve painted over your desired area, go to Adjust >> Add/Remove Noise >> Add Noise. Make sure that Gaussian is selected and that Monochrome is checked. Set your noise level to 10%. This makes your eye shadow seem more shimmery. Set your layer to Color (L). This setting makes the shadow seem less bright.
After you’ve added shadow to both the lids, it’s time to give the eye the ‘highlight’. A highlight is the eye shadow that is extended to the brow bone. This colour is a lighter tone than the colour on the lid. You will still follow the same steps as above, except with a lighter colour.
*Note: If your shadows look too hard, trace around the colours with the Freehand Selection Tool. The feather should be set to 8. Then hit the delete key once.
Let’s move on to the lips! Select a shade you would like to use for your lips. I usually use a subtle pink depending on what skin tone I’ve created. Outline the lips as well as you can. Then set the blend mode to either Color or Color (L). If the colour seems to be seeping out of the edge of the lips, take your Eraser Tool and erase around the edges. Make sure your Eraser Tool has a low hardness.
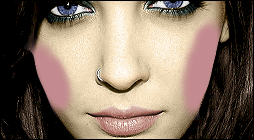
The final piece of make-up you have to colour is the blush. Blush is supposed to be subtle, so you don’t want to use a bright shade. A good thing to do is after you’ve filled in your lips, move the colour slider up a little bit in into the darker shades. This will give you a darker, but subtle pink. To apply the blush, take your paint brush and make the size quite big, sort of like a blush brush. Make sure the hardness is low. Then wisp the brush on the ball of the cheeks and along the cheek bones like so:
Then set your layer to either Color or Color (L).
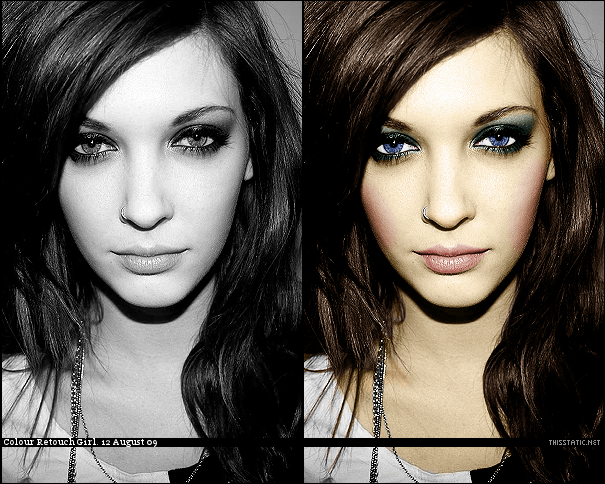
Now you’re done! Here’s how mine turned out:
Extra Stuff
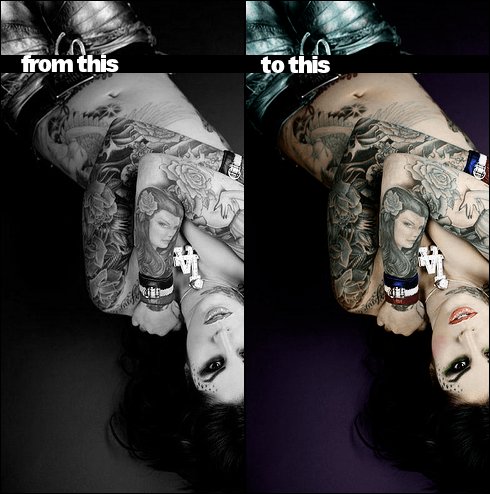
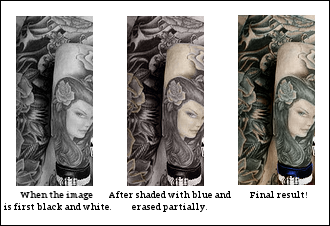
Sometimes you will recolour photographs that have different elements in them. One of the harder things to recolour is black tattoos. If you have noticed with your own tattoos or on someone else, they aren’t really black. No, they’re more of a blueish colour.
Here’s a tip: If you have to recolour a black tattoo, fill the layer with #34374c and set it to Color (L). After you’ve done that, erase away the parts that aren’t supposed to be really dark, such as the shading. Here’s an example of what I mean:
For more tutorials, head over to my website: thisstatic.net
*Note: So I don’t have to write “Create a new raster layer” over and over, know that you will have to create a new raster layer with each step.
Skin
First, you’ll want to colour the skin. So create a new raster layer and fill it with a skin colour. I usually use #f3dcb5. Set the layer to either Color or Color (L). Mess around with the opacity until you get the desired skin colour. You will want to erase the parts of the colour that is over the eyes, teeth, and other white parts.
Now, you’ll need to shade in the parts of the skin that appear to have a darker shadow. If you don’t understand what I’m talking about, look below, I’ve outlined the shadows in purple:
So select a dark skin colour, I use #dcb790. Set your paint brush hardness to 6 and your size to whatever you prefer. Now, just paint over the darker parts of the skin. Set the layer to either Color or Color (L). Again, mess around with the opacity.
Hair & Eyebrows
After you’re done with the skin, move onto the hair. Pick a desired hair colour you want to use. I’ve made up a little chart for you to see which colour is good to use for which hair colour.
Paint over the hair with your paintbrush tool. Again, you’ll want to set it on a low hardness. It’s easier to outline the hair with the Brush Tool, then to fill it in with the Flood Fill Tool. When you’re done shading the hair, set the layer to either Color or Color (L).
*Remember, you’re going to have to mess around with the opacities of every layer until you get the desired colour.
You do the eyebrows the same way, only you should make your colour a little darker than the hair colour. Doing so will make your image look more realistic.
Eyes
First, colour in the eye whites with the colour #ffffff. Set that layer to Overlay.
Now, pick your desired eye colour. Try not to make the colour too bright, as this will look very fake. Paint over the cornea (coloured part) of the eye. If you get the colour on the pupil (the black part), erase it. Set that layer to Color or Color (L).
Make-up
First we'll do the eye make-up. Take your paint brush and paint over the eyelids. When you’ve painted over your desired area, go to Adjust >> Add/Remove Noise >> Add Noise. Make sure that Gaussian is selected and that Monochrome is checked. Set your noise level to 10%. This makes your eye shadow seem more shimmery. Set your layer to Color (L). This setting makes the shadow seem less bright.
After you’ve added shadow to both the lids, it’s time to give the eye the ‘highlight’. A highlight is the eye shadow that is extended to the brow bone. This colour is a lighter tone than the colour on the lid. You will still follow the same steps as above, except with a lighter colour.
*Note: If your shadows look too hard, trace around the colours with the Freehand Selection Tool. The feather should be set to 8. Then hit the delete key once.
Let’s move on to the lips! Select a shade you would like to use for your lips. I usually use a subtle pink depending on what skin tone I’ve created. Outline the lips as well as you can. Then set the blend mode to either Color or Color (L). If the colour seems to be seeping out of the edge of the lips, take your Eraser Tool and erase around the edges. Make sure your Eraser Tool has a low hardness.
The final piece of make-up you have to colour is the blush. Blush is supposed to be subtle, so you don’t want to use a bright shade. A good thing to do is after you’ve filled in your lips, move the colour slider up a little bit in into the darker shades. This will give you a darker, but subtle pink. To apply the blush, take your paint brush and make the size quite big, sort of like a blush brush. Make sure the hardness is low. Then wisp the brush on the ball of the cheeks and along the cheek bones like so:
Then set your layer to either Color or Color (L).
Now you’re done! Here’s how mine turned out:
Extra Stuff
Sometimes you will recolour photographs that have different elements in them. One of the harder things to recolour is black tattoos. If you have noticed with your own tattoos or on someone else, they aren’t really black. No, they’re more of a blueish colour.
Here’s a tip: If you have to recolour a black tattoo, fill the layer with #34374c and set it to Color (L). After you’ve done that, erase away the parts that aren’t supposed to be really dark, such as the shading. Here’s an example of what I mean:
For more tutorials, head over to my website: thisstatic.net
Tutorial Comments
Showing latest 8 of 8 comments

Very cool effect ...
I just found a loada FREE PSP video here:
http://paintshoppro-tut orials.com - they're like full screen
By angyclick on Apr 18, 2011 4:29 pm

Perfect! I like this.
By darealtipwifey1 on Nov 25, 2010 5:32 pm

amazing retouch!
By digitalivory on Sep 6, 2009 8:32 pm

wow, really nice.
By futura on Aug 24, 2009 1:27 am

Wow. I love this. And I love how you did difficult photos as examples.
By emileeexhale on Aug 22, 2009 11:53 pm

Well! I'll give kudos to you, coloring a B&W image is tricky (for me at least). This is a nice job!
By goth-nina on Aug 20, 2009 12:54 am

got to try it
By classypinkbarbie on Aug 18, 2009 1:45 pm

Perfect retouching.
By aliiicimo on Aug 18, 2009 11:34 am
Tutorial Details
| Author |
hospitalhorror
|
| Submitted on | Aug 17, 2009 |
| Page views | 19,102 |
| Favorites | 34 |
| Comments | 8 |
| Reviewer |
manny-the-dino
|
| Approved on | Aug 18, 2009 |