
Tutorial
Click on thumbnailed images to enlarge
Hello!!
So, I'll be starting with the image below that I found on the beloved Photobucket.

First, crop your image.

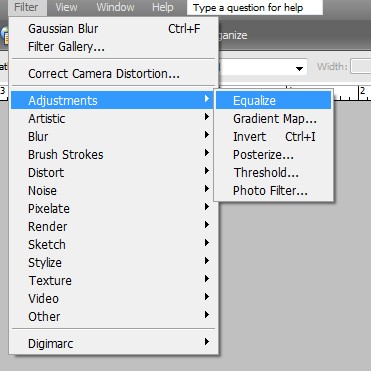
Next go to Filter > Adjustments > Equalize.
Now your image should look something like the following:

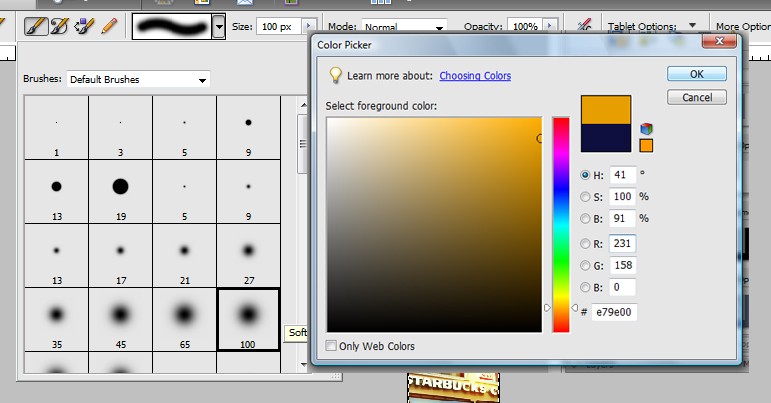
Now create a new layer. Select your brush tool and use a large circular brush. Mine is size 100. Use the color e79e00.
Put two spots on your photo in the upper right corner and lower left corner (or wherever, really). Now set this layer to Color Dodge, 100%. Mine looks like this:

Create another new layer: Color Dodge, 30%, b2a324. Results:

One more layer: Exclusion, 100%, 131845.
NOTE: If you don't want such a dull photo, decrease the opacity on this layer.
Optional: Duplicate your base layer, drag to top and set to Soft Light.
BEFORE:
AFTER:

OPTIONAL:

Stealing is wrong!
So, I'll be starting with the image below that I found on the beloved Photobucket.
First, crop your image.
Next go to Filter > Adjustments > Equalize.
Now your image should look something like the following:
Now create a new layer. Select your brush tool and use a large circular brush. Mine is size 100. Use the color e79e00.
Put two spots on your photo in the upper right corner and lower left corner (or wherever, really). Now set this layer to Color Dodge, 100%. Mine looks like this:
Create another new layer: Color Dodge, 30%, b2a324. Results:
One more layer: Exclusion, 100%, 131845.
NOTE: If you don't want such a dull photo, decrease the opacity on this layer.
Optional: Duplicate your base layer, drag to top and set to Soft Light.
BEFORE:
AFTER:
OPTIONAL:
Stealing is wrong!
Tutorial Comments
Showing latest 5 of 5 comments

Hah, sry, I'm a n00b when it comes to this site;
I JUST saw your reply to my comment TODAY.
Lol.
Thanks!!
Love the effect;;
By Z0MGsz on Jan 24, 2009 12:28 pm
When I use the brush, all the colors come out gray...
Am I doing something wrong && how can I fix it???
=/
By Z0MGsz on Dec 19, 2008 4:12 pm

I really like the outcome. :D
By so-sarcastic on Dec 16, 2008 7:41 am

i have cs2, where is equalize?
i dont have an adjustment panel.
-]
By shakeene on Dec 13, 2008 6:13 pm

i love the effect.
its like its being shined on.
fav.
By daisyy-yupp on Dec 13, 2008 6:00 pm
Tutorial Details
| Author |
digitalivory
|
| Submitted on | Dec 11, 2008 |
| Page views | 8,662 |
| Favorites | 48 |
| Comments | 5 |
| Reviewer |
manny-the-dino
|
| Approved on | Dec 11, 2008 |