
Tutorial
Click on thumbnailed images to enlarge
**NOTE**
I did this tutorial in Photoshop CS3 Extended which is why some of you may have problems. However, that doesn't mean this tutorial won't work in other versions of Photoshop. Just try it out.
Looking to add some "purple" to your photos? Well I'll teach you. I will be using a photo of Kate Moss. Here's the before:

Here's the after:

To work!
001.First, open up your picture.

002.Do a ctrl+j, set the blend mode to Screen & change the layer's opacity to 70%.
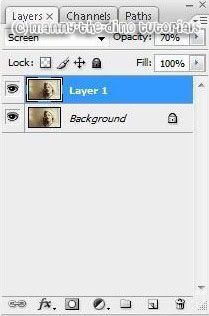
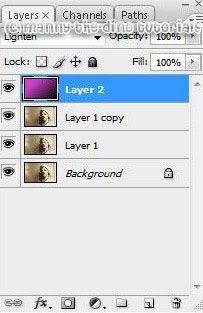
003.Do a ctrl+j once again & set the new layer's blend mode to Overlay.

004.Copy & paste this gradient on top of your picture: (If it doesn't fit over your picture properly, simply do a ctrl+t & resize)

005.Set it's blend more to Lighten.
006.Copy & paste this gradient on top of the other gradient:

007.Set it's blend mode to Lighten.

008.And there you have your final product! :) Oh yeah & this works with any color, fyi.
If you got lost or have any questions, comment the tutotial & I'll get back to you as soon as I can. :D
I did this tutorial in Photoshop CS3 Extended which is why some of you may have problems. However, that doesn't mean this tutorial won't work in other versions of Photoshop. Just try it out.
Looking to add some "purple" to your photos? Well I'll teach you. I will be using a photo of Kate Moss. Here's the before:
Here's the after:
To work!
001.First, open up your picture.
002.Do a ctrl+j, set the blend mode to Screen & change the layer's opacity to 70%.
003.Do a ctrl+j once again & set the new layer's blend mode to Overlay.
004.Copy & paste this gradient on top of your picture: (If it doesn't fit over your picture properly, simply do a ctrl+t & resize)
005.Set it's blend more to Lighten.
006.Copy & paste this gradient on top of the other gradient:
007.Set it's blend mode to Lighten.
008.And there you have your final product! :) Oh yeah & this works with any color, fyi.
If you got lost or have any questions, comment the tutotial & I'll get back to you as soon as I can. :D
Tutorial Comments
Showing latest 7 of 7 comments

Omg, thank you!
By aaaaaa000000 on Feb 20, 2010 4:48 pm

i am lost at step 4..the gradient thingy..i dont get it...
By lilvy01 on Aug 20, 2008 6:13 pm

this is awesome!!
so so so simple but i love it!
thanks heaps
=]
x
By whits on Mar 11, 2008 1:33 am
do we copy and
paste the gradient
that you made already ?
im confused at that part !
By xiloveandax on Jan 18, 2008 11:54 pm

how do we set the bleand mode to screen, i really don't know
By x-cherries-x on Jan 6, 2008 7:45 am

of course you can.
By twodreamlovers on Jan 5, 2008 2:35 pm

this is coool, but you can do it with any color right?
By retrochicxxoo on Jan 4, 2008 10:49 pm
Tutorial Details
| Author |
manny-the-dino
|
| Submitted on | Jan 4, 2008 |
| Page views | 17,287 |
| Favorites | 114 |
| Comments | 7 |
| Reviewer |
S-Majere
|
| Approved on | Jan 4, 2008 |