Tutorial
Click on thumbnailed images to enlarge
Since everyone is showing the magical unknown powers of MS paint lately, I'm jumping on the bandwagon and writing up a tutorial for coming up with something pretty decent with two free programs: MS Paint and GiFFY.
1.) Open your picture in MS Paint.
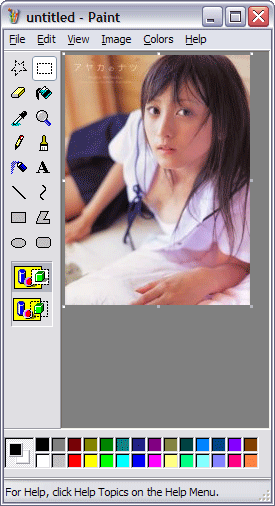
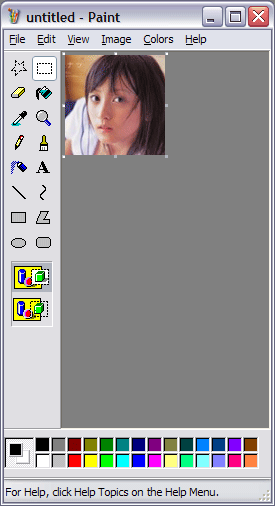
2.) Size it down.
It's a little harder to do this in Paint without a crop tool, but it is possible. You can use attributes (ctrl+E), stretch/skew (ctrl+W), and flip/rotate (ctrl+R) to move the image around a little until you've got a picture that is 100x100 pixels in size:
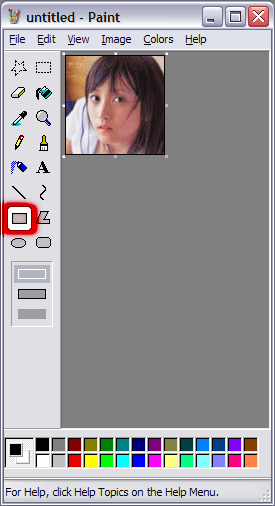
3.) Add a border.
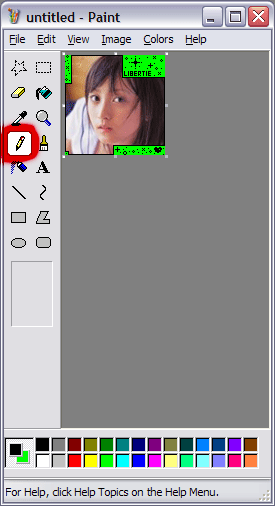
Use the rectangle tool (highlighted) to draw a box around your image. I made a plain border to start out with:
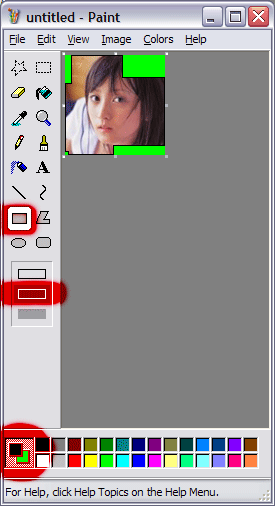
4.) Draw your transparent space.
We're using the rectangle tool again, but this time select the second option. Right-click on bright green: it will be the color we make transparent since it's not in the actual picture. Now just draw areas on the image that you want to "disappear", and extend outside the picture so there's no black space around the edges. You can make it look however you want, but mine looks like this:
5.) Make it interesting.
I used the text tool to write my username in a 6pt pixel font. For this particular image, I used 04b. Now use the pencil tool to decorate in the green area. Green is still your background color, so if you mess up, you can erase it by drawing with right-click instead of left-click. Mine looks like this:
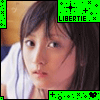
I went a little overboard, but you get the picture. Use your imagination. If you need help being inspired on shapes, I believe there's a sparkle tutorial around here somewhere. .:edit:. Yes, Frankie's sparkle tutorial, which can be found here: http://www.createblog.com/tutorials/download.php?id=88
6.) Now it's time to save your work.
Go to File>Save as, and type in your filename. But make sure you are saving as a bitmap! This is very important, if you use any other extension (jpg, gif) your work will be completely lost. You should have a picture that looks like this:
Not very attractive, is it? Remember how I said something about transparency? That's where GiFFY comes in.
7.) Download GiFFY
http://virtualcaffeine.net/giffy.zip
This should only take a couple of seconds to download, as it is a very small file. Unzip the folder, and double click the red, green, and blue icon to open GiFFY.

8.) Open your file.
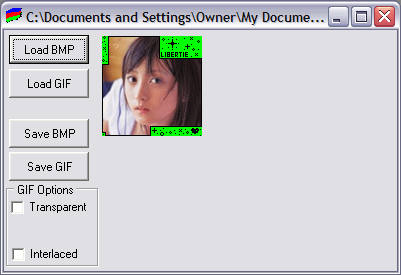
Click Load BMP and find the image you just saved in paint.
9.) Make it transparent.
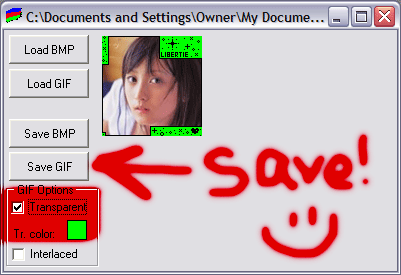
Check the box underneath "Transparent". Now click on any part of the image that is bright green. Your window should now show the Transparent box being checked with a green box underneath it. Now you can save your work.
10.) That's it!
You should be finished! Mine ended up looking like this:
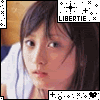
Now you try. :) Let me know if you have any questions!
1.) Open your picture in MS Paint.
2.) Size it down.
It's a little harder to do this in Paint without a crop tool, but it is possible. You can use attributes (ctrl+E), stretch/skew (ctrl+W), and flip/rotate (ctrl+R) to move the image around a little until you've got a picture that is 100x100 pixels in size:
3.) Add a border.
Use the rectangle tool (highlighted) to draw a box around your image. I made a plain border to start out with:
4.) Draw your transparent space.
We're using the rectangle tool again, but this time select the second option. Right-click on bright green: it will be the color we make transparent since it's not in the actual picture. Now just draw areas on the image that you want to "disappear", and extend outside the picture so there's no black space around the edges. You can make it look however you want, but mine looks like this:
5.) Make it interesting.
I used the text tool to write my username in a 6pt pixel font. For this particular image, I used 04b. Now use the pencil tool to decorate in the green area. Green is still your background color, so if you mess up, you can erase it by drawing with right-click instead of left-click. Mine looks like this:
I went a little overboard, but you get the picture. Use your imagination. If you need help being inspired on shapes, I believe there's a sparkle tutorial around here somewhere. .:edit:. Yes, Frankie's sparkle tutorial, which can be found here: http://www.createblog.com/tutorials/download.php?id=88
6.) Now it's time to save your work.
Go to File>Save as, and type in your filename. But make sure you are saving as a bitmap! This is very important, if you use any other extension (jpg, gif) your work will be completely lost. You should have a picture that looks like this:
Not very attractive, is it? Remember how I said something about transparency? That's where GiFFY comes in.
7.) Download GiFFY
http://virtualcaffeine.net/giffy.zip
This should only take a couple of seconds to download, as it is a very small file. Unzip the folder, and double click the red, green, and blue icon to open GiFFY.
8.) Open your file.
Click Load BMP and find the image you just saved in paint.
9.) Make it transparent.
Check the box underneath "Transparent". Now click on any part of the image that is bright green. Your window should now show the Transparent box being checked with a green box underneath it. Now you can save your work.
10.) That's it!
You should be finished! Mine ended up looking like this:
Now you try. :) Let me know if you have any questions!
Tutorial Comments
Showing latest 3 of 3 comments

I love this! Should put in there that you need to upload it as .bmp or .gif and then save as the opposite.
Like if you have .bmp save it as .gif.
I figured that out but it's not very clear in this tutorial.
By theerinkal on Nov 1, 2008 11:13 am

this is kewl but my green didnt go transparent :\
By ashbash-x on Nov 11, 2007 1:12 am

Oh my Goodness I LOVE this Tutorial now I have a amazing inkblot picture of myself thanks.
By Gryffindor-Girl on Aug 14, 2007 4:40 pm
Tutorial Details
| Author |
souperstition
|
| Submitted on | Feb 11, 2006 |
| Page views | 6,806 |
| Favorites | 14 |
| Comments | 3 |