
Tutorial
Click on thumbnailed images to enlarge
**NOTE**
I did this tutorial in Photoshop CS3 Extended which is why some of you may have problems. However, that does't mean this tutorial won't work in other versions of Photoshop. Just try it out.
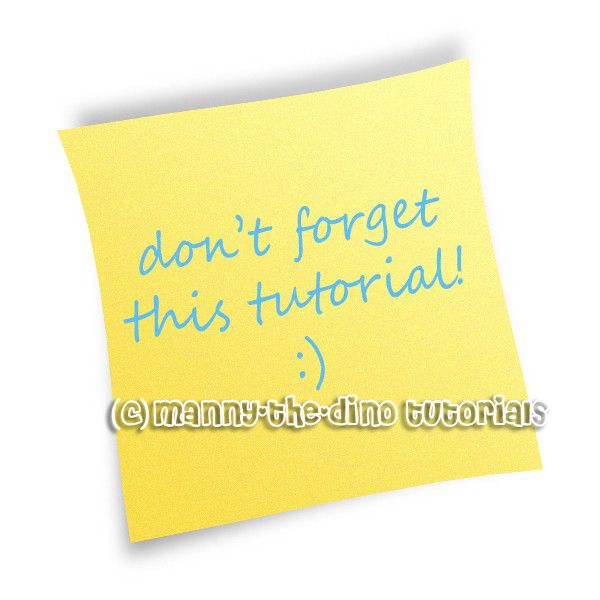
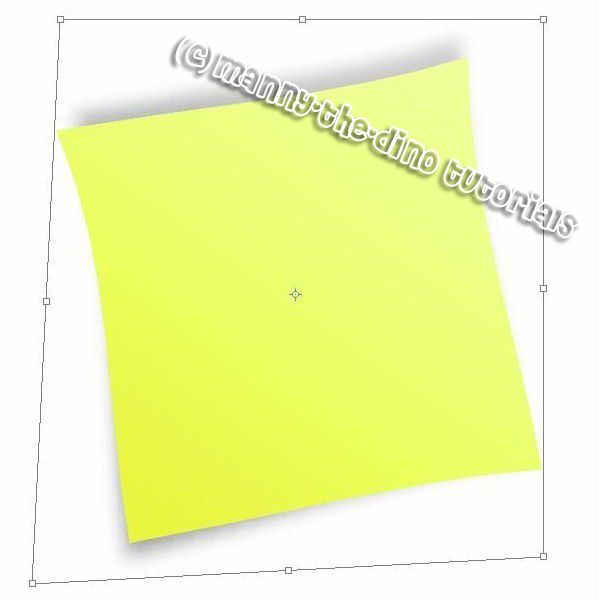
So, for this tutorial, I will teach you how to make a cute little post-it! Here's my final product...
Let's start, yeah?
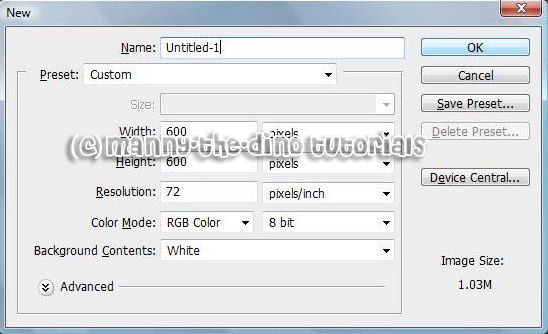
001.Create a new document (ctrl+n) that's 600 x 600 pixels.
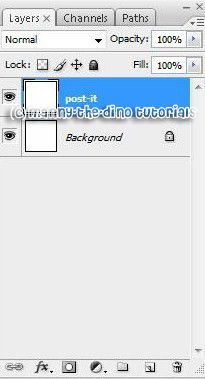
002.Create a new layer (ctrl+j) & rename it "post-it".
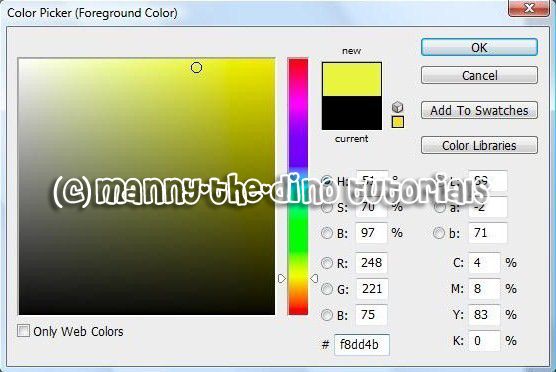
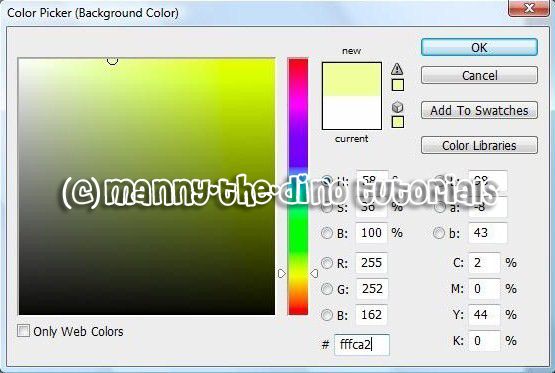
003.Set the Foreground color to #f8dd4b.
004.And the Background color to #fffca2.
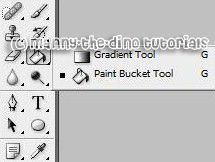
005 You can use the Gradient Tool to do this next step...
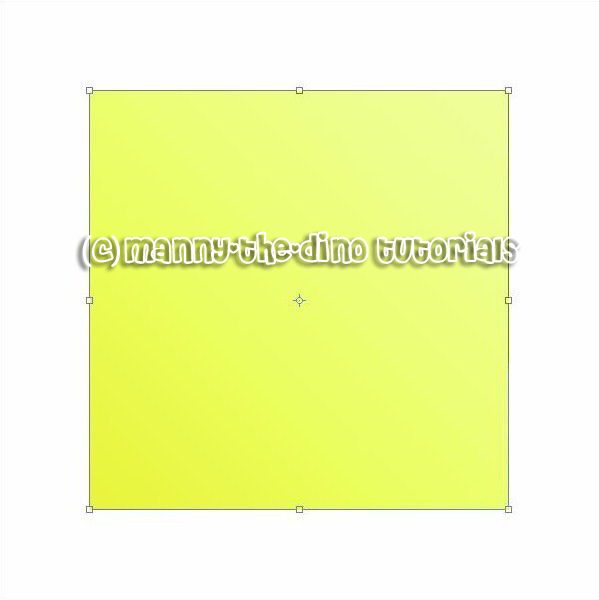
006.With the "post-it" layer selected, gradient fill the post-it from the upper right corner to the bottom left corner.

007.Your post-it should look like this:

008.Now go Edit>Free Transform (ctrl+t) to make the post-it smaller. Not too small thought. Just the right size. Tip: Press Shift+Alt while you drag a corner handle to maintain proportions and the keep the post-it on the center of the canvas. Don't apply changes yet.

009.Yor post-it should look like this:
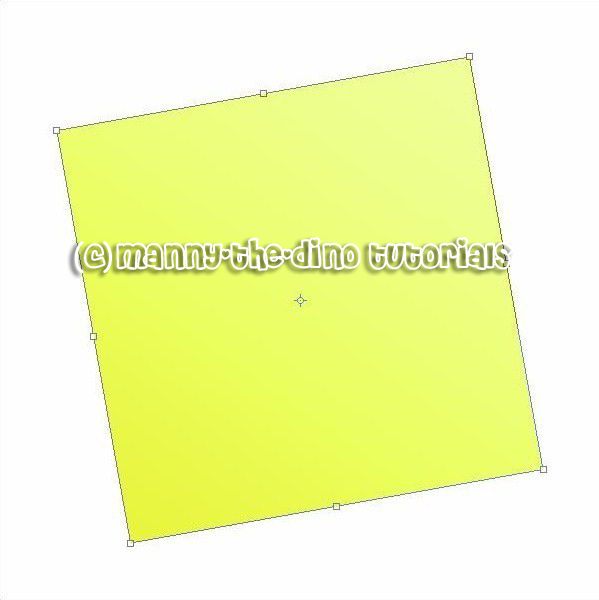
010.Now rotate the selection a few degrees. Don't apply changes yet
011.Now click the Switch Between Free Transform And Warp Mode button in the options bar.

012.Your image should look like this:
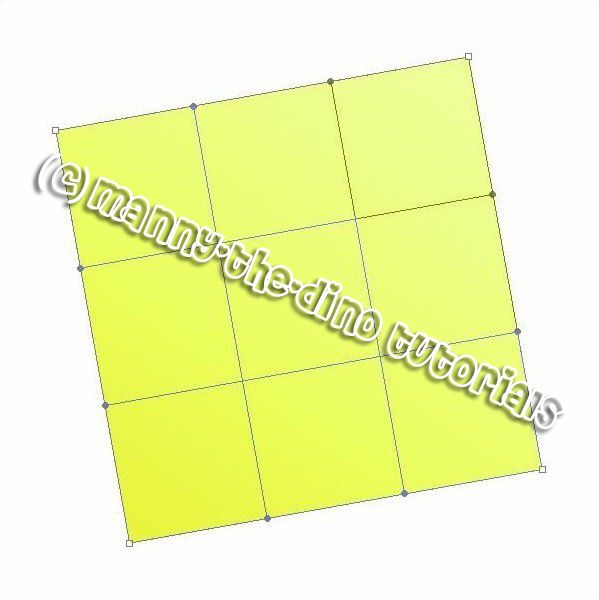
013.Try & make your post-it to look like mine. There are 4 points you need to move. Then press Enter to apply the changes.
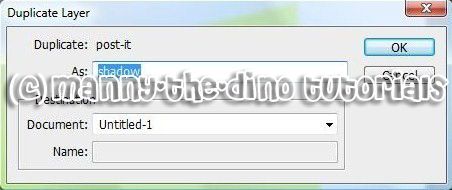
014.Duplicate "post-it" layer.
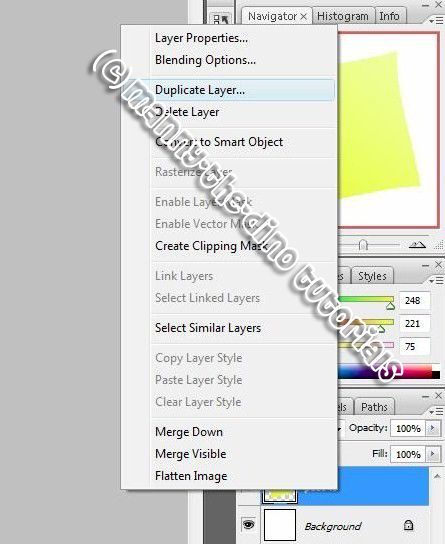
015.Name the new layer "shadow".
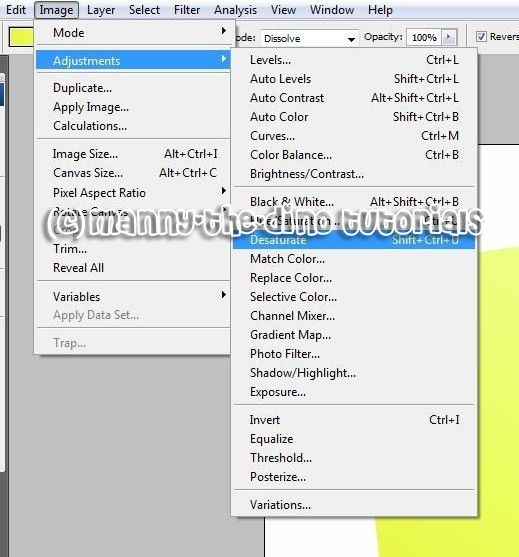
016.Go to Image>Adjustments>Desaturate.
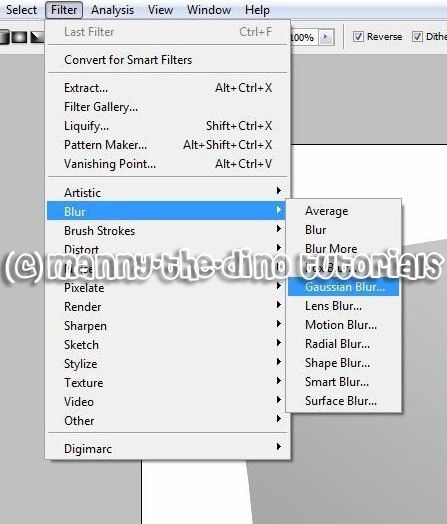
017.Go to Filter>Blur>Gaussian Blur. Set 8.5 pixels as radius value.
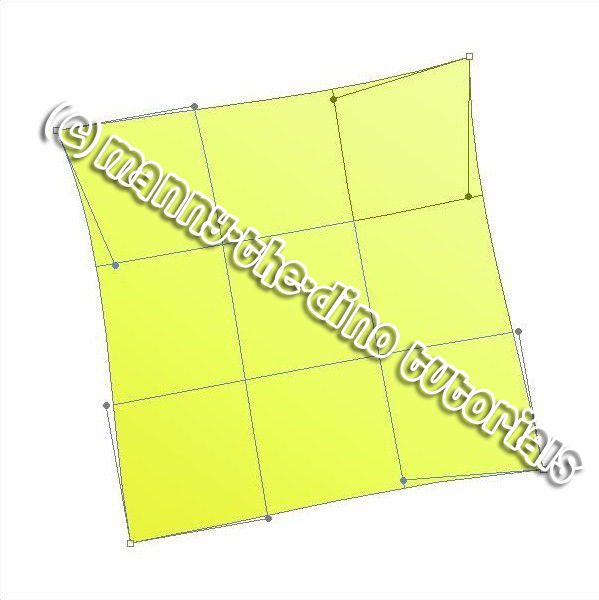
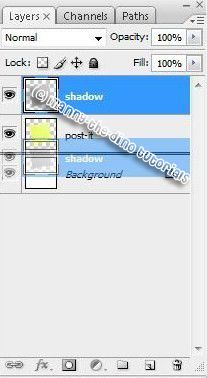
018.On the Layers Palette drag the "shadow" layer under the "post-it" layer like shown below.
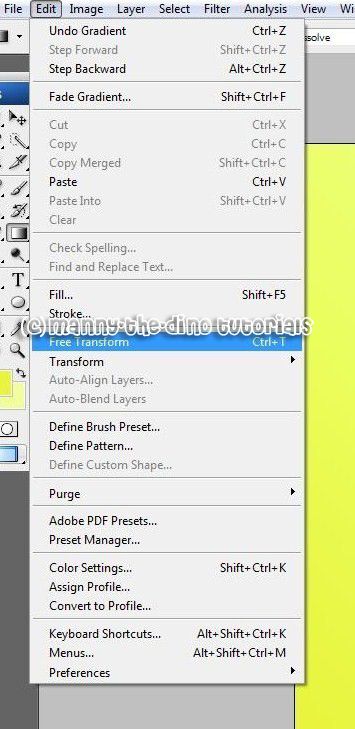
019.Select the "shadow" layer on the Layers Palette and go to Edit>Free Transform.
020.Make your post-it look like mine:
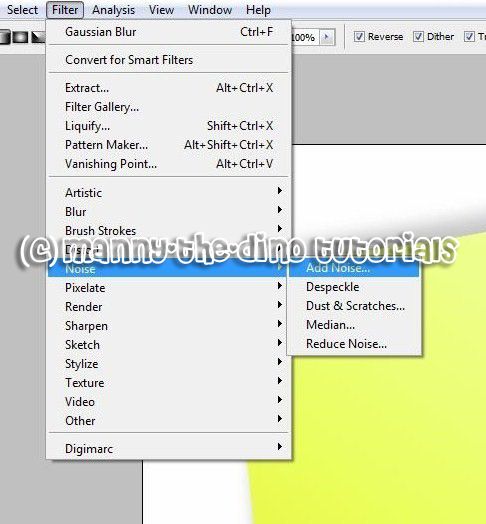
021.With your "post-it" layer selected, go Filter>Noise>Add noise.
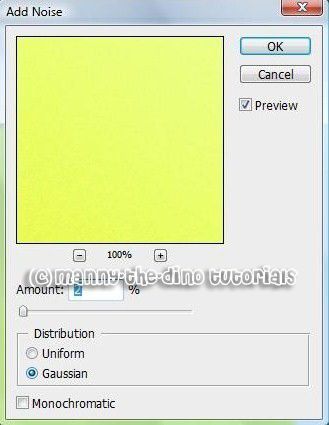
022.And use these settings:
Amount: 2
Distribution: Gaussian
(This will make the post-it look more realistic).
023.And that's it! You can add some text now. Don't forget to Add Noise to text too to make it look more realistic & better.
If you got lost or have any questions, comment the tutotial & I'll get back to you as soon as I can. :D
I did this tutorial in Photoshop CS3 Extended which is why some of you may have problems. However, that does't mean this tutorial won't work in other versions of Photoshop. Just try it out.
So, for this tutorial, I will teach you how to make a cute little post-it! Here's my final product...
Let's start, yeah?
001.Create a new document (ctrl+n) that's 600 x 600 pixels.
002.Create a new layer (ctrl+j) & rename it "post-it".
003.Set the Foreground color to #f8dd4b.
004.And the Background color to #fffca2.
005 You can use the Gradient Tool to do this next step...
006.With the "post-it" layer selected, gradient fill the post-it from the upper right corner to the bottom left corner.
007.Your post-it should look like this:
008.Now go Edit>Free Transform (ctrl+t) to make the post-it smaller. Not too small thought. Just the right size. Tip: Press Shift+Alt while you drag a corner handle to maintain proportions and the keep the post-it on the center of the canvas. Don't apply changes yet.
009.Yor post-it should look like this:
010.Now rotate the selection a few degrees. Don't apply changes yet
011.Now click the Switch Between Free Transform And Warp Mode button in the options bar.
012.Your image should look like this:
013.Try & make your post-it to look like mine. There are 4 points you need to move. Then press Enter to apply the changes.
014.Duplicate "post-it" layer.
015.Name the new layer "shadow".
016.Go to Image>Adjustments>Desaturate.
017.Go to Filter>Blur>Gaussian Blur. Set 8.5 pixels as radius value.
018.On the Layers Palette drag the "shadow" layer under the "post-it" layer like shown below.
019.Select the "shadow" layer on the Layers Palette and go to Edit>Free Transform.
020.Make your post-it look like mine:
021.With your "post-it" layer selected, go Filter>Noise>Add noise.
022.And use these settings:
Amount: 2
Distribution: Gaussian
(This will make the post-it look more realistic).
023.And that's it! You can add some text now. Don't forget to Add Noise to text too to make it look more realistic & better.
If you got lost or have any questions, comment the tutotial & I'll get back to you as soon as I can. :D
Tutorial Comments
Showing latest 10 of 11 comments

When i do the gradient fill, it doesn't turn yellow, it turns black. whats the problem?
By pakizfynest93 on Jul 11, 2008 1:01 am

i agree..very good detail and very easy to follow!! you ROCK girlie!!
By missk on May 13, 2008 8:46 am

brilliant! worked perfectly, very good detail and easy to follow, helped a lot more than other tutorials of the post-it not on the web!
By only1ebbz on Apr 14, 2008 11:29 pm

realli good tutorial =]
By N4th4li3L on Apr 4, 2008 9:17 pm

wowwwww! i loveee itttt! now it'll be useful for my fanfics ;D
Thankss soo muchers.... (:
By jennierawrs on Dec 10, 2007 2:52 am

that was fun! thanks!
By cereazlinda on Nov 18, 2007 3:44 am

thaaaaanks i loved it :]
By l0serish on Nov 13, 2007 11:34 am

this is great! unfortunately i wasnt able to follow some steps because im using photoshop 7
By vampirella on Sep 30, 2007 5:12 am

very awesome =]
By xeviloompaloompa on Sep 26, 2007 8:30 pm

pretty cool!
By elrene06 on Sep 26, 2007 4:05 pm
Tutorial Details
| Author |
manny-the-dino
|
| Submitted on | Sep 25, 2007 |
| Page views | 33,885 |
| Favorites | 104 |
| Comments | 11 |
| Reviewer |
IVIike
|
| Approved on | Sep 26, 2007 |